A main circuit breaker panel or the main electrical service panel is an important part of EV charger installations, the main electrical service panel takes in AC power from the grid and distributes it evenly through individual circuit breakers.
The amperage (amps) capacity of main electrical panels typically ranges from 100 to 200 amps, with 200 amps being common in modern homes. Larger homes or those with significant electrical loads might have panels rated up to 400 amps.
In this guide we will take a look at how to wire a main circuit breaker panel for EV charging, we will take a look at an EV charger connected directly to the main electrical panel, and the wiring of an EV charger connected to the main electrical panel through a subpanel.
Recommended Related Posts:
- Best 200 Amp Panels For EV Charging
- Best Electrical Panel For EV Charging
- Will I Need a Service Panel Upgrade for My EV Charger?
- Electric Vehicle Charger Circuit Breaker Selection Guide
- Top 5 Best Smart Meters For EV Charging.
Table of Contents
Main Electrical Service Panel
- The main electrical service panel in EV charging installations has three main purposes:
- Act as a distribution hub for power distribution in an EV charging set-up.
- House circuit breakers, and electrical components related to EV charging such as smart meters, sensors, etc
The image below shows a typical main electrical service panel of a hardwired EV charger connected to the main electrical service panel:
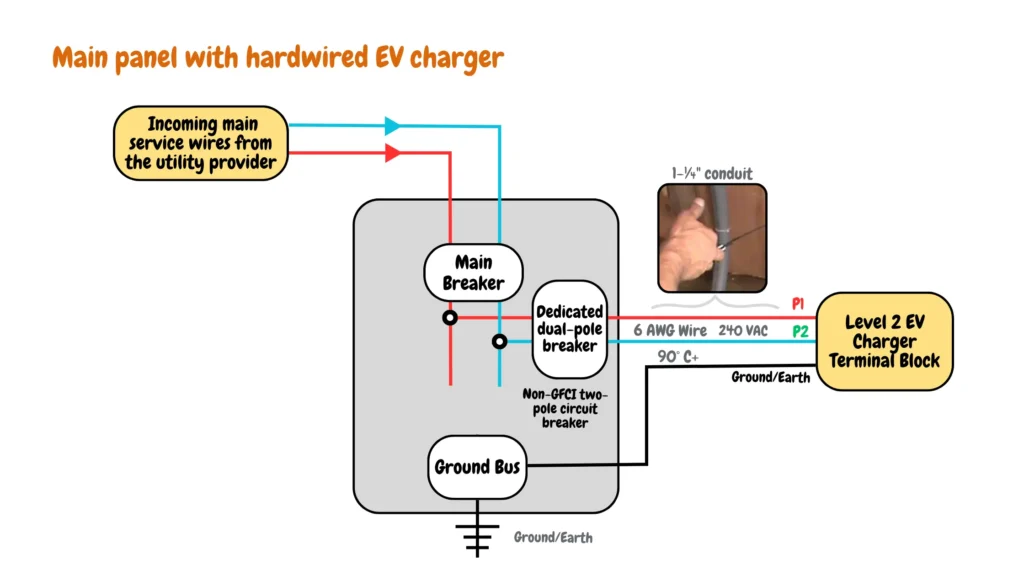
There are knockouts for passing mains cables at the top, bottom, and sides of the main electrical panel depending on your EV charger installations, the top knockouts are for passing mains service cables that provide power to the main electrical service panel, the sides knockouts are mainly used to pass wires to the EV charger or the EV charger sub-panel, they can also be used for passing service wires from renewable EV charging energy sources, and antennas for smart meters for EV charging monitoring. The bottom knockouts are mainly used for passing ground wires from the main electrical panel.
At the top of the main electrical panel, there is the main circuit breaker that is also used as the master switch for switching off AC power flowing to the main electrical panel, main electrical panels typically range from 100 to 200 amps, with 200 amps common in modern homes. Larger homes or those with significant loads might have panels up to 400 amps.
Beneath the main breaker, two hot bus bars (copper or aluminum) distribute power to individual circuits. These connect to the incoming black and red hot wires (both 120/240V relative to neutral). A neutral bus with screw terminals on the side panels connects the incoming neutral and distributes it to circuits. Some panels have a separate ground bus with screw terminals connected to a grounding rod.
Tools Required for Wiring a Main Circuit Breaker Panel for EV Charging
- Screwdrivers (Phillips & Flathead): Used for removing knockouts, installing grounding straps, and tightening terminal screws on breakers and bus bars. (Electricians may also use specialized insulated screwdrivers for added safety.)
- Wire Strippers and Cutters: Essential for stripping insulation to the appropriate length for secure connections within the subpanel.
- Flashlight: Provides illumination for working within the subpanel, especially when dealing with tight spaces or obscured wires.
- Fish Tape: A flexible, non-conductive tool used to pull new wires through the conduit between the main panel and the subpanel location.
- Voltage Tester (Non-Contact is Preferred): Used ONLY by a qualified electrician to verify wires are de-energized before working on the panel. A non-contact tester minimizes the risk of accidental contact with live wires.
- Utility Knife: This may be used for carefully cutting through drywall or insulation during subpanel mounting or conduit routing (depending on the installation).
- Circuit Breaker Panel (Subpanel): The dedicated panel for your EV charger circuit, sized appropriately for the charger’s amperage requirements.
- Electrical Tape: Used for color-coding wires if necessary (though not typically used for permanent connections within a panel).
- Dedicated Circuit Breakers: A dedicated double-pole breaker will be installed within the subpanel to handle the high current draw of your EV charger (EV charging load management).
Wire Sizes and Temperature Ratings for EV Charger Circuits (NEC 80 Rules)
There are two cables/wires that you will find in a typical EV charger installation, they include service entry cables, and wires within the subpanel:
Service Entrance Cables (from Utility Company to Main Panel)
Typically consists of three or four insulated wires:
- Two Hot Wires: Black and Red – Hot service wires carry the main supply voltage (usually 120V or 240V depending on your location).
- Neutral Wire: White – This carries the return path for the electrical circuit.
- Grounding Wire: Bare copper or green/yellow insulated – Ground wire provides a safety path for any stray current.
Wires Within the EV Charger Subpanel
Wires within the EV charger subpanel will vary depending on the specific setup and the amperage of the subpanel, but common colors include:
- Black: Hotwire from the main electrical panel feeding the EV charger circuit.
- White: Neutral wire feeding the EV charger circuit from the main electrical panel.
- Bare Copper or Green/Yellow Insulated: Grounding wire for the subpanel and potentially equipment grounding conductors for the EV charger.
Dedicated Circuit Breaker and Cable to Use
| Circuit Breaker (amps) | Cable to Use (600 Volt Copper Cables) | Maximum Output (amps) | Power at 240V (Kilowatt) |
|---|---|---|---|
| 60 | 6 gauge | 48 | 11.5kW |
| 50 | 6 gauge | 40 | 9.6kW |
| 40 | 6 gauge | 32 | 7.7kW |
| 30 | 10 gauge | 24 | 5.7kW |
| 20 | 12 gauge (Yellow) | 16 | 3.8kW |
| 15 | 14 gauge (White) | 12 | 2.8kW |
How to Wire a Main Circuit Breaker Panel for EV Charging
There are two ways to wire a main circuit breaker panel for EV charging. The first is connecting the EV charger directly to the main electrical panel, and the second is connecting the EV charger to the main panel through a sub-panel.
How to Wire an EV Charger to the Main Electrical Panel
This process shows how to install a new main electrical panel for EV charging, whether it’s a new installation or upgrading the main electrical panel for EV charging.
Before installing an EV charger on the main electrical panel, we recommend contacting your power utility company and requesting them to switch off the power. You can confirm power flow through the main electrical panel by using a voltage tester.
By the end of this guide your EV charger will be connected to the main electrical panel as shown in the circuit diagram below:
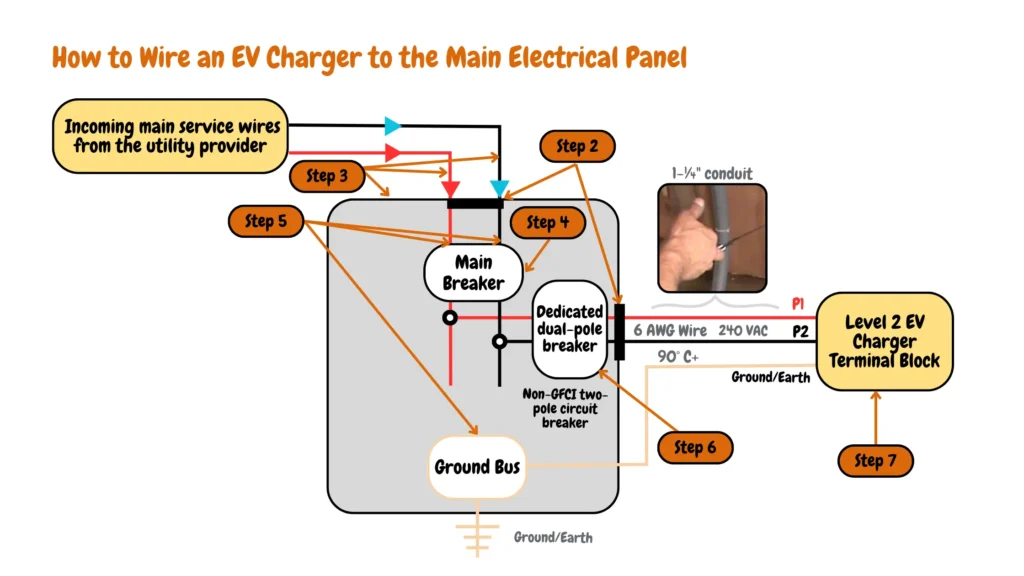
Circuit diagram showing seven steps on how to wire an EV charger connected to the main electrical panel
- Step 1: The first step involves disconnecting the old main electrical service panel from the wall, you can unscrew the main service wires from the main electrical panel switch or main electrical panel circuit breaker (in case of an upgrade)
- Step 2: Prepare the new main electrical panel and break the top knockouts using a screwdriver or chisel for the incoming main service wires from the utility provider, at this stage also break the side knockouts where the service wires for the EV charger will pass through from the main electrical panel, finally break the bottom knockouts for the grounding wire from the EV charger.
- Step 3: Mount the main electrical panel to the wall where the old electrical panel was positioned, and align the incoming service wires from the utility company to the top of the main electrical panel top knockouts, the incoming service wires from the utility company are mainly protected by a metal or plastic conduit which should be aligned to the top knockouts of the main electrical panel.
- Step 4: Once you have mounted the main electrical panel and aligned the incoming service wires from the utility provider with the top knockouts of the main electrical panel, you can then proceed to Install the main switch or circuit breaker to the main electrical panel, you can use a fish tape to pull the service wires through the conduit protecting them.
- Step 5: Insert the main electrical panel circuit breaker/ switch (Usually a 200A rated breaker), and connect the incoming hot services wires from the utility company to the main electrical panel circuit breaker/switch lugs. Connect the main white neutral wire to the neutral bus bar, and the grounding wire to the grounding rod.
At this stage, you have completed the installation of the main electrical service panel. If you want to install an EV charger through a sub-panel, skip to the next section: “How to Wire an EV Charger to the EV Charger Subpanel“.
- Step 6: Following local electrical codes and considering your EV charger’s specifications (including continuous load rating and future-proofing needs), select the appropriate wire size and install a dedicated circuit breaker in the main electrical panel. Connect the hot wires from the main panel breaker to the EV charger breaker, followed by the neutral wires. If grounding is required, connect a copper grounding wire from the grounding bus to the EV charger breaker.
- Step 7: Install service wires from the dedicated EV charger circuit breaker to the EV charger junction box for hardwired EV chargers and NEMA receptacles for plug-in EV chargers.
How to Wire an EV Charger to the EV Charger Subpanel
After installation of the main electrical panel at stage 5, it’s time to install an EV charger subpanel, depending on the type of your EV charger subpanel and current rating (mainly 100-200amps).
By the end of this guide, you will be able to wire an EV charger to the EV charger subpanel as shown in the circuit diagram below:
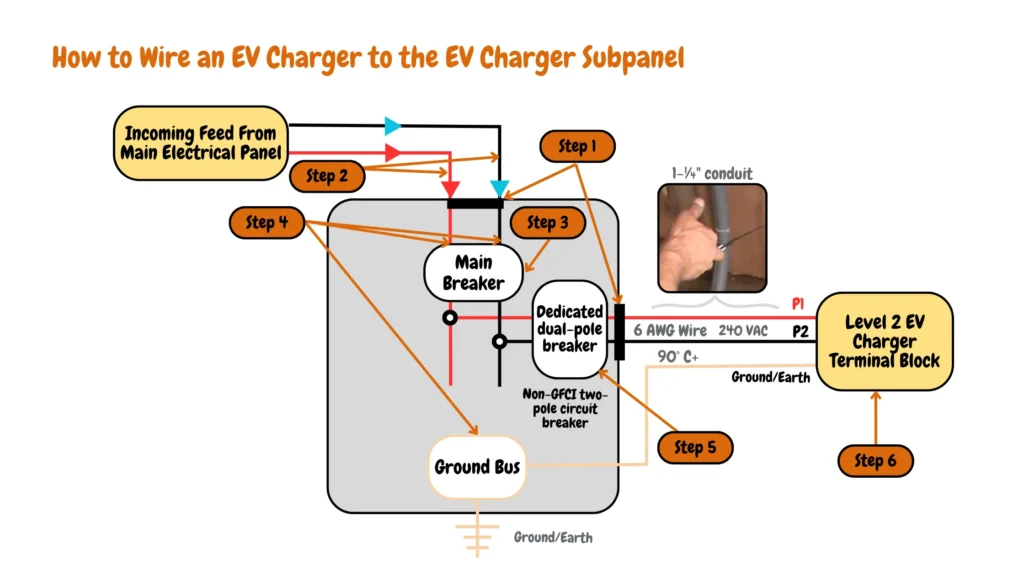
Circuit Diagram Showing Six Steps to Install an EV charger sub-panel connected to the main electrical panel and an EV charger connected to the EV charger subpanel
- Step 1: Prepare the EV charger subpanel by breaking the top knockouts for the service wires from the main electrical panel, you should also break the side knockouts for the EV charger service wires that feed AC power to the EV charger.
- Step 2: Mount the EV charger subpanel to the wall, and align the service wires conduit from the main electrical panel with the top knockouts of the EV charger subpanel.
- Step 3: If you have a main electrical sub-panel with a main electrical circuit breaker (usually 100- 200A), it is time to install it, if you have a main lug EV charger subpanel you can ignore this step as main lug panels don’t have provision for main circuit breakers.
- Step 4: Make all connections within the subpanel securely. Tighten the lugs on the main breaker to secure the hot wires from the main panel. Connect the grounding wire to the grounding bus bar and the neutral wire to the neutral bus bar within the sub-panel.
- Step 5: Following local codes and your EV charger’s specifications, select the appropriate wire size and install a dedicated circuit breaker in the EV charger sub-panel. Connect the two hot wires from the main sub-panel circuit breaker to the dedicated breaker. If the breaker has a ground connection, install a grounding wire and connect it to the sub-panel’s grounding bus bar.
- Step 6: Install service wires from the dedicated EV charger circuit breaker installed in the subpanel to the EV charger junction box for hardwired EV chargers or to NEMA receptacles for plug-in EV chargers. EV charger junction boxes and NEMA receptacles should be installed 20-26 inches from the ground to prevent voltage drops.
Conclusions.
While this guide provided an overview of EV charger installation in both main panels and subpanels, it’s crucial to prioritize safety. EV charger installations, especially those involving the main electrical panel or subpanel work, deal with high voltage and require extensive electrical code knowledge. Improper installation can lead to serious injury, fire, or even death.
We strongly recommend entrusting all EV charger installation work, including tasks related to main panels and subpanels, to a qualified and licensed electrician. They can ensure a safe and code-compliant installation, optimizing the performance of your EV charger.

James Ndungu is a certified EV charger installer with over five years of experience in EVSE selection, permitting, and installation. He holds advanced credentials, including certification from the Electric Vehicle Infrastructure Training Program (EVITP) and specialized training in EV charging equipment and installation, as well as diplomas in EV Technology and Engineering Fundamentals of EVs. Since 2021, James has tested dozens of EV chargers and accessories, sharing expert insights into the latest EV charging technologies.