
As of 2026, the Tesla Universal Wall Connector remains our #1 recommended home EV charger and the best overall electric vehicle charger we have ever reviewed, thanks to its unmatched combination of universal compatibility, advanced smart features, and superior solar integration capabilities.
The standout feature is its integrated “Magic Dock” adapter system that seamlessly switches between the North American Charging Standard (NACS) and J1772 connectors, eliminating the need for external adapters and providing true universal compatibility with virtually all electric vehicles in North America. This future-proof design positions it perfectly as NACS becomes the industry standard.
With a powerful 48-amp output (11.5 kW), it delivers up to 44 miles of range per hour of charging, making it one of the fastest home charging options available. When combined with its bi-directional V2X capability and native integration with Tesla Powerwall systems, it creates a comprehensive home energy ecosystem that no competitor can fully replicate.
Tesla’s Universal Wall Connector comes with three key power management options: Static Power Management, Dynamic Load Management (DLM), and Group Power Management (GPM). Each one helps manage energy differently, depending on your home’s electrical capacity and electric-vehicle branch-circuit setup.
- Static Power Management is the simplest option. The installer sets a fixed charging limit based on your panel’s capacity, and it does not change. No extra hardware, such as power meters, is required, making it easy to use.
- Dynamic Load Management (DLM) adjusts charging in real time. A Tesla-approved power meter monitors your home’s electricity use. If an appliance, such as a dryer or AC, turns on, DLM slows your car’s charging to keep the system within safe limits.
- Group Power Management (GPM) is for homes with multiple EVs. Up to six Wall Connectors, either on individual branch circuits or daisy-chained, can communicate and share the available charging power. This ensures all vehicles charge efficiently without overloading your system.
Together, these three features give homeowners flexible, safe ways to manage EV charging. Whether your home is grid-tied or solar-powered, you can choose the option that fits your energy needs.
Smart features accessed through the Tesla app include scheduling charging times to maximize solar production, viewing detailed charging history, receiving remote diagnostics, and controlling access, all via Wi-Fi. The premium, weather-resistant construction ensures reliable performance in both indoor and outdoor installations.
For off-grid and grid-tied solar EV charging specifically, the Tesla Universal Wall Connector excels through its stable load control, secure energy management, and long-term reliability when deployed within a properly engineered microgrid setup. Its tight integration with the Tesla energy ecosystem, including Tesla Powerwall, Solar Panels, and Solar Roof, creates a unified system in which the Wall Connector communicates directly with your energy storage and generation equipment to optimize charging.
While it provides seamless plug-and-play compatibility for Tesla vehicles (Model S, 3, X, Y, and Cybertruck), its universal adapter support and intelligent power distribution make it the top choice for any EV owner seeking comprehensive solar integration, whether operating fully off-grid or in a grid-tied configuration with battery backup and future-proof expandability.
The Tesla Universal Wall Connector is built with comprehensive safety and security protections for reliable off-grid and solar installations. The IP55-rated weather-resistant enclosure provides dust and water protection for both indoor and outdoor use, while the vandal-resistant design withstands harsh environments and remote locations.
Security features include a built-in cable locking mechanism that secures both NACS and J1772 connections, preventing theft and unauthorized access. The charger also incorporates multiple EV charging safety protections, including ground fault detection, overcurrent protection, and thermal monitoring to prevent overheating.
Tesla’s commitment to ongoing improvement ensures these safety and reliability systems remain up to date through regular Tesla Wall Connector firmware updates. The latest firmware version, 26.2.0 (and subsequent bug-fix releases such as 26.2.1), addresses a long-standing issue that prevented reliable Wi-Fi auto-negotiation on routers using WPA3 encryption. This update improves network connectivity and helps ensure more consistent communication between the Wall Connector, the Tesla app, and cloud-based management features.
Additional upgrades we have seen over the past few months include WPA3 Wi-Fi support, which resolves many past connectivity problems with modern mesh networks, making setup and operation smoother than ever. The Tesla app integration remains unmatched, providing real-time charging stats, energy-flow monitoring, and scheduling features to optimize solar power and Powerwall battery use.
We have also seen significant improvements in firmware update security. In 2025, Tesla implemented an anti-downgrade mechanism that prevents firmware rollback, the very technique hackers previously used to gain access to EV chargers. Such unauthorized access could provide a foothold into private networks, potentially allowing lateral movement to other connected devices.
The Tesla Universal Wall Connector has also maintained stable pricing over the years, especially during the volatile 2025 period, when US tariffs and supply chain issues affected other chargers, including the standard Tesla Wall Connector, which saw fluctuating costs. Buying the Universal Wall Connector now means securing a reliable, future-proof charger with seamless compatibility for both Tesla and non-Tesla vehicles, without worrying about price increases down the line.
For multi-EV households and solar-equipped homes, the Universal Wall Connector remains the most reliable, feature-rich, and future-proof choice in 2026.
We’ve rated the Tesla Universal Wall Connector as the best Tesla Cybertruck home charger if you want the fastest home charging speed (11.5 kW / 48 amps) and the ability to use your Cybertruck for home backup power through its unique Tesla Powershare bidirectional charging feature.
The Tesla Universal Wall Connector supports the full range of bidirectional features (V2L, V2V, V2G, V2H/V2B, and Tesla Powershare), letting you power your home, other vehicles, or the grid directly from your Cybertruck.
A bi-directional EV charger competitor/alternative, the Tesla Gen 3 Mobile Connector offers basic bidirectional flexibility, only V2L and V2V. This means you can power devices or charge another vehicle, but it does not support V2G or V2H/V2B, and it doesn’t support group power management.
If you need fast EV charging, home backup power, or full grid integration, the Universal Wall Connector is the only Tesla charger that covers all three.

We have also rated the Tesla Universal Wall Connector as the best Level 2 solar EV charger and the best off-grid EV charger. It’s especially ideal if you plan to integrate it with a Tesla Powerwall 3 and solar panels, creating a complete system that charges your EV with solar power while maintaining grid backup during outages.

Tesla Universal Wall Connector with Solar and Powerwall Integration Wiring Diagram.
The Tesla Universal Wall Connector integrates seamlessly with the Tesla app, providing real-time monitoring of charging status and energy flow across solar panels, Powerwall battery storage, home consumption, and the grid. This makes it an excellent choice for solar-equipped homes with battery backup systems.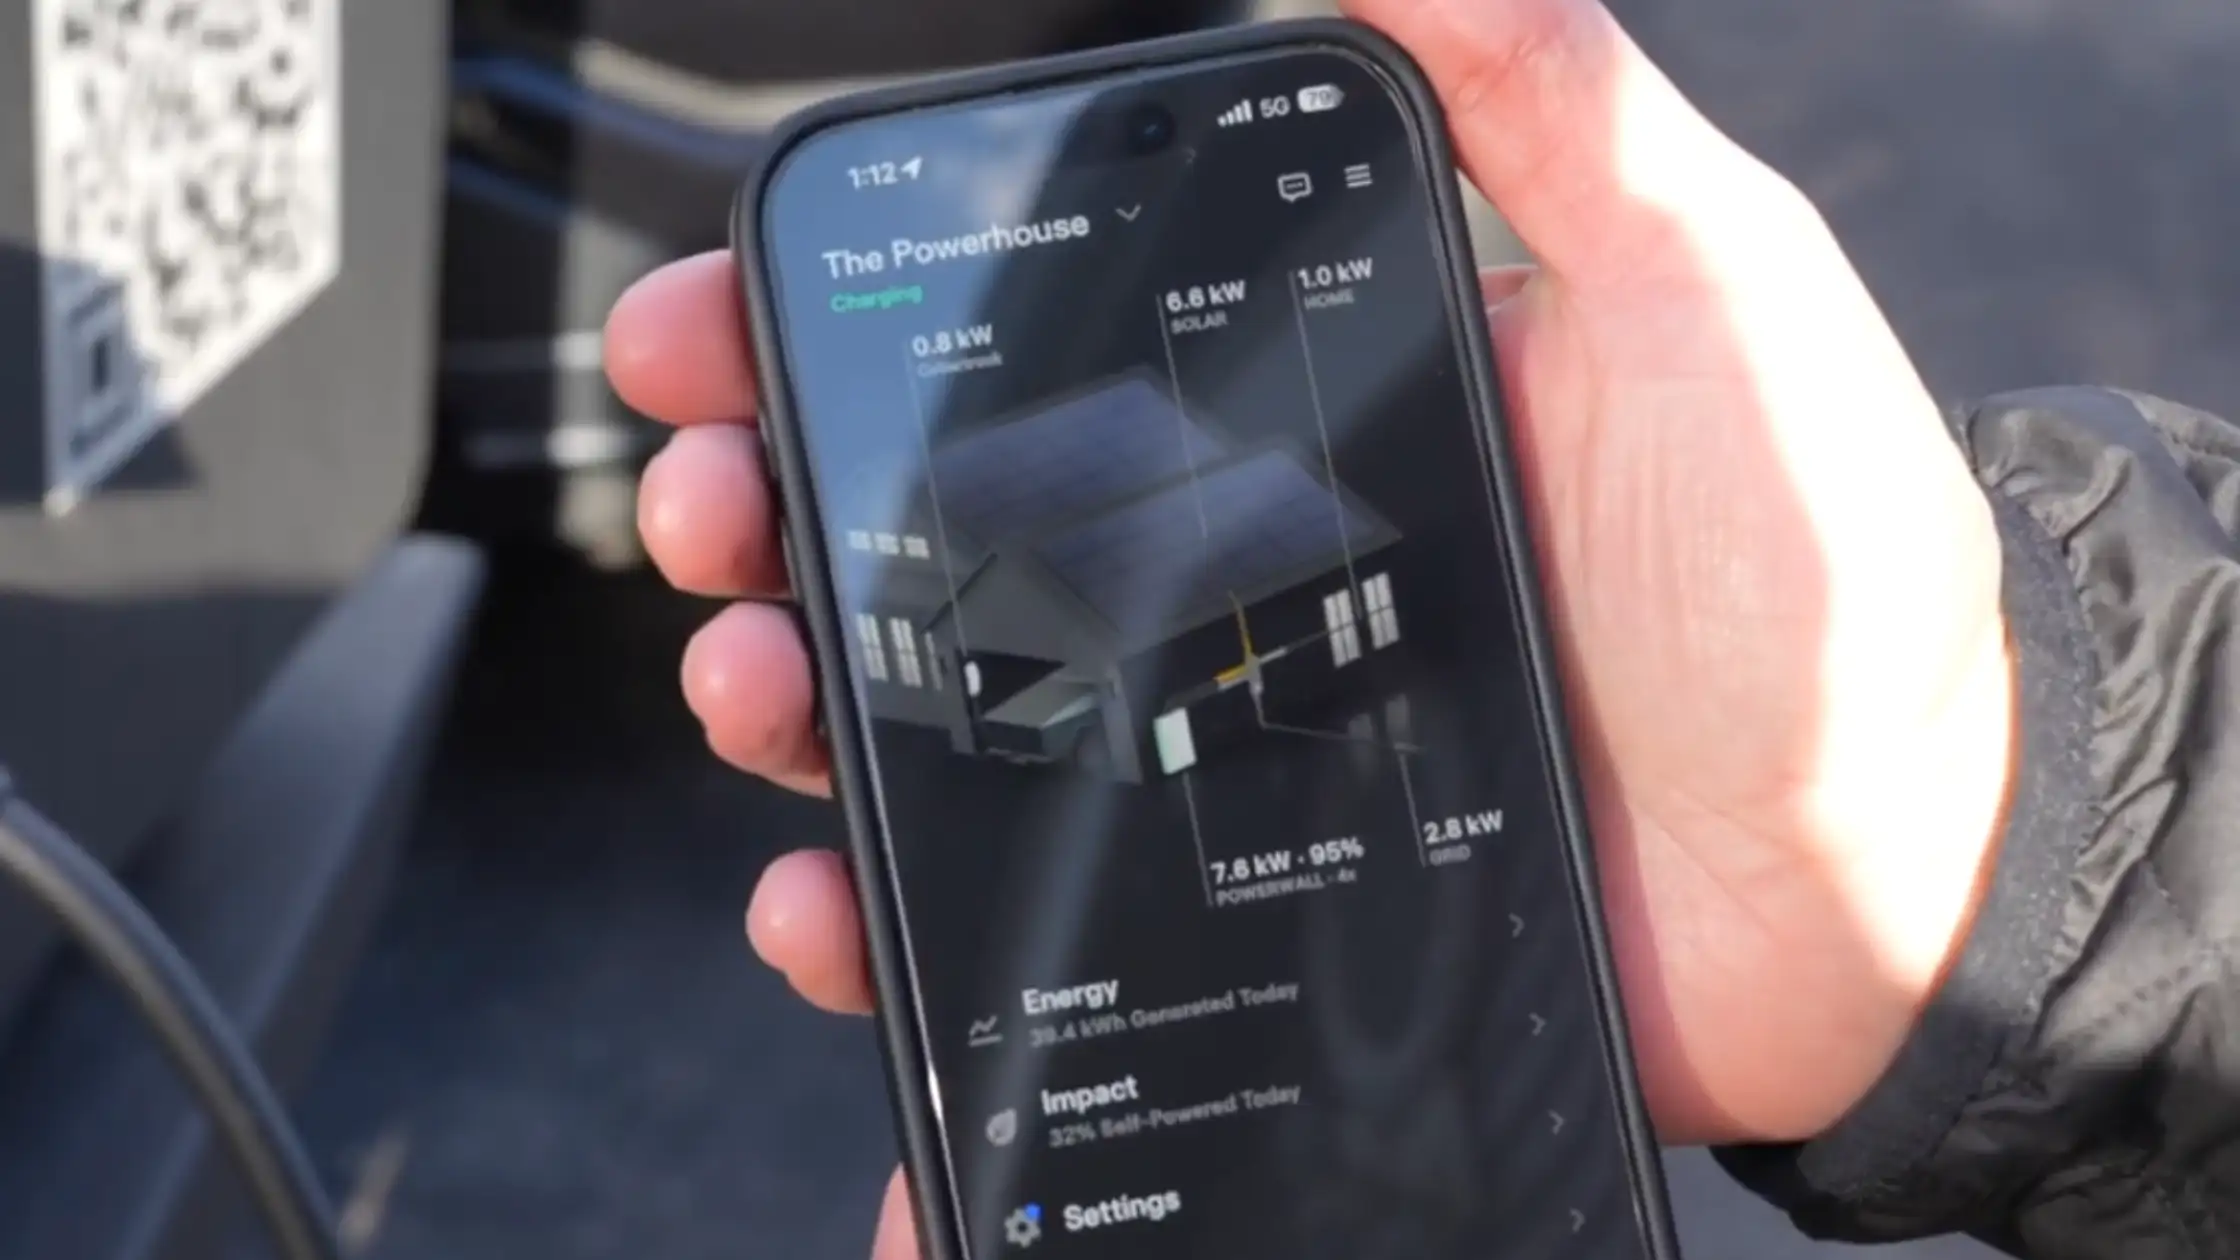
Additionally, the charger’s integration with Tesla’s proprietary communication protocol (NACS/SAE J3400) optimizes interaction between the vehicle and the charger, reducing energy loss during charging cycles. This aligns with our hands-on observations of improved efficiency and lower heat generation during extended use.
While the Tesla Universal Wall Connector does not include native dynamic load balancing out of the box, it can support this functionality when paired with an external energy meter. When integrated with Tesla’s Powerwall and Gateway systems, the charger can intelligently adjust charging rates based on home energy consumption and solar production, enabling a more grid-friendly charging experience.
Such smart load management is especially important in shared residential buildings, where coordinating charging loads reduces peak demand and helps maintain grid stability. This also works well for homes connected to grid-tied and off-grid solar EV charging setups.
Tesla’s Power Sharing feature (often confused with “PowerShare”) allows up to six Universal Wall Connectors on the same electrical circuit to dynamically share available power. This prevents circuit overload and improves efficiency in homes with multiple EVs charging simultaneously. However, Power Sharing manages local load distribution and does not provide full grid-level load balancing.
One thing we love about the Tesla Universal Wall Connector is that it’s a Level 2 charger that works with all NACS and J1772 electric vehicles. While it reliably charges any EV, its smart features and solar charging work best with Tesla vehicles. Non-Tesla drivers still get fast, dependable charging, but they won’t have the same level of app features or solar optimization as Tesla owners.
Over the past few months of use, we’ve seen big improvements from Tesla’s firmware updates. The most stable and widely used versions (Firmware 25.10 and newer) improved Compatibility Mode, especially by fixing connection and handshake issues seen in some non-Tesla EVs, such as the Rivian R1S and R1T. These updates make charging start more smoothly and reduce errors, which is why the Tesla Universal Wall Connector is one of our top recommended universal chargers for multi-EV households in 2026.
The Tesla Universal Wall Connector is packed with built-in EV charger safety and smart features, including ground fault and overcurrent protection, continuous thermal monitoring with automatic current reduction, and static, dynamic, and group power management to prevent circuit overloads. Its app-based access control, weather-resistant enclosure, and self-testing routines ensure safe, reliable operation for both indoor and outdoor installations.
Installation requires a licensed electrician, as it’s not a DIY project due to the high electrical load and strict safety requirements. While the setup is fairly straightforward for professionals, safety and proper wiring are critical, making expert installation essential. The Tesla Universal Wall Connector installation is costly, especially for advanced or complex installations that involve long wiring runs, panel upgrades, bidirectional charging, or solar integration.
The Universal Tesla Wall Connector adds up to 44 miles of range per hour, making it a fast and reliable option for home charging. In comparison, the Tesla Mobile Connector only provides about 3 miles per hour.
Superchargers are much faster, adding up to 200 miles in 15 minutes, but they’re meant for road trips, not daily use. Destination Chargers offer speeds similar to the Wall Connector but are typically found at hotels or other public locations, not at home.
For small businesses without three-phase electrical systems or the budget for a supercharger, we recommend the Tesla Universal Wall Connector. It combines universal compatibility, intelligent power management, and built-in revenue generation, making it the best EV Charger for small business EV charging on a budget. With the ability to serve all EV drivers, manage multiple units on a single circuit, and integrate with Tesla’s network, it offers a flexible, scalable, and profitable solution for any business looking to invest in EV infrastructure.
Inside the Tesla Universal Wall Connector: Technical Block Diagram
The Tesla Universal Wall Connector stands out because of its advanced engineering, not just its feature list.
At Electric Vehicle Geek, we like looking beyond the specifications to understand how an EV charger actually works before reviewing it. Following our Tesla Universal Wall Connector teardown, we created the technical block diagram below to illustrate the major electrical, safety, and communication systems inside the EV charger.
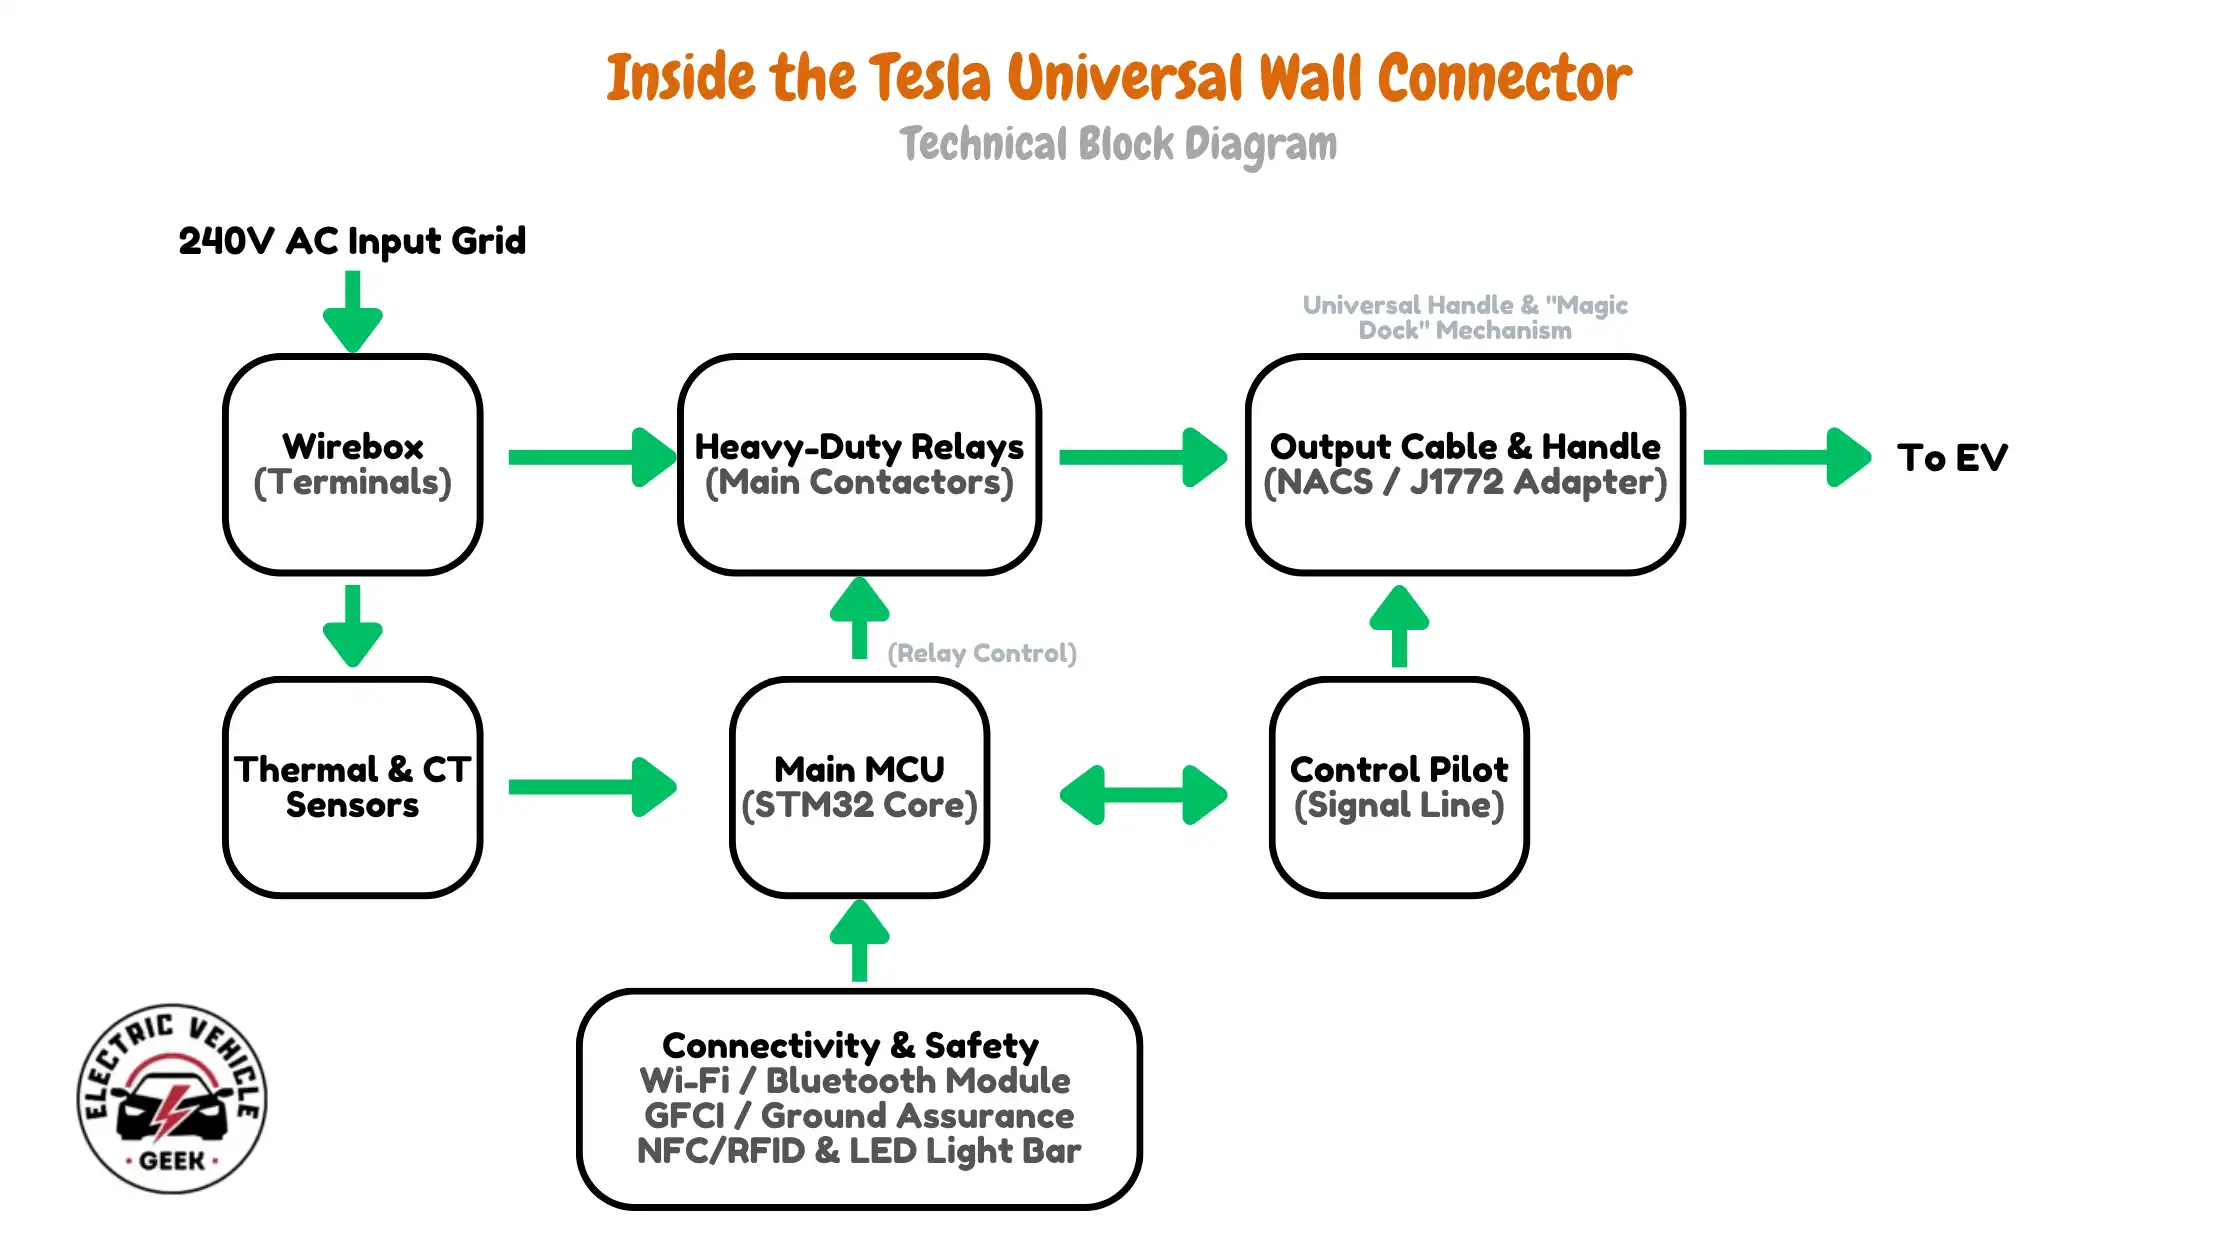
A functional breakdown of the Tesla Universal Wall Connector, showcasing the integration of high-voltage power routing, STM32-based logic control, and the “Magic Dock” adapter system.
Rather than simply showing the external components which we all see, the diagram maps how power flows from your home’s electrical panel to the vehicle through the Universal Wall Connector. It also shows how the Universal Wall Connector continuously monitors voltage, current, temperature, ground faults, and communication throughout every charging session.
This provides a clearer picture of how Tesla combines intelligent power management, multiple layers of safety protection, and universal NACS and J1772 compatibility into one compact Level 2 EV charger.
Tesla Universal Wall Connector Versus Other NACS Chargers
The following chart compares key specifications (charging power, weight, operating temperature range, cable length, and warranty) of the Tesla Universal Wall Connector with other EV chargers using the same NACS connector type (direct competitors).
At 11.52 kW, the Tesla Universal Wall Connector hits the gold standard for home Level 2 NACS charging. It performs much better than the average 9.0 kW of NACS chargers we have reviewed. To reach full power, you will need a dedicated 60A electric vehicle charging branch circuit. If your electrical panel is limited, the Lectron Level 2 Tesla Portable is a safer option that usually does not require electrical upgrades.
At 15 lbs, the Tesla Universal Wall Connector is close to the average for NACS chargers (about 11.2 lbs) and works well with standard mounting hardware. If weight matters for a portable or temporary setup, the Bokman 16A Portable Tesla Charger is very light at just 4.41 lbs. On the other hand, the ApexCharger MACH 2 is the heaviest in the group at 19.72 lbs, which may require stronger mounting for certain wall types.
The ApexCharger MACH 2 comes with a 30-foot cable, which is longer than the Tesla Universal Wall Connector if cable reach is important for your installation. However, 30 feet exceeds typical NEC cable length guidelines for EV chargers. The Tesla cable is 24 feet, which is the sweet spot. It provides plenty of reach for most garages while remaining code-compliant and inspection-friendly.
The Tesla Universal Wall Connector is rated from -22°F to 122°F and is very durable. However, if you live in very cold climates, such as North Dakota or Canada, the ApexCharger MACH 2 NACS charger performs slightly better in extreme cold, with a minimum rating of -31°F.
The Tesla Universal Wall Connector comes with a 4-year warranty, which is well above the 3-year average for most NACS chargers in this category. The similarly rated ApexCharger MACH 2 NACS charger extends coverage to 5 years, offering slightly better long-term protection and peace of mind.
Tesla-brand EV chargers are hard to beat if you already own a Tesla electric vehicle and wish to upgrade or install a complex EV charging ecosystem, such as home solar EV charging, which is why we usually recommend Tesla chargers for Tesla owners for the easiest compatibility, seamless integration, and high efficiency in complex EV charger installations. For solar integration, the Tesla Universal Wall Connector “Charge on Solar” works seamlessly but requires a Tesla Powerwall. If you want solar EV charging that works with any solar ecosystem and not just Tesla Powerwall systems, the Emporia Level 2 NACS charger with the Emporia energy monitor is the better choice.
If smart security is a priority for shared garages or apartments, the ApexCharger MACH 2(NACS) and MACH 3 (NACS) are better suited. They include built-in RFID access control, letting property managers restrict charging to authorized users, a feature the Tesla Universal Wall Connector lacks. Tesla does offer “VIN-locking” through its app, but this only works for Tesla vehicles.
The Tesla Universal Wall Connector remains the better choice for high-density installations than any other AC NACS charger we have reviewed. Its Group Power Management allows up to six units to share a single circuit intelligently, saving on installation resources and costs. The ApexCharger NACS charger series typically requires dedicated EV charger circuit breakers or more complex external management to handle multiple chargers.
The Tesla Universal Wall Connector and Tesla Gen 3 Mobile Connector lead the NACS category in bidirectional EV charging through the Tesla Powershare system. The Universal Wall Connector supports Vehicle-to-Grid (V2G), Vehicle-to-Home (V2H), Vehicle-to-Load (V2L), and Vehicle-to-Vehicle (V2V), making it a full-featured solution for energy flexibility. The Tesla Gen 3 Mobile Connector excels at portable Vehicle-to-Load applications, delivering about 3.6 kW for tools, outdoor equipment, or camping. Both devices allow your car to act as a battery, but only the Universal Wall Connector is engineered to replace a home backup generator.
Tesla Universal Wall Charger Installation (60A Circuit Installation)
Here’s a detailed, step-by-step guide to the professional installation of the Tesla Universal Wall Charger on a 60-amp circuit for our Tesla Cybertruck. We cover everything from selecting the right dedicated circuit breaker and wiring to grounding and properly sizing conduit for maximum charging efficiency at home. This ensures both safety and optimal performance.
Tools & Materials Needed:
- 60-amp double-pole breaker
- 6-gauge THHN or 6-gauge THWN-2 copper wire (two hot wires, L1 and L2)
- 10-gauge THHN or THWN-2 ground wire
- Conduit (PVC or EMT) – 3/4-inch for indoor or 1-inch for outdoor runs
- Manual hole punch
- Drill and core bits
- PVC adhesive and strain relief fittings
- Screwdrivers and a torque wrench
- Tesla Universal Wall Charger
Here’s the full list of the top tools we use for every EV charger installation – These are the same professional-grade tools we rely on to get the job done right, every time.
Tesla Universal Wall Charger Wiring Diagram (60A Circuit Installation)
At the end of the installation, your setup should mirror the following wiring diagram for the 60-amp Circuit Tesla Universal Wall Charger installation, showing the connection from the sub-panel to the charger:

Installation Steps:
Turn off the Power
Start by turning off the power at the main electrical panel to ensure safety while working on the circuit.
Prepare the Subpanel
- Install a dedicated 60-amp double-pole breaker into your subpanel.
- Use a manual hole punch to create a hole for the conduit, sizing it appropriately (1-inch for PVC).
- Connect two 6-gauge THWN-2 wires (L1 and L2) to the 60A circuit breaker
- Connect the 10-gauge ground to the ground busbar.
- Use a torque wrench to properly tighten the ground wire to the ground bar (25 in-lbs for the ground wire and 45 in-lbs for the breaker).
Exterior Conduit Installation
- Note and mark the charger installation point (point of use), which should be 4 ft above the floor, and have at least 8 in of clearance around it. Install all conduit from the electrical panel to the Tesla Universal Wall Connector point-of-use.
- Run the two 6-gauge THWN-2 wires (L1 and L2) (from the 60A dedicated circuit breaker) and a 10-gauge ground (from the ground busbar) wire through the conduit.
- Attach strain-relief fittings at both ends of the conduit to keep the wires secure and prevent stress on the connections.
Mount the Charger
- Remove the charger faceplate
- Attach the Universal Wall Charger to the wall using anchors.
- Ensure the conduit is aligned with the charger’s strain relief box adapter, which will house the wire connections.
Wire the Charger
In some instances, passing inspection requires wires rated for at least 4 amps since the Tesla Wall Connector allows amperage adjustments via a smartphone app. Always consult a certified EV charger installer to verify the correct wire size.
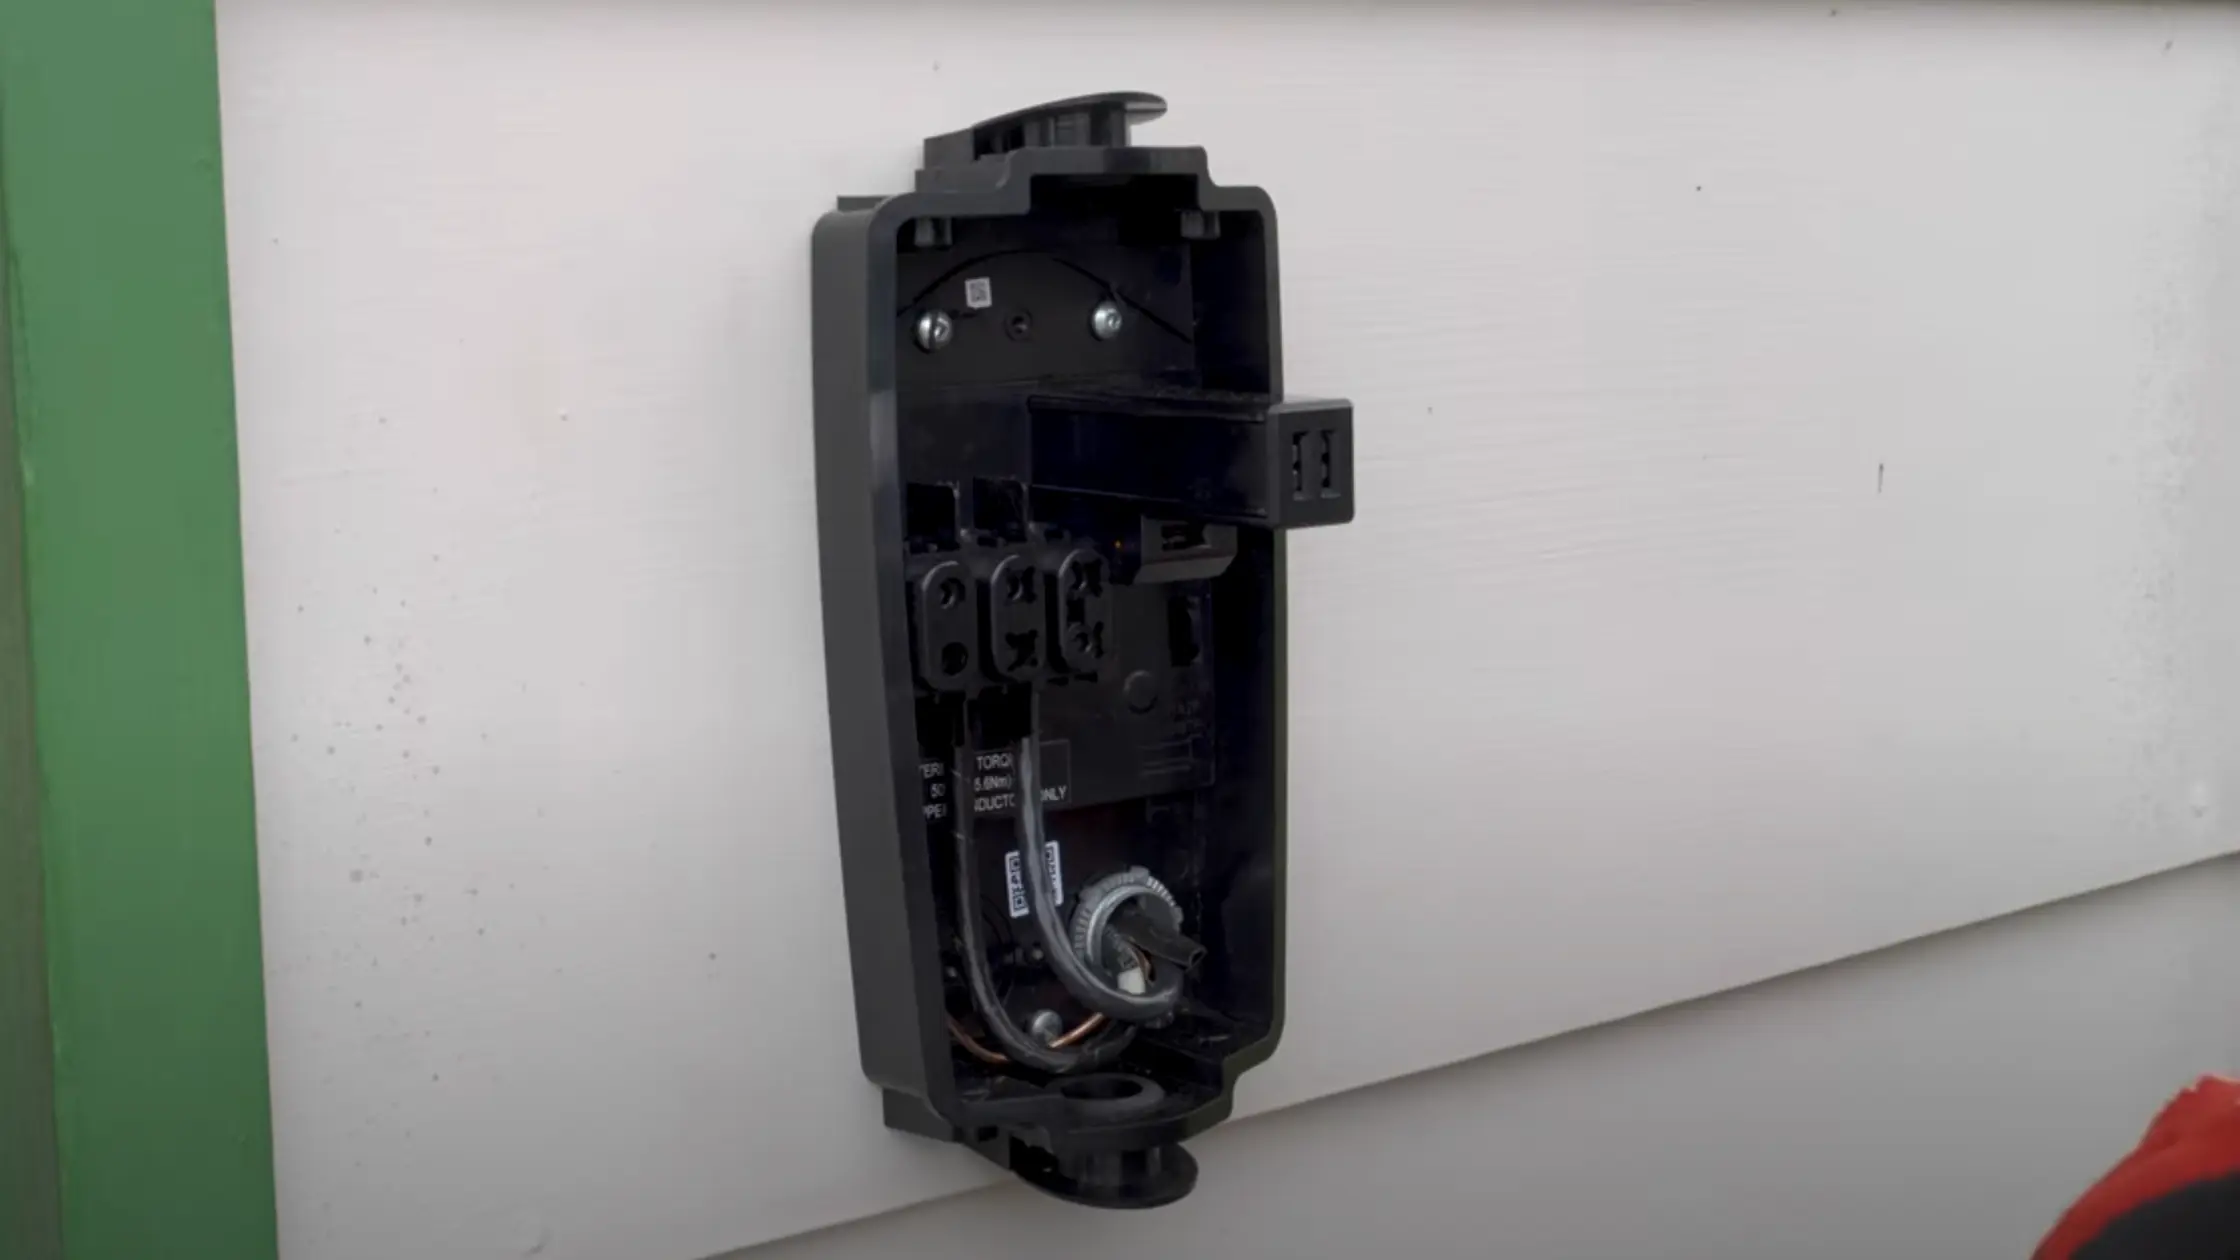
- Feed the wires from the conduit into the charger.
- Connect the two 6-gauge hot wires to the L1 and L2 terminals inside the charger.
- Attach the 10-gauge ground wire to the charger’s ground terminal.
- Use a torque wrench to tighten the connections to 50 in-lbs (as specified in the Tesla charger manual).
- Reinstall the charger’s faceplate securely.
Connect and Test
- Plug in the Tesla Universal Wall Charger, then scan the QR code to connect via Bluetooth and Wi-Fi. (If your Tesla Universal Wall Connector won’t connect to a WPA3 network, it’s likely running older factory firmware. Update to the latest firmware to resolve mesh Wi-Fi and 2.4 GHz compatibility issues. Connect your phone to the charger’s TeslaWallConnector_XXXX Wi-Fi, open 192.168.92.1, and manually upload the latest firmware from Tesla’s support site before reconnecting it to your home network.)
- Test the charger by plugging in your Tesla and verifying that the charging rate is around 48 amps (11-12 kW).
Expert Tip
We recommended sealing the conduit edges where they meet the wall with silicone sealant to prevent water or debris from entering.
Tesla Universal Wall Connector Installation (Hardwired Wiring Diagrams)
The “Tesla Universal Wall Connector Installation (Hardwired Wiring Diagrams)” section offers detailed wiring diagrams for hardwired setups of the Tesla Universal Wall Connector. Each diagram corresponds to different circuit amperages (12A, 16A, 20A, 24A, 32A, 40A, 48A) and outlines the essential electrical connections, including circuit breaker ratings, wire sizes, and output power. These diagrams help electricians and homeowners perform safe, efficient installations of various home electric vehicle (EV) charging setups, ensuring optimal performance and compliance with electrical standards.
The Tesla Universal Wall Connector also allows installers to adjust the charger’s amperage via the Tesla One App, providing flexibility to match your home’s electrical capacity. Certified EV charger installers can choose from six available amperage levels (12A, 16A, 24A, 32A, 40A, or 48A) to ensure compatibility with the electrical infrastructure and enhance charging efficiency. Note that this amperage adjustment feature is not accessible via the regular Tesla App, as confirmed during our installation and testing.
The table below provides detailed information on each Tesla Universal Wall Connector amperage setting, including the corresponding amperage, estimated range per hour, maximum output power, and required circuit breaker rating.
| Tesla Universal Wall Charger Amperage | Estimated Range Per Hour | Maximum Output Power | Circuit Breaker Rating |
|---|---|---|---|
| 12A | 9 mi / 14 km | 2.8 kW | 15A |
| 16A | 12 mi / 19 km | 3.8 kW | 20A |
| 24A | 18 mi / 29 km | 5.8 kW | 30A |
| 32A | 25 mi / 40 km | 7.7 kW | 40A |
| 40A | 30 mi / 48 km | 9.6 kW | 50A |
| 48A | 36 mi / 58 km | 11.5 kW | 60A |
Tesla Universal Wall Connector 48A Hardwire Wiring Diagram (60A Circuit Breaker)
This diagram depicts the installation of the Tesla Universal Wall Connector on a 60A circuit, with a 48A continuous load (80% of the circuit’s capacity). This configuration delivers 11.4 kW of output and is designed for ultra-fast home EV charging.
Tesla Universal Wall Connector 40A Hardwire Wiring Diagram (50A Circuit Breaker)
The wiring diagram below illustrates the installation of the Tesla Universal Wall Connector on a 50A circuit, with a 40A continuous load (80% of the circuit’s capacity). This setup delivers a 9.5 kW output, perfect for high-speed home electric vehicle charging.”

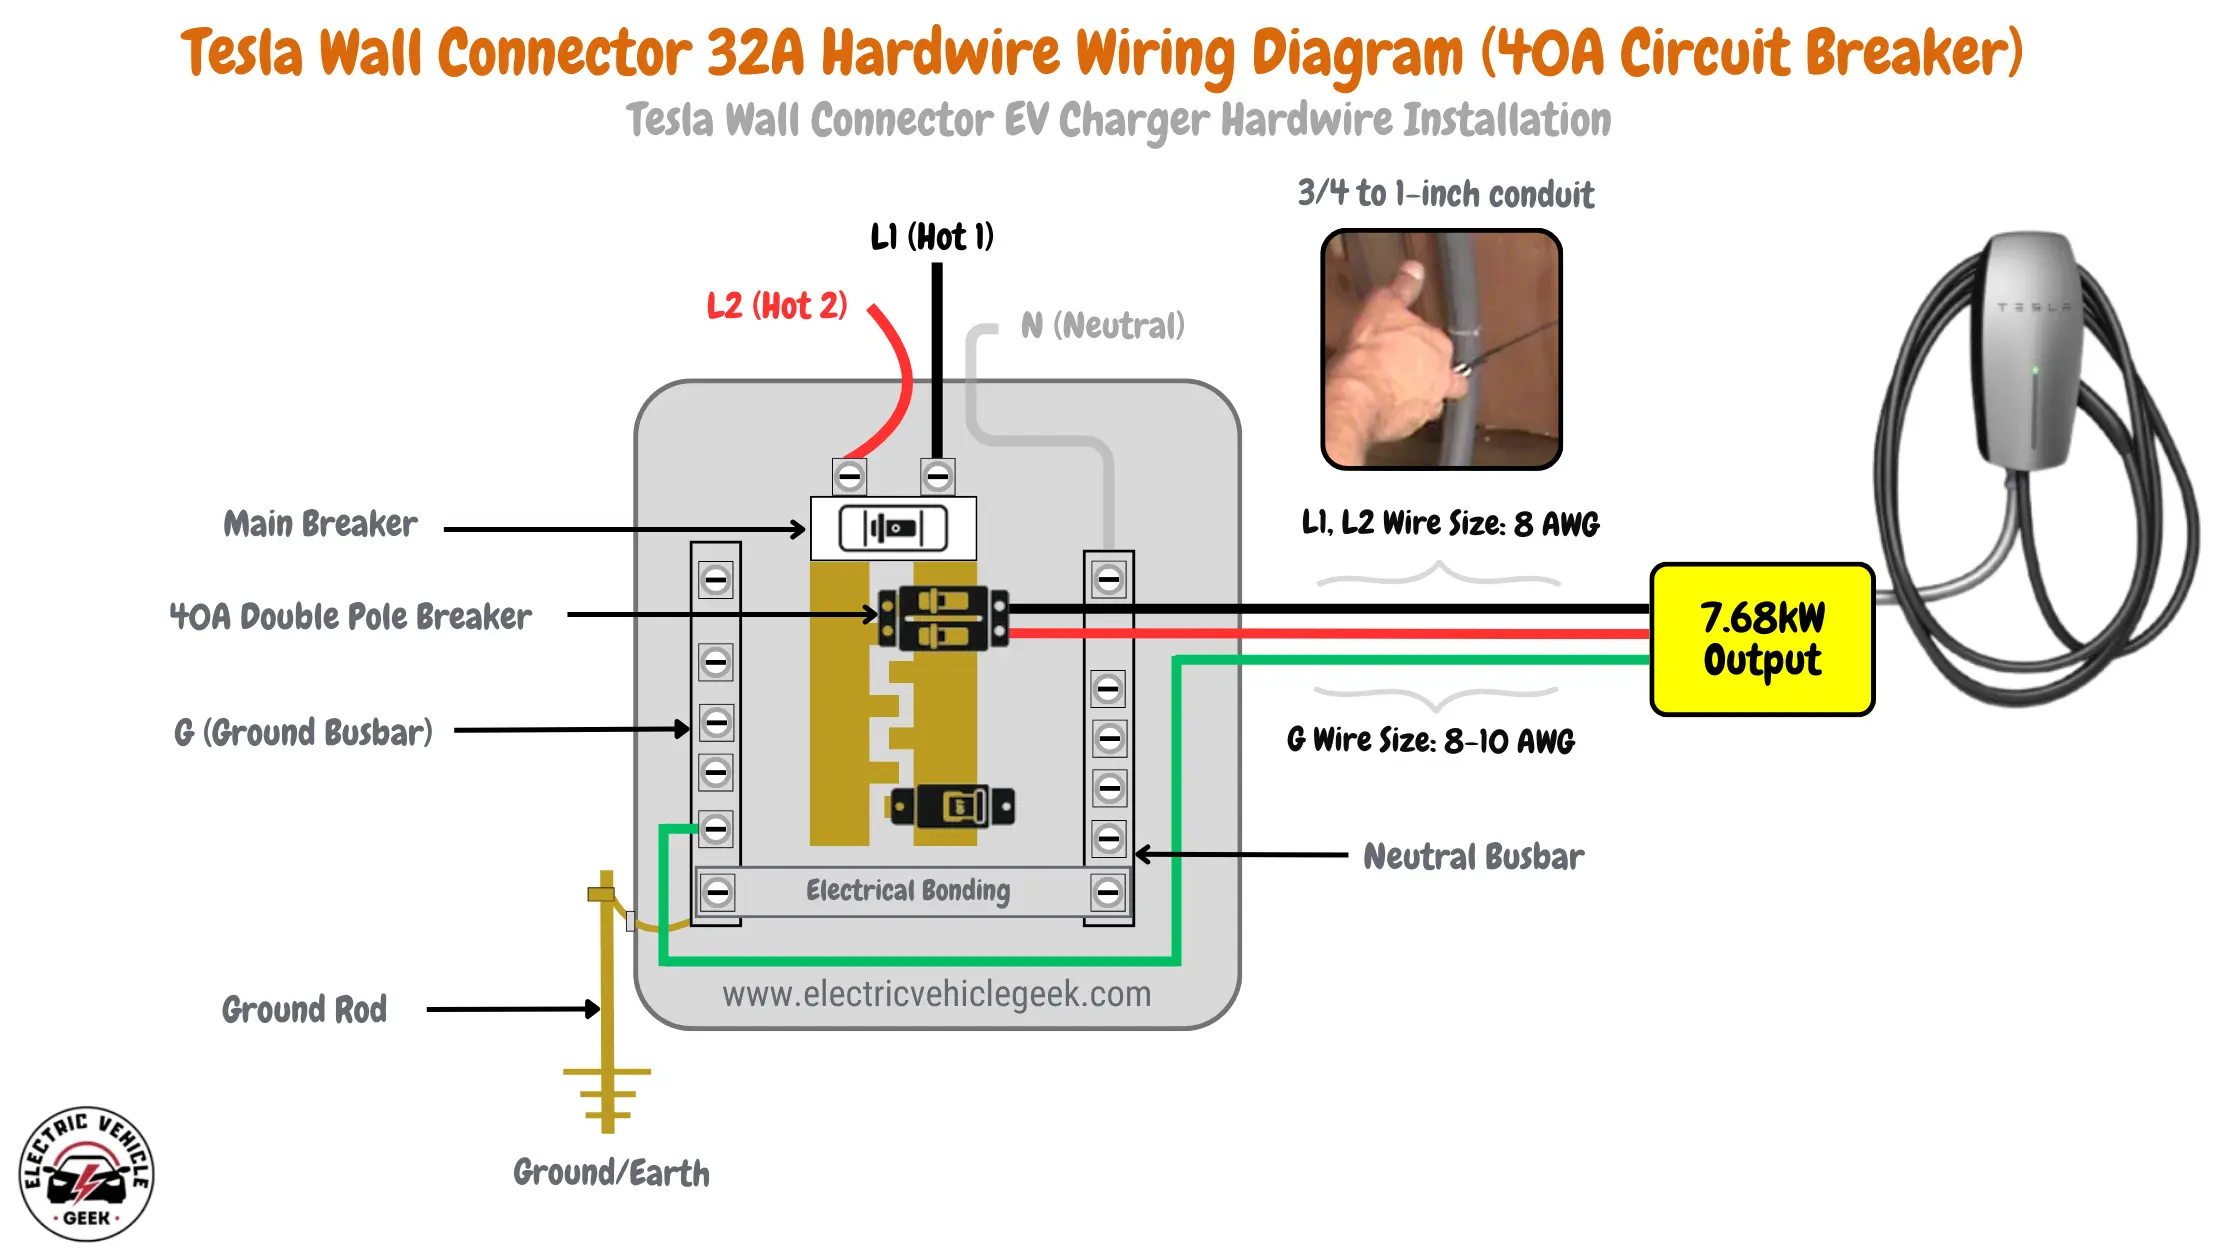
Tesla Universal Wall Connector 32A Hardwire Wiring Diagram (40A Circuit Breaker)
This diagram shows the installation of the Tesla Universal Wall Connector on a 40A circuit, with a 32A continuous load (80% of the circuit’s capacity). This hardwired configuration delivers a 7.6 kW output, ideal for faster home EV charging.
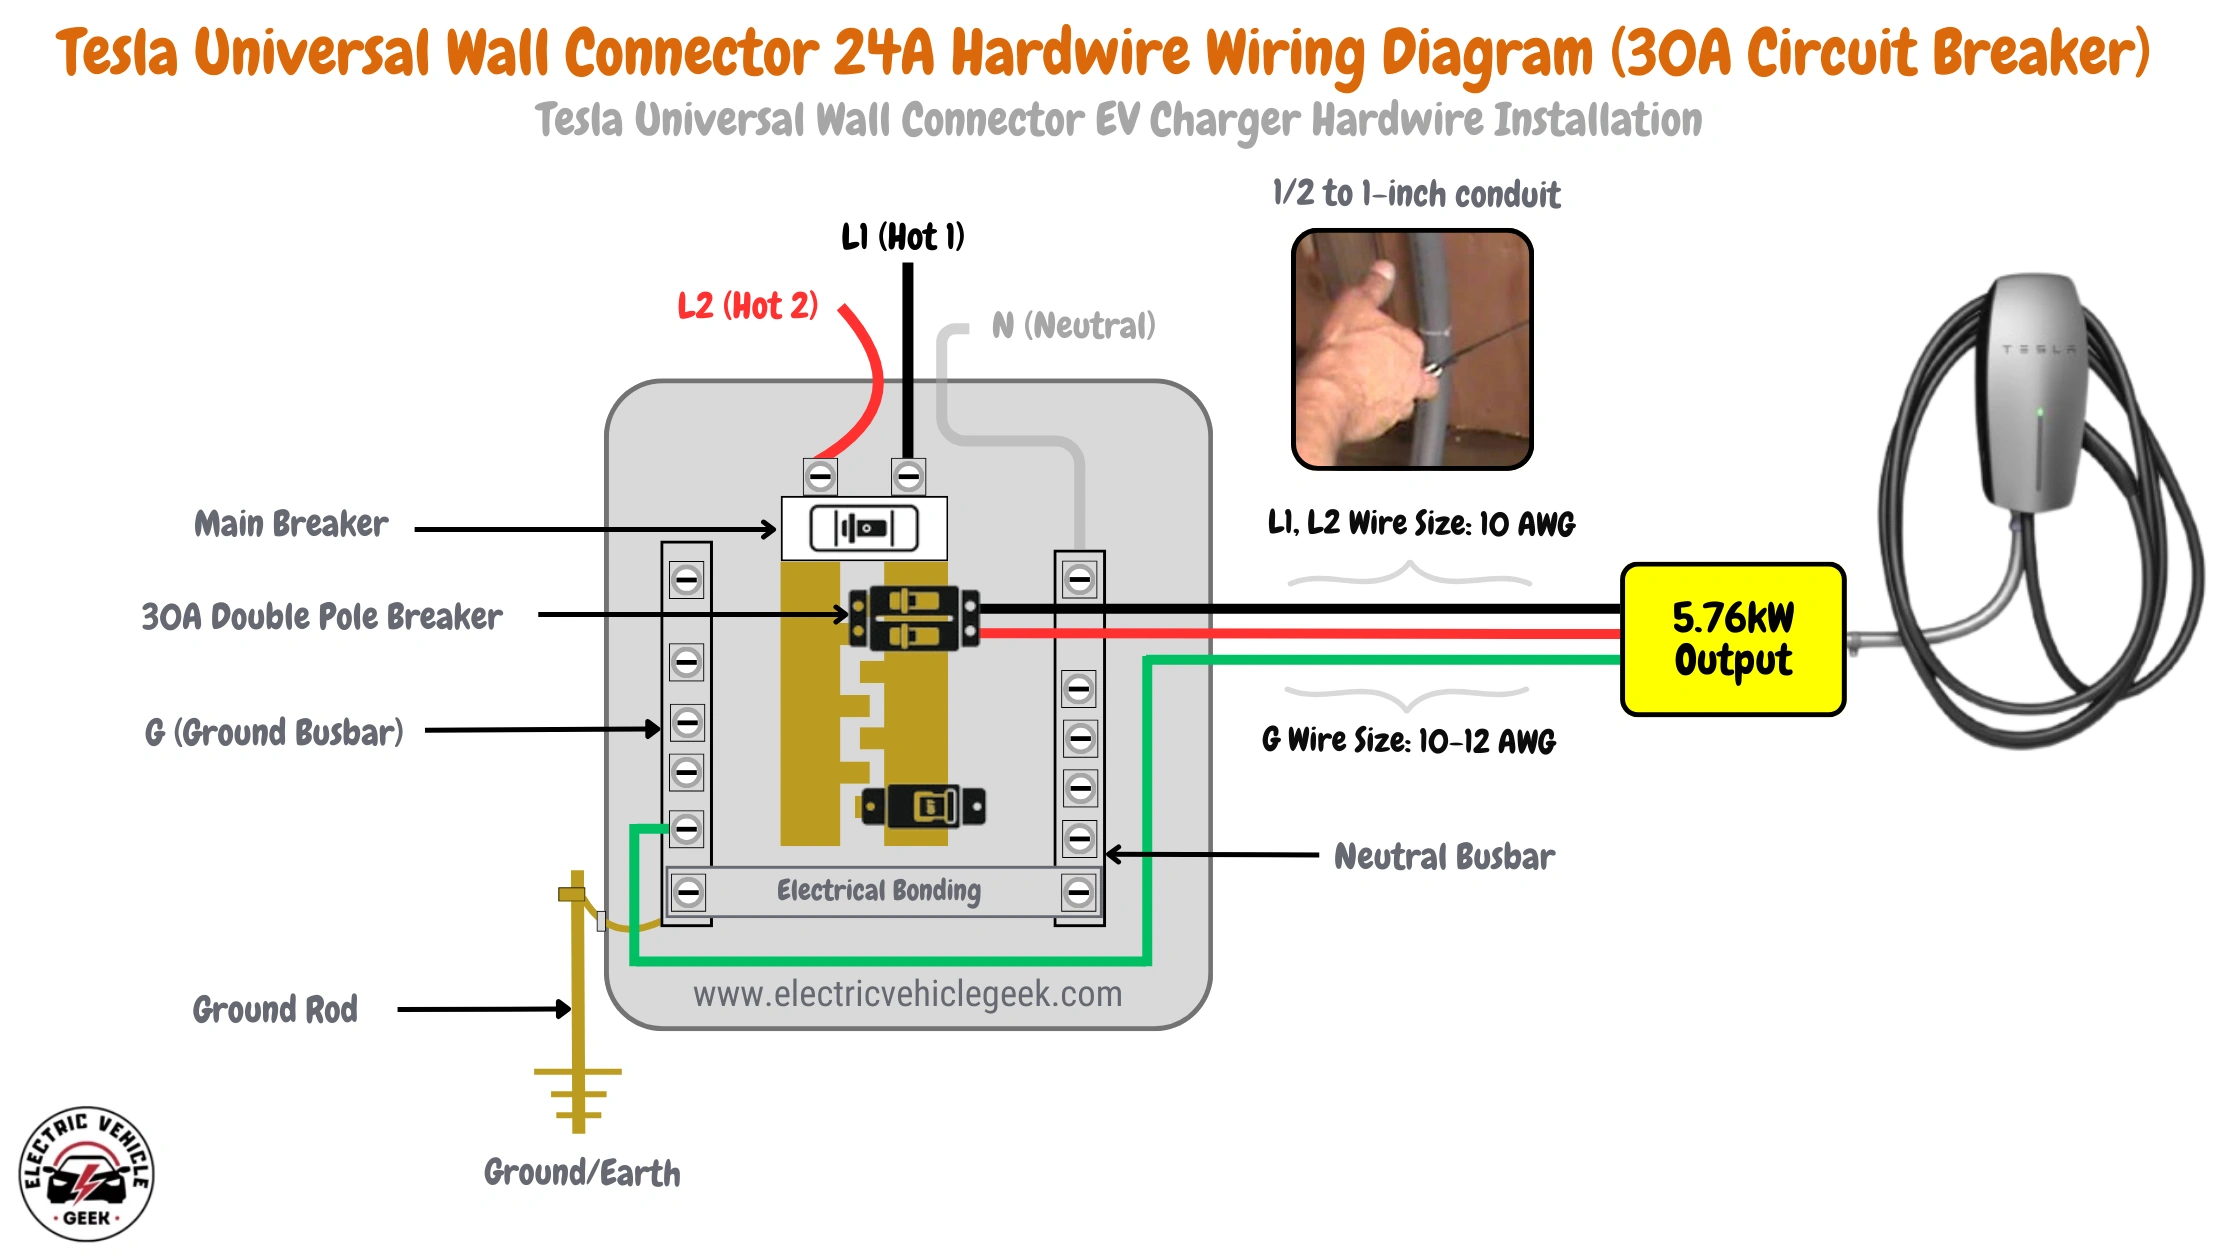
Tesla Universal Wall Connector 24A Hardwire Wiring Diagram (30A Circuit Breaker)
The Tesla charger wiring diagram below shows the installation of the Tesla Universal Wall Connector on a 30A circuit, with a 24A continuous load (80% of the circuit’s capacity). This setup delivers a 5.7 kW output, suitable for fast home charging of electric vehicles.
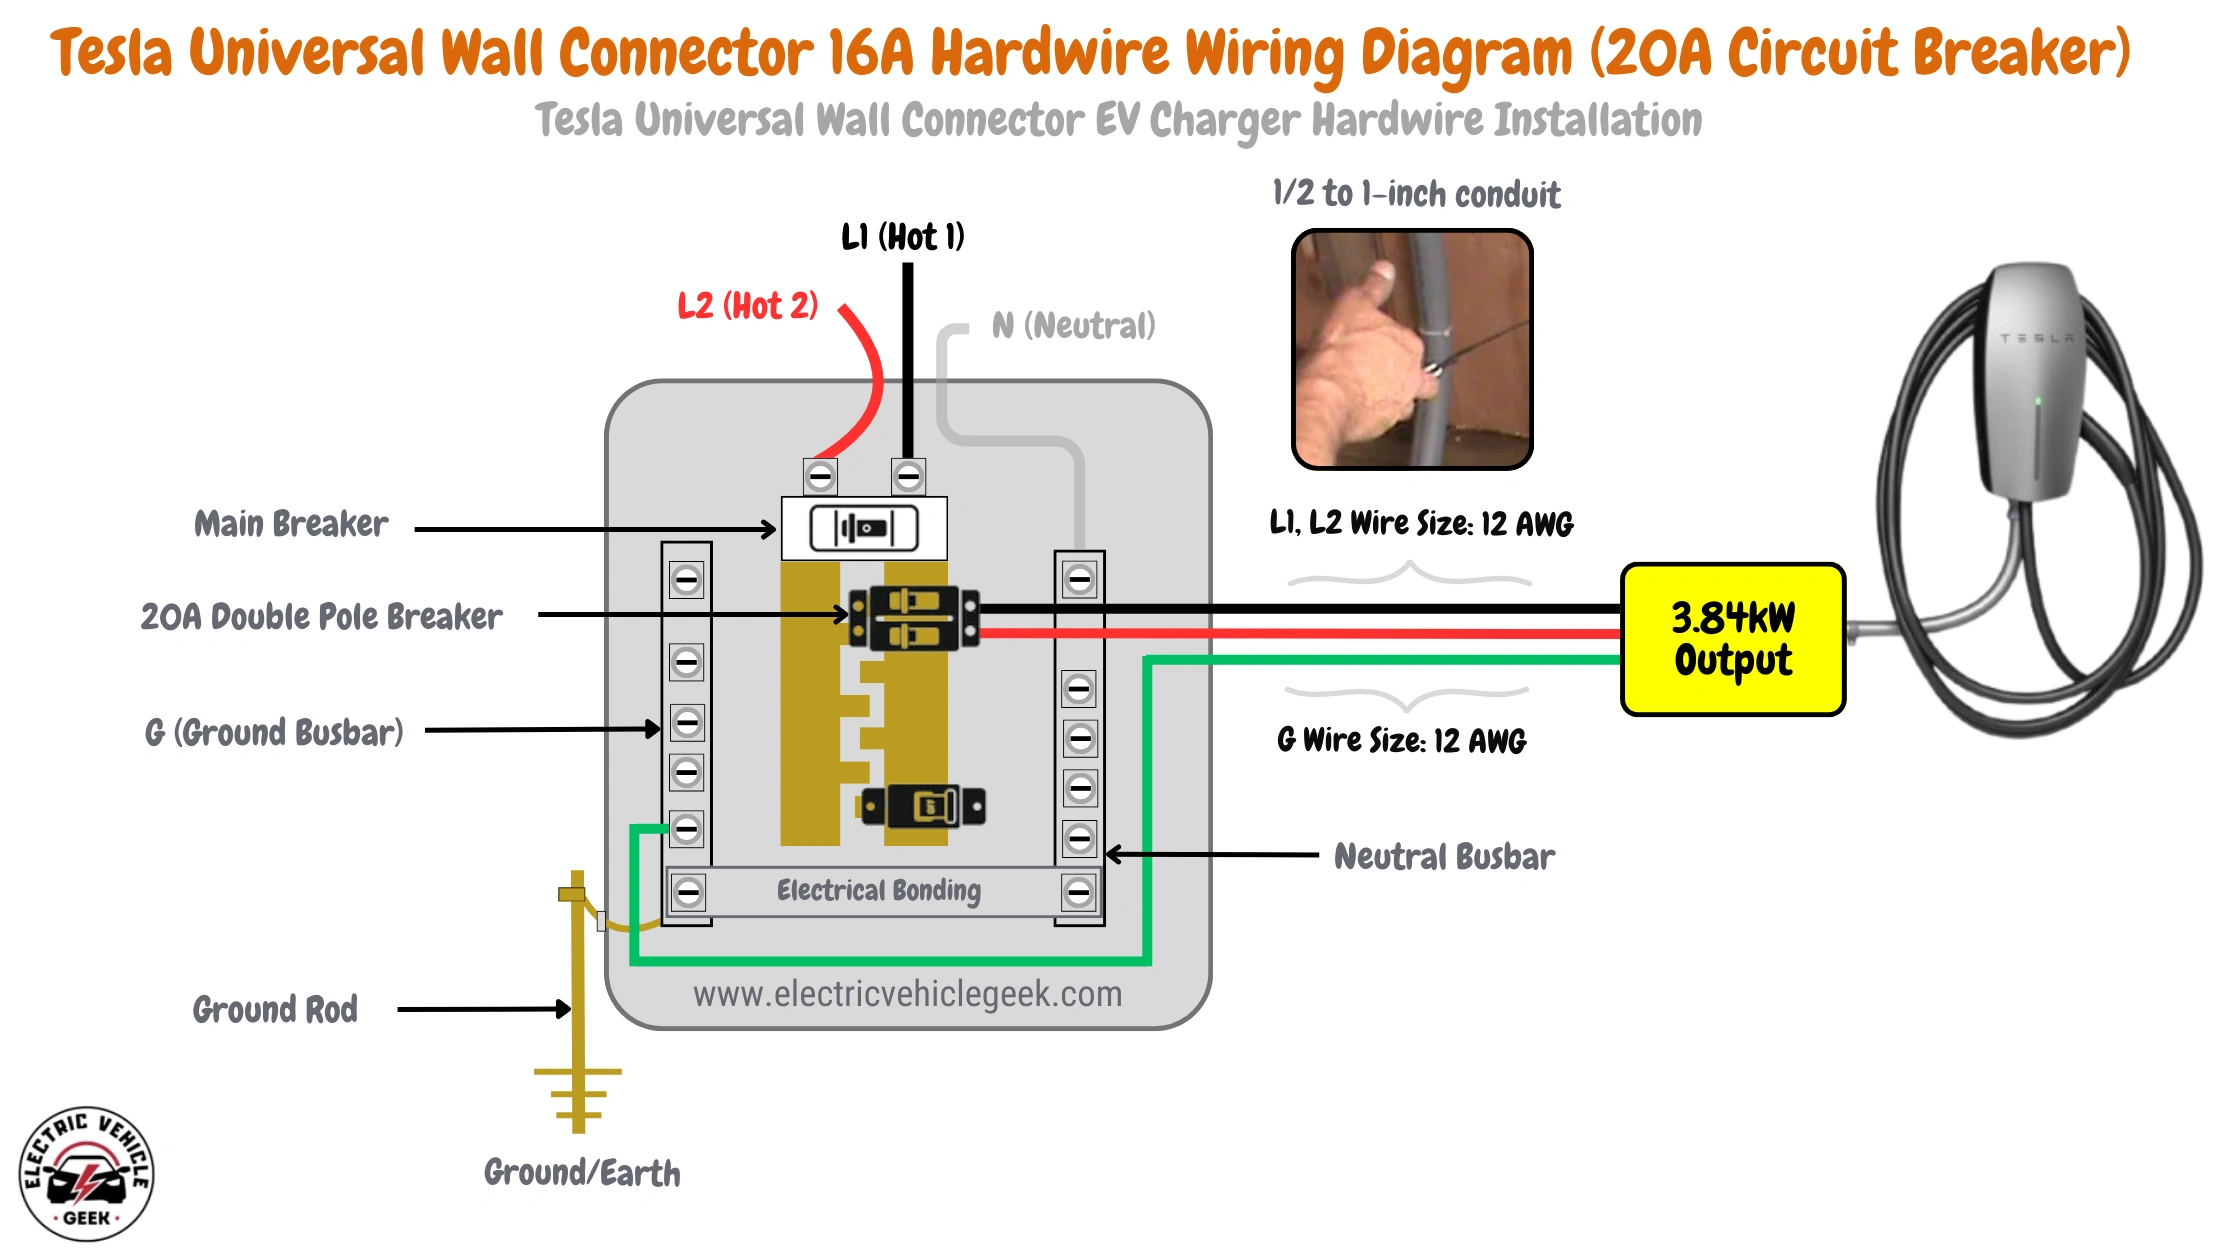
Tesla Universal Wall Connector 16A Hardwire Wiring Diagram (20A Circuit Breaker)
This wiring diagram illustrates the installation of the Tesla Universal Wall Connector on a 20A circuit, with a 16A continuous load (80% of the circuit’s capacity). This configuration delivers 3.8 kW of output, ideal for residential EV charging.
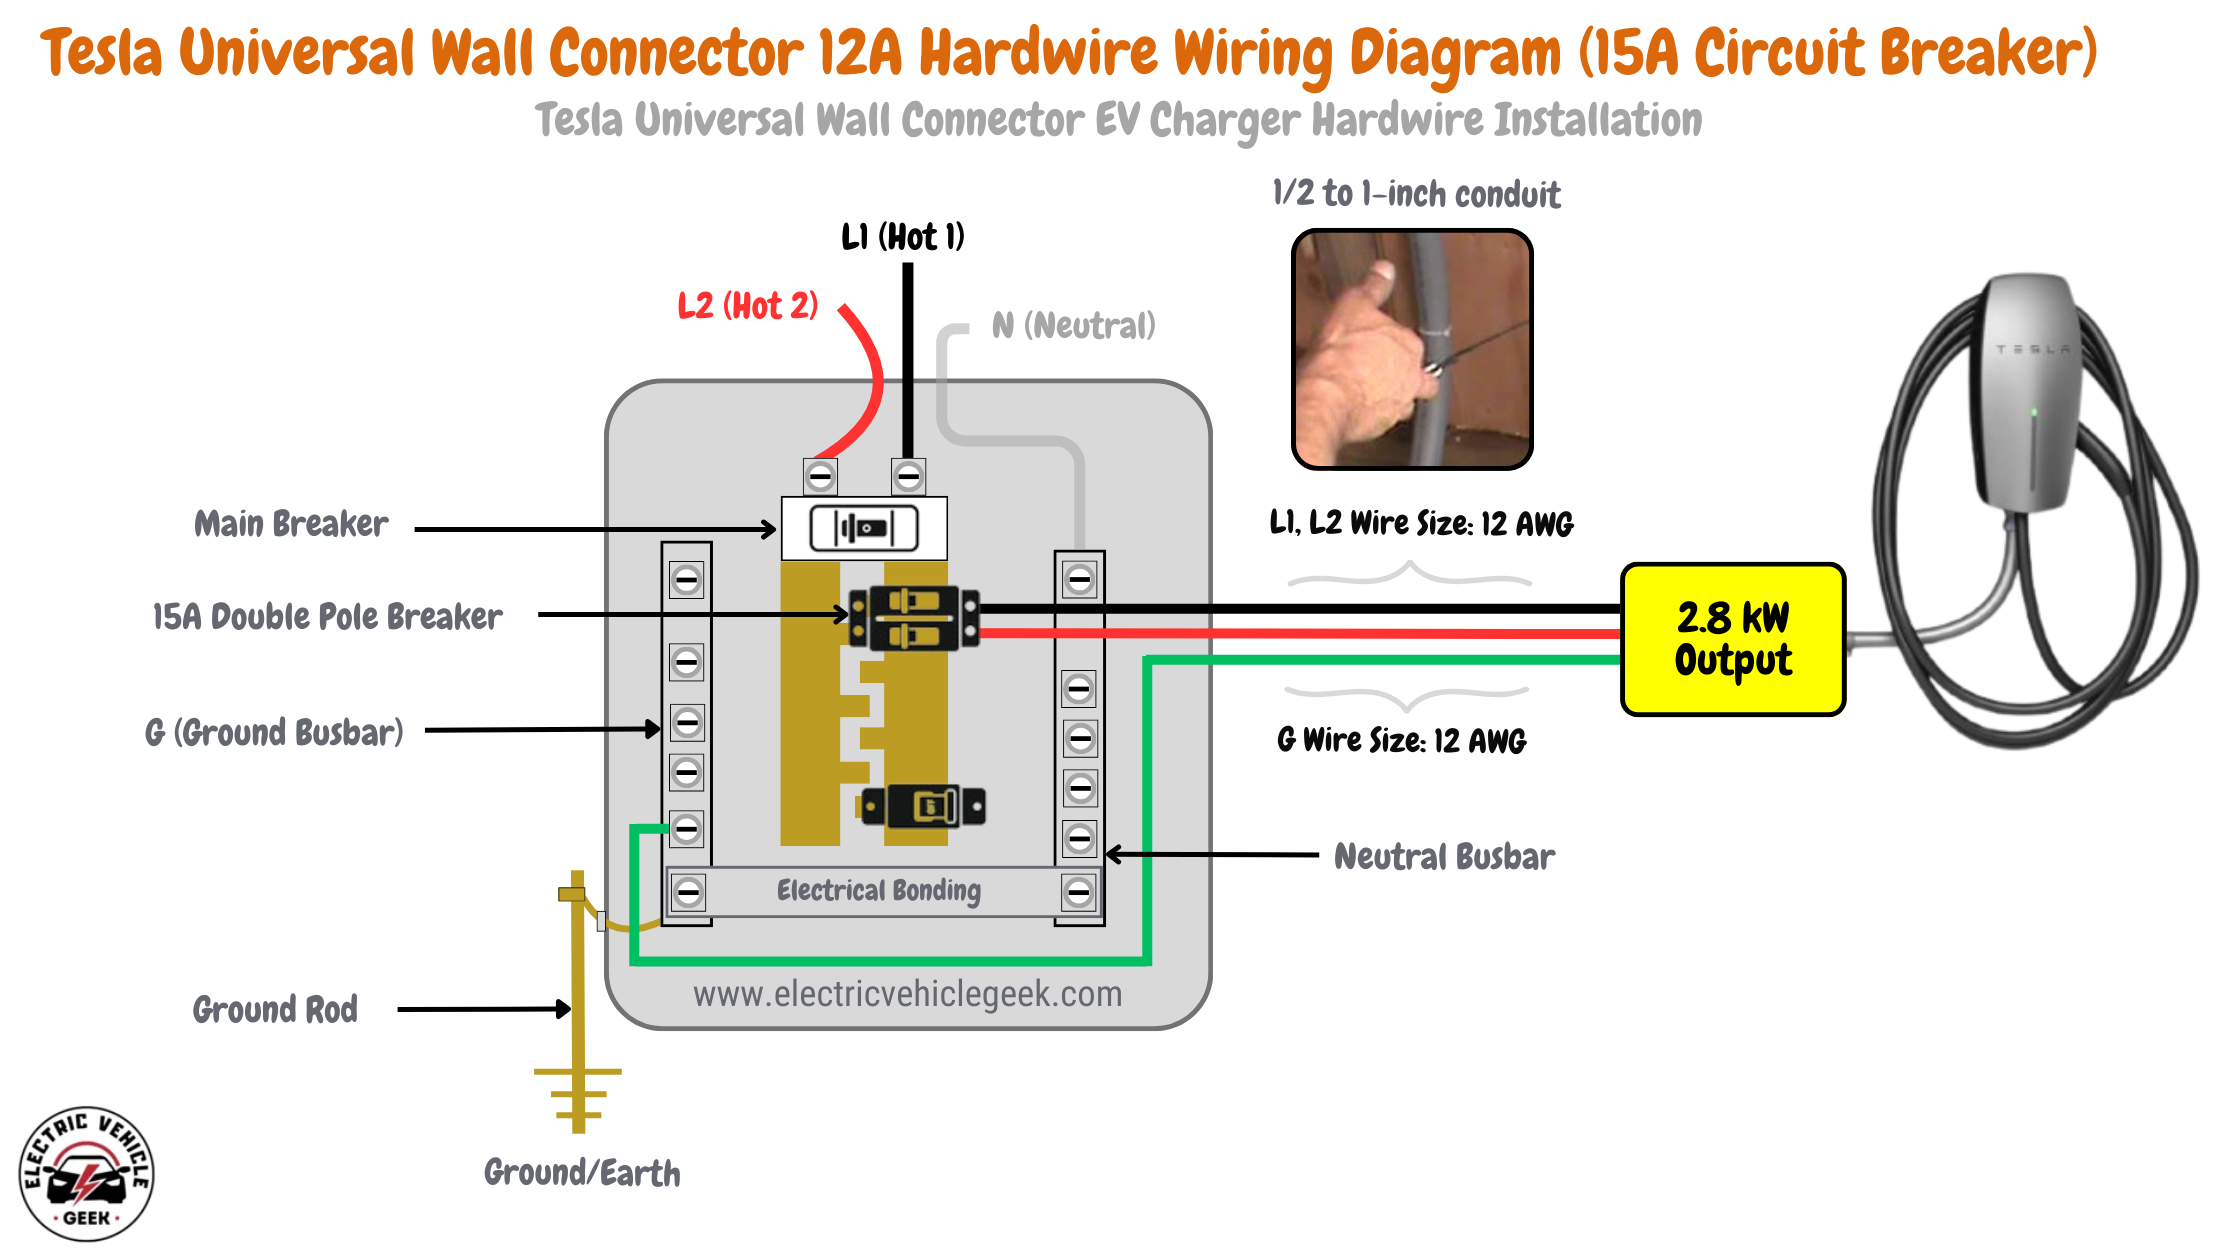
Tesla Universal Wall Connector 12A Hardwire Wiring Diagram (15A Circuit Breaker)
The Tesla charger wiring diagram below shows the installation of the Tesla Universal Wall Connector on a 15A circuit, with a 12A continuous load (80% of the circuit’s capacity). This hardwired setup delivers a 2.8 kW output, ideal for home electric vehicle (EV) charging.
Home Assistant Integration with Tesla Universal Wall Charger
When I set up our Tesla Universal Wall Connector with our home solar system, it felt great knowing we’d be charging our EV with clean, solar power. We first connected the solar panels to a Tesla Powerwall, which stores energy so we can charge efficiently, even when the sun isn’t shining. The Powerwall hooks up to the Backup Gateway, which then ties into our main electrical panel. From there, power flows through a 60A double-pole breaker that controls electricity to the wall connector.
I noticed the wiring includes the usual L1 and L2 lines, plus ground and neutral, which keeps everything balanced and safe. One thing I really appreciated was how smoothly the breaker handled load shifts during peak sun hours, no flickering or interruptions. The setup gives me peace of mind, knowing the Powerwall manages energy so well, optimizing when to charge based on what the house needs versus what the solar system generates.
A quick tip from my experience: if you’re running a 60A breaker for a continuous load like this, make sure you size the wiring carefully. This is a common issue in solar EV charging installations where the EV charger manual doesn’t include complex installation instructions. For longer runs common in solar EV charging, upsizing beyond 6 AWG copper helps reduce voltage drop and thermal buildup, which can affect both safety and the lifespan of your charger’s internal components. In my setup, I went with 4 AWG in conduit to keep everything cool and efficient, especially during those hot afternoons when the garage can hit 100°F.
All in all, this integration makes charging my EV feel effortless and sustainable. Plus, I get to enjoy the confidence that comes with a well-balanced, NEC-compliant system built for real-world conditions.
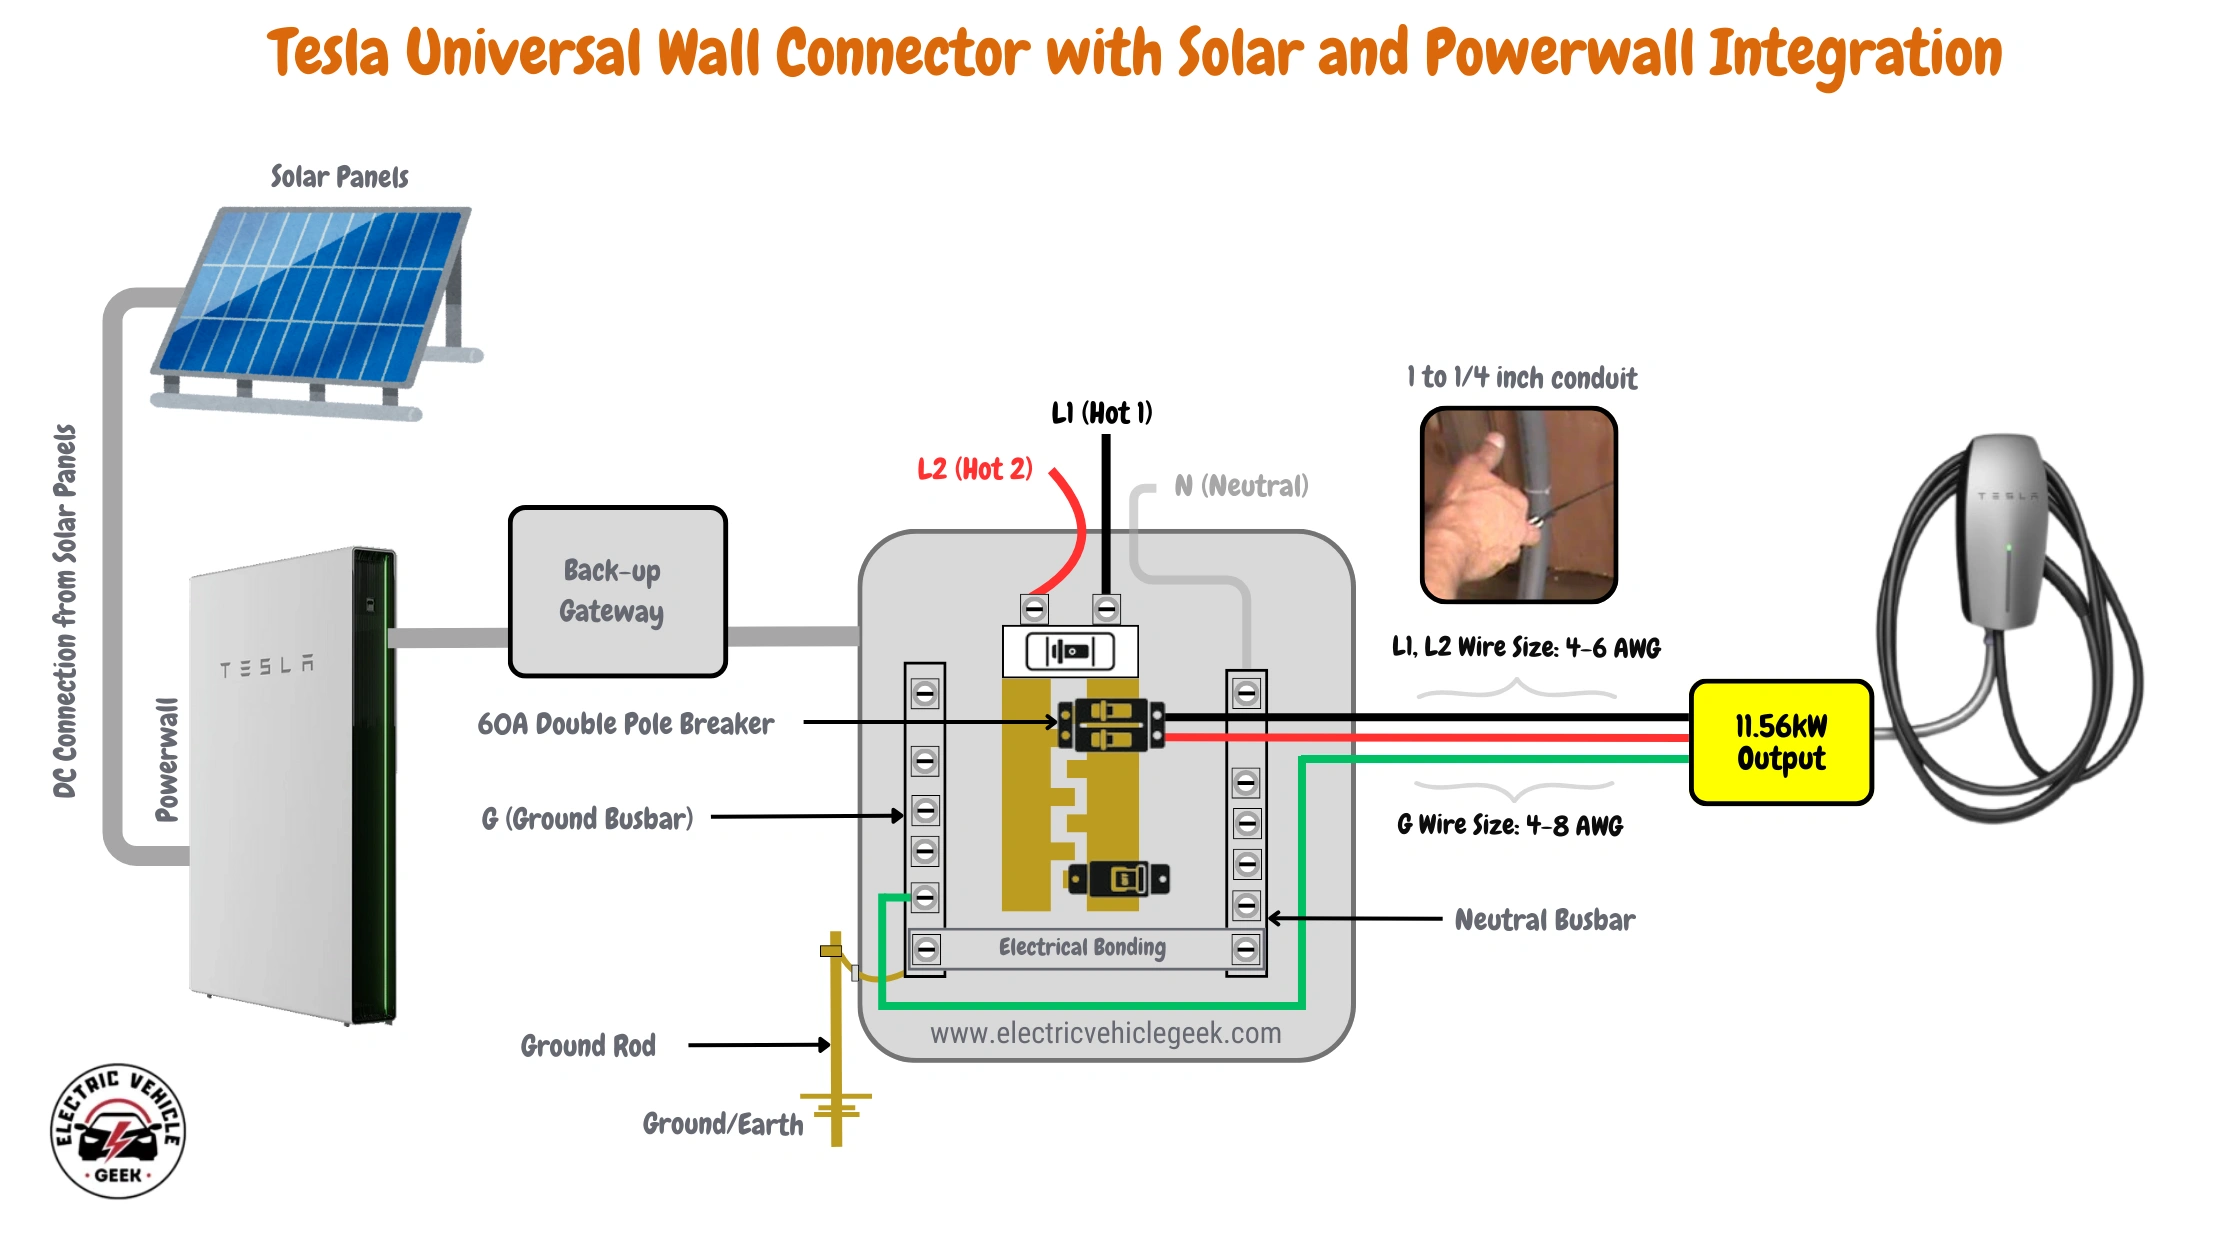
Tesla Universal Wall Connector with Solar and Powerwall Integration Wiring Diagram.
Tesla Universal Wall Connector Multi-Charger Deployment
The Tesla Universal Wall Connector supports multiple chargers on a single circuit, making it ideal for residential garages, commercial lots, and small-business fleets. Using group power management, Universal Wall Connectors can be installed on a shared branch circuit (daisy chaining) or on individual dedicated branch circuits, offering flexibility to optimize wiring, panel space, and overall installation costs.
In a shared branch-circuit setup (daisy-chaining), a high-capacity circuit runs to the first charger, and power is passed downstream to additional units via the charger’s internal dual-terminal hardware.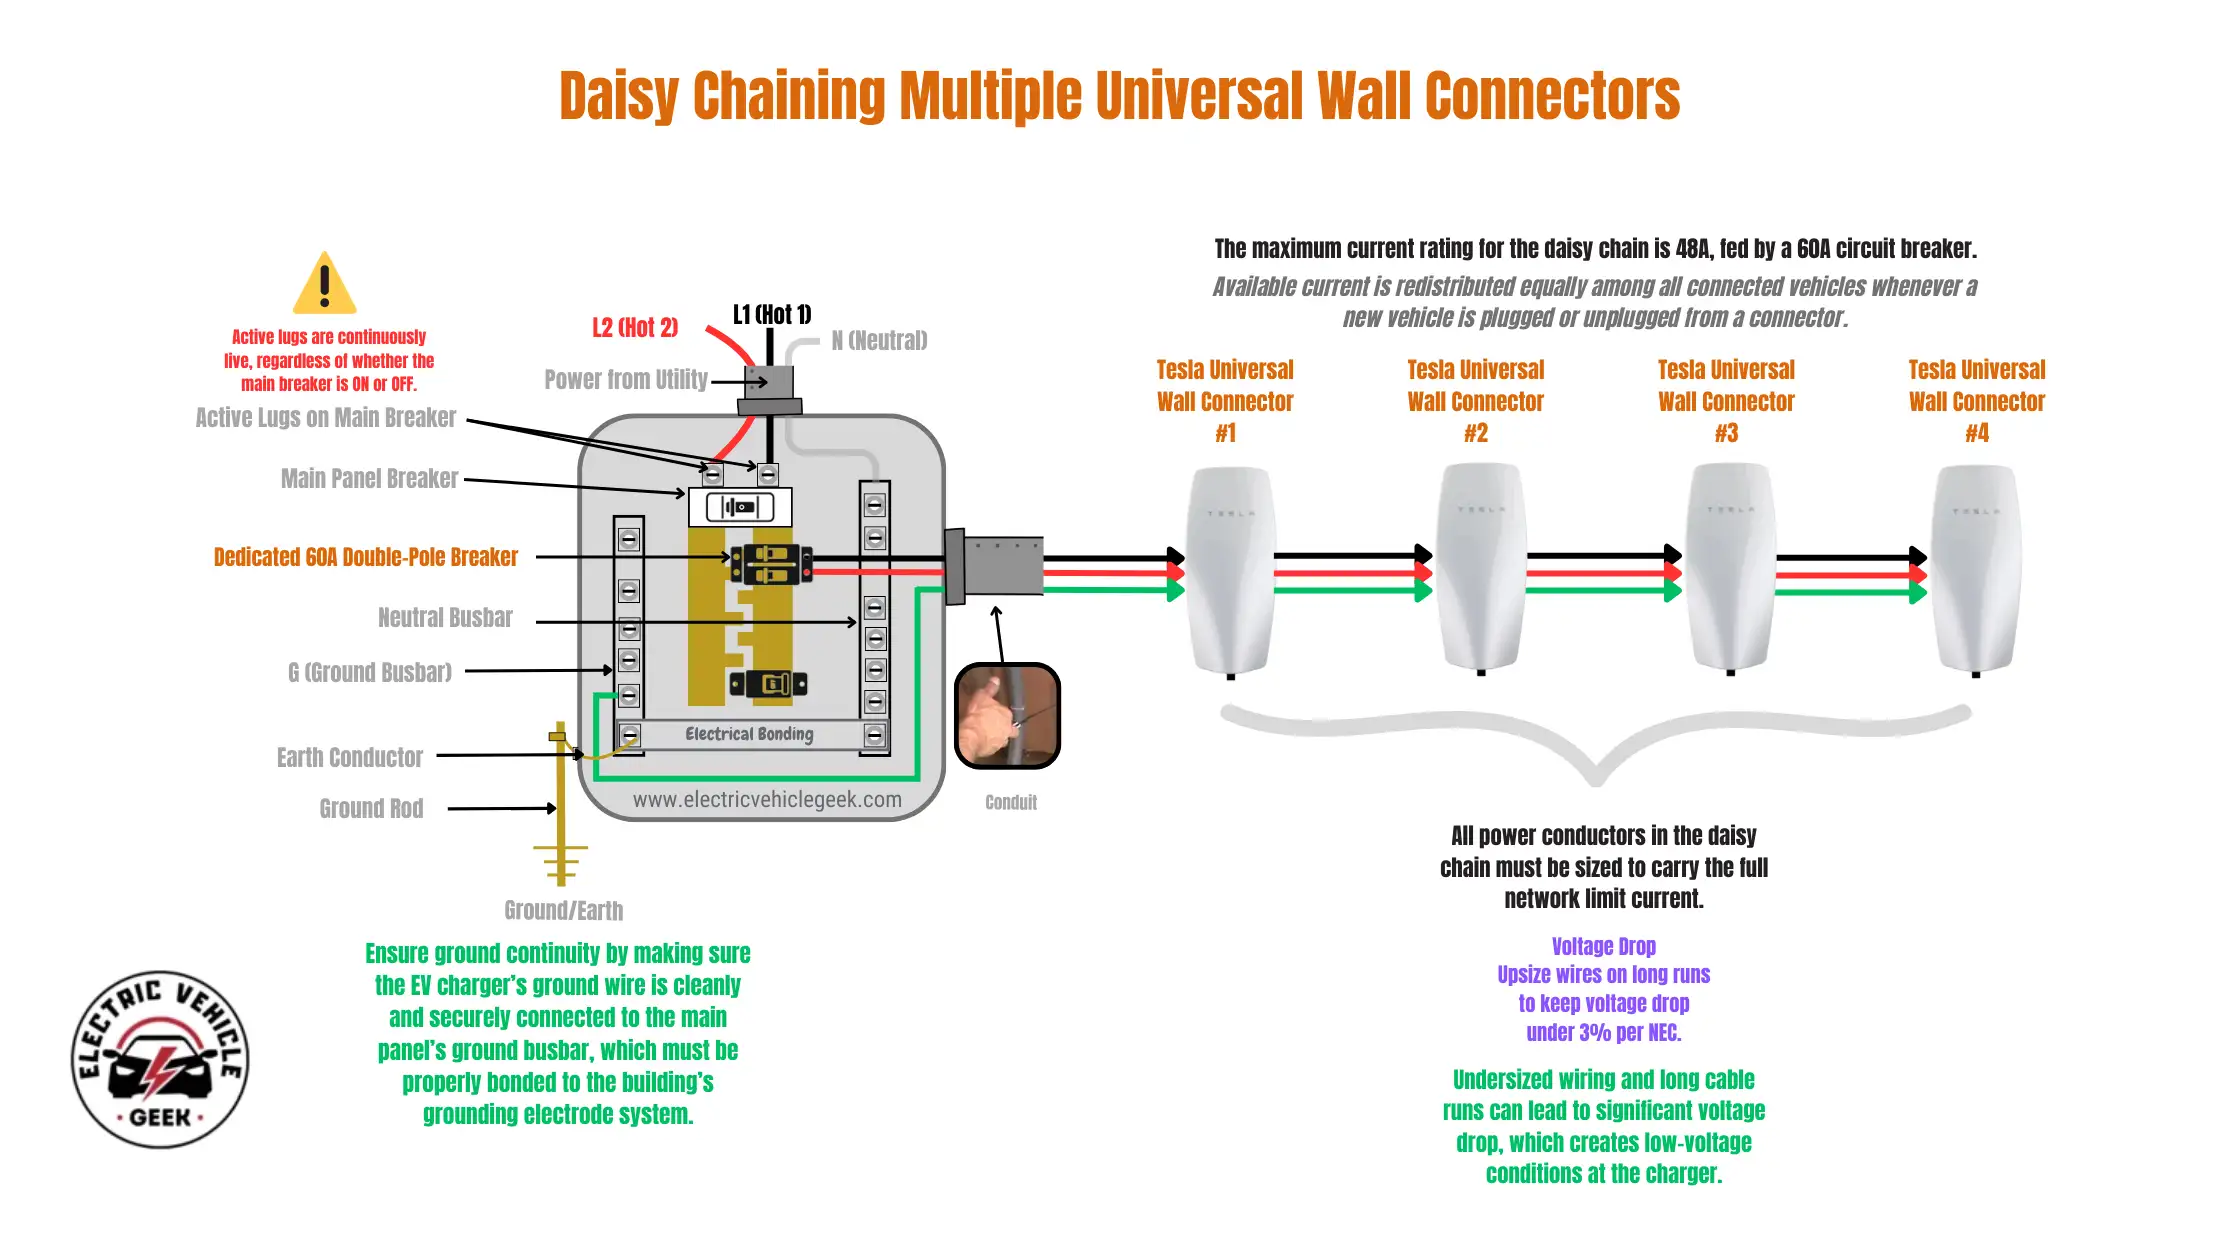
Daisy-chaining multiple Tesla Universal Wall Connectors reduces the need for additional conduit runs and copper wiring. NEC guidelines require all wiring in the chain to match the breaker’s rating (for example, 6 AWG copper for a 60A breaker) to safely carry the full load, even if the software limits output to individual chargers.
For individual branch circuits, each charger has its own dedicated breaker and dedicated wiring, while all units still communicate wirelessly. The system intelligently monitors total site power and automatically adjusts each charger’s output based on the number of vehicles charging. This ensures the panel or sub-panel is never overloaded.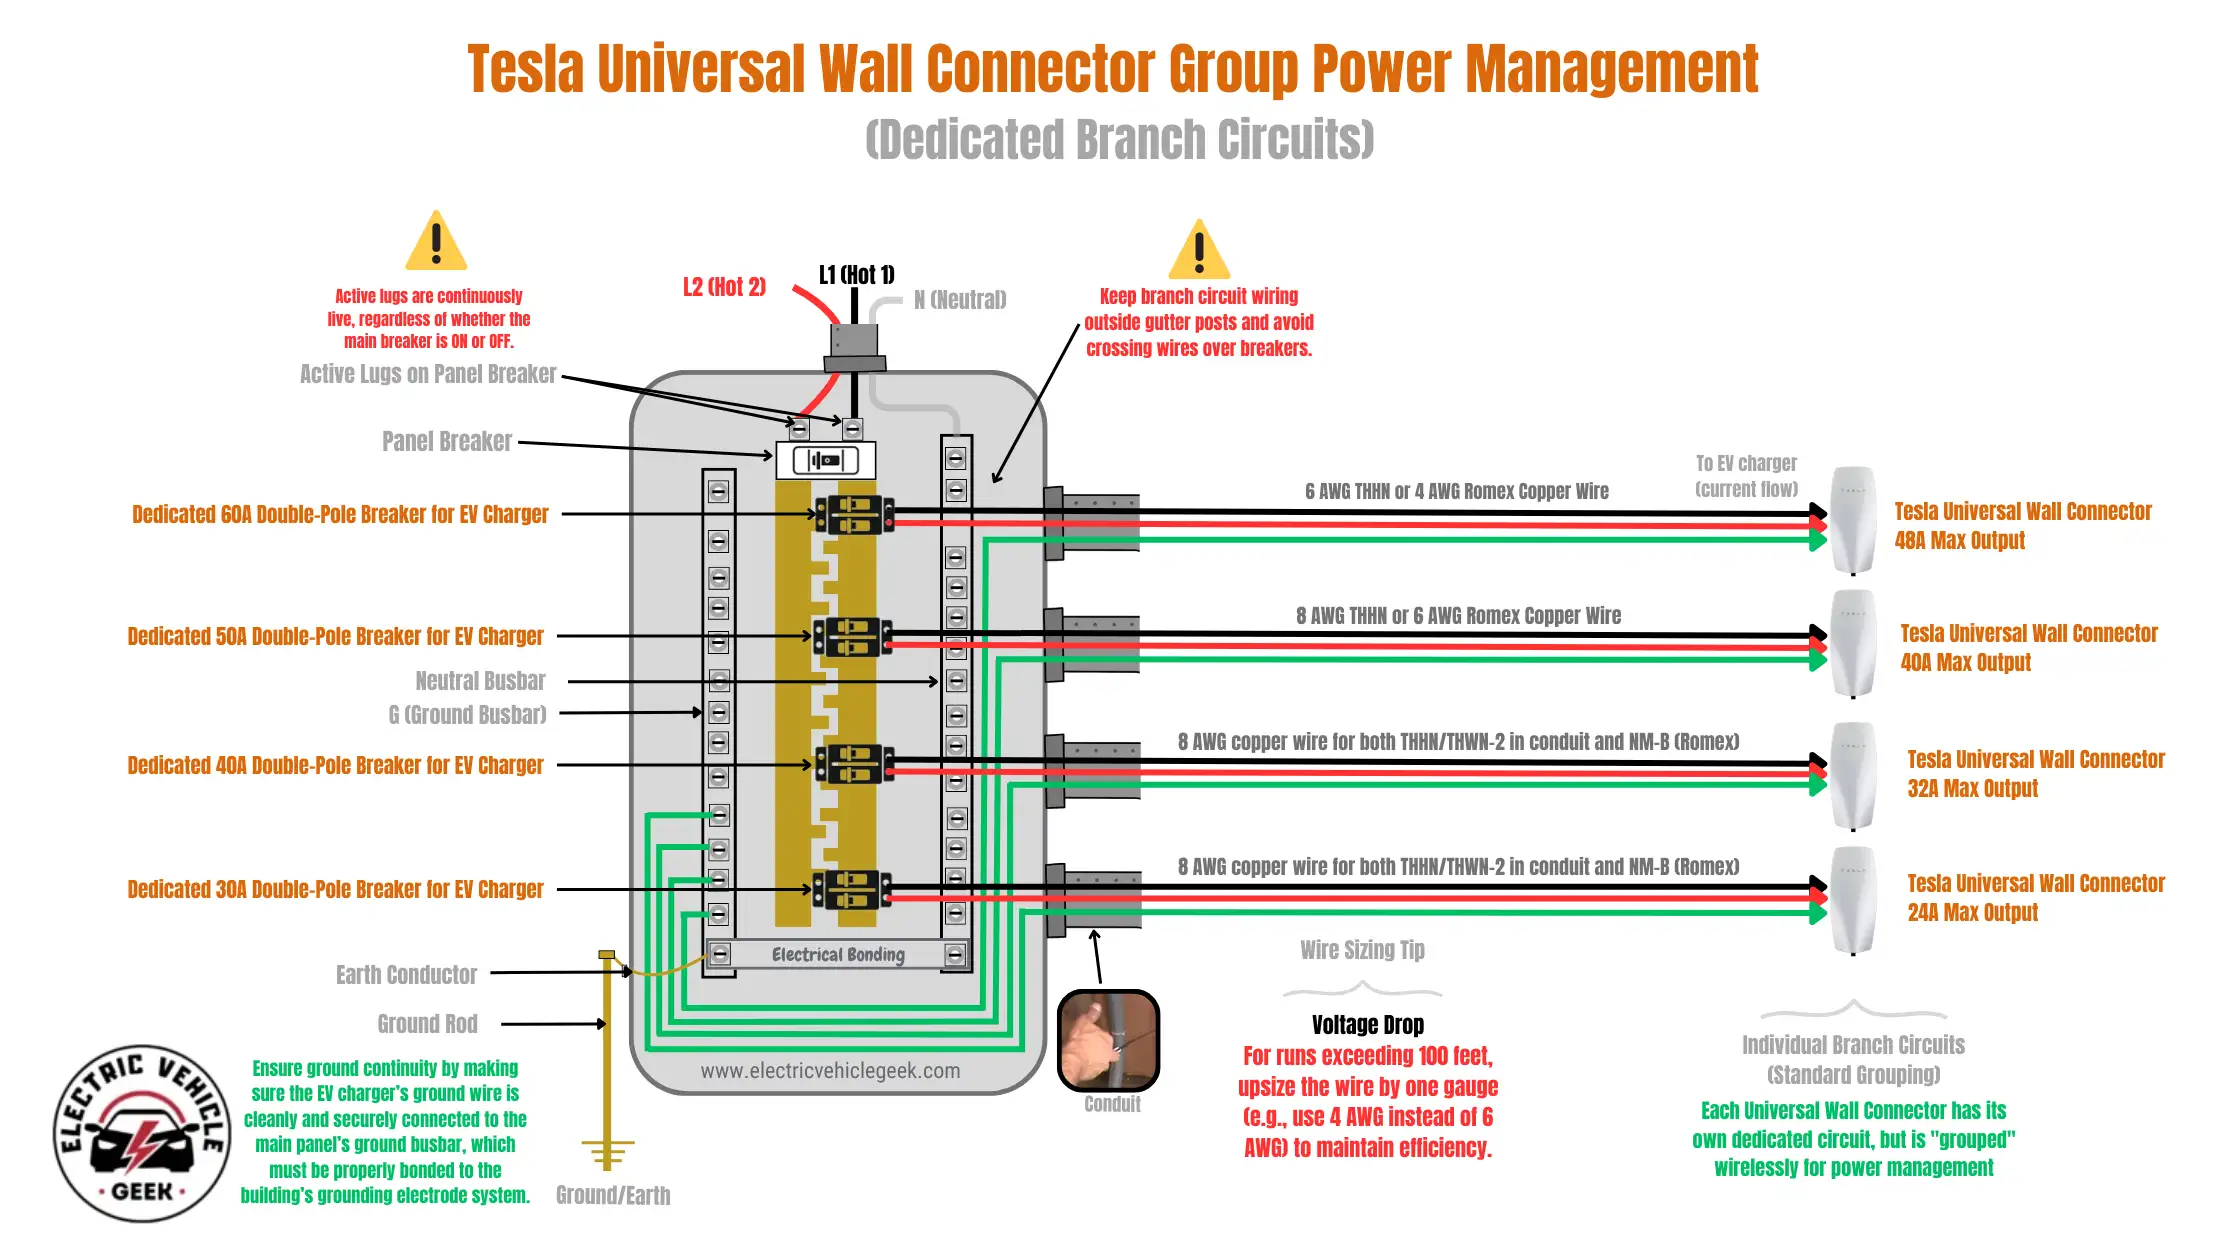
This configuration provides redundancy and flexibility. If one breaker trips or a wire is damaged, the remaining chargers continue operating. Installers can also mix circuits with different amperages within the same group to match the site’s power capacity and expected load.
Compared to the Tesla Gen 3 Wall Connector, the Universal model offers greater flexibility for multi-charger deployments. Its ability to daisy-chain reduces the need for extra conduit, copper, and panel space while still supporting wireless group management. The Gen 3 Wall Connector does not support daisy chaining and requires a dedicated breaker and wiring run for each unit, increasing installation complexity and infrastructure demands.
For residential garages, multi-unit buildings, or commercial fleet lots with limited panel space, the Universal Wall Connector offers a more flexible, scalable, and cost-efficient solution for deploying multiple EV chargers than the Tesla Gen 3 Wall Connector.
Learn why the Universal Wall Connector is our #1 recommended Level 2 EV charger for small businesses.
Price Comparison
Tesla Universal Wall Connector Price Comparison
Tesla Universal Wall Connector vs. other NACS chargers plotted by price and power output. Bubble size represents the EV Charger Price Index Rating™.
As shown in the interactive chart above, the Tesla Universal Wall Connector falls within the mid-price range among the NACS chargers we have reviewed. It delivers 11.5 kW and features the Magic Dock, removing the need for bulky adapters. Power sharing allows multiple Wall Connectors to operate on a single circuit, reducing installation costs and making it ideal for multi-EV households. Its dual-connector capability can save on the cost of buying a second charger.
Tesla Universal Wall Connector Rebates & Tax Credits
Because the Tesla Universal Wall Connector pairs deep-integration Wi-Fi with bidirectional charging and Group Power Management, it is a top contender for local utility managed-charging programs. You can comfortably layer this hardware onto time-of-use rates and demand-response credits to offset your purchase well beyond the standard 30% federal tax credit. Utility incentives are highly specific to your area.
Use our EV Charger Rebate Finder to enter your zip code and see every federal, state, and utility program this smart connector qualifies for before you check out.
References
- Tesla, Inc. (n.d.-a). Universal Wall Connector charges any EV. Retrieved February 3, 2026, from Charge any EV at home with Tesla
- Tesla, Inc. (n.d.-b). Wall Connector installation and operation guide (Gen 3). Retrieved February 3, 2026, from Dynamic Power Management
- Almutairi, A., Albagami, N., Almesned, S., et al. (2024). Optimal management of electric vehicle charging loads for enhanced sustainability in shared residential buildings. Frontiers in Energy Research, 12. https://doi.org/10.3389/fenrg.2024.1396899

- Versatile Charging (Supports Tesla and J1772-compatible electric vehicles)
- Advanced smart features
- Renewable energy integration
- Features a modern and minimalist design that complements most homes
- Integrates into the Tesla mobile app for remote monitoring.
- Allows bi-directional EV charging
- Requires professional installation
- The non-replaceable J1772 adapter may limit flexibility for some users
- Initial setup challenges
- No plug-in installation version.
- A flimsy electronic locking mechanism
Specification: Tesla Universal Wall Connector Review
| Charging Performance | ||||||||||||||||||||||
|---|---|---|---|---|---|---|---|---|---|---|---|---|---|---|---|---|---|---|---|---|---|---|
| ||||||||||||||||||||||
| Electrical & Installation | ||||||||||||||||||||||
| ||||||||||||||||||||||
| Communication & Smart Features | ||||||||||||||||||||||
| ||||||||||||||||||||||
| Safety & Protection | ||||||||||||||||||||||
| ||||||||||||||||||||||
| Durability & Environment | ||||||||||||||||||||||
| ||||||||||||||||||||||
| Interface & Access | ||||||||||||||||||||||
| ||||||||||||||||||||||
| Physical Specifications | ||||||||||||||||||||||
| ||||||||||||||||||||||
| Compliance & Standards | ||||||||||||||||||||||
| ||||||||||||||||||||||
| Warranty Information | ||||||||||||||||||||||
| ||||||||||||||||||||||
There are no reviews yet.