Electric vehicles are becoming increasingly common as part of global efforts to reduce emissions. Installing a home EV charger provides safe, convenient, and reliable access to clean transportation energy. A dedicated home charger lets you charge your electric vehicle on your own schedule (often overnight), avoid waiting at public stations, and maintain full control over your charging setup and costs.
Installing an EV charger is a technical process that requires adherence to electrical codes and proper sizing for safe and efficient operation.
This guide provides a clear overview of the home EV charger installation process, covering both plug-in and hardwired options for residential setups. Drawing from real-world experience, we outline the essential steps involved in EV charger installation, including site assessment, electrical evaluation, selection of chargers, accessories, and installation components, as well as safety compliance, to ensure a reliable, code-compliant home charging system.
Pre-Installation Assessment and Specifications
Before installing an EV charger, it’s important to check the site and choose the right equipment.
Electrical Service Evaluation
A licensed electrician should inspect your home’s electrical panel (breaker box) to make sure it can handle the added load from the charger. This is done using a load calculation following the National Electrical Code (NEC) standards.
Electrical Panel Service Capacity
The amperage of your dedicated electric vehicle (EV) branch circuit determines the maximum charging current your EV charger can safely draw. For example, a Level 2 charger on a 40-amp branch circuit can only draw up to 40 amps continuously, and the dedicated EV charger circuit breaker must be sized at 125% of the charger’s continuous load according to National Electrical Code (NEC) Article 625.
Your home’s main electrical panel (for example, 100-amp or 200-amp service) must have sufficient available capacity to safely handle EV charging’s continuous load without tripping breakers, voltage drops, or exceeding panel limits. If there isn’t enough headroom, you may need a service upgrade or the installation of an automatic load management system (ALMS), or purchase an EV charger with smart EV charging load management.

Choosing the Right Home EV Charger
Choosing the right Electric Vehicle Supply Equipment (EVSE) is essential for a safe and efficient home charging setup. This section explains key EV charger specifications such as charging levels, amperage, connection types, and vehicle compatibility. along with other important factors such as budget, brand, smart features, safety certifications, weather resistance, and future upgrade potential to help you select the optimal charger for your home and EV.
EV Charging Level
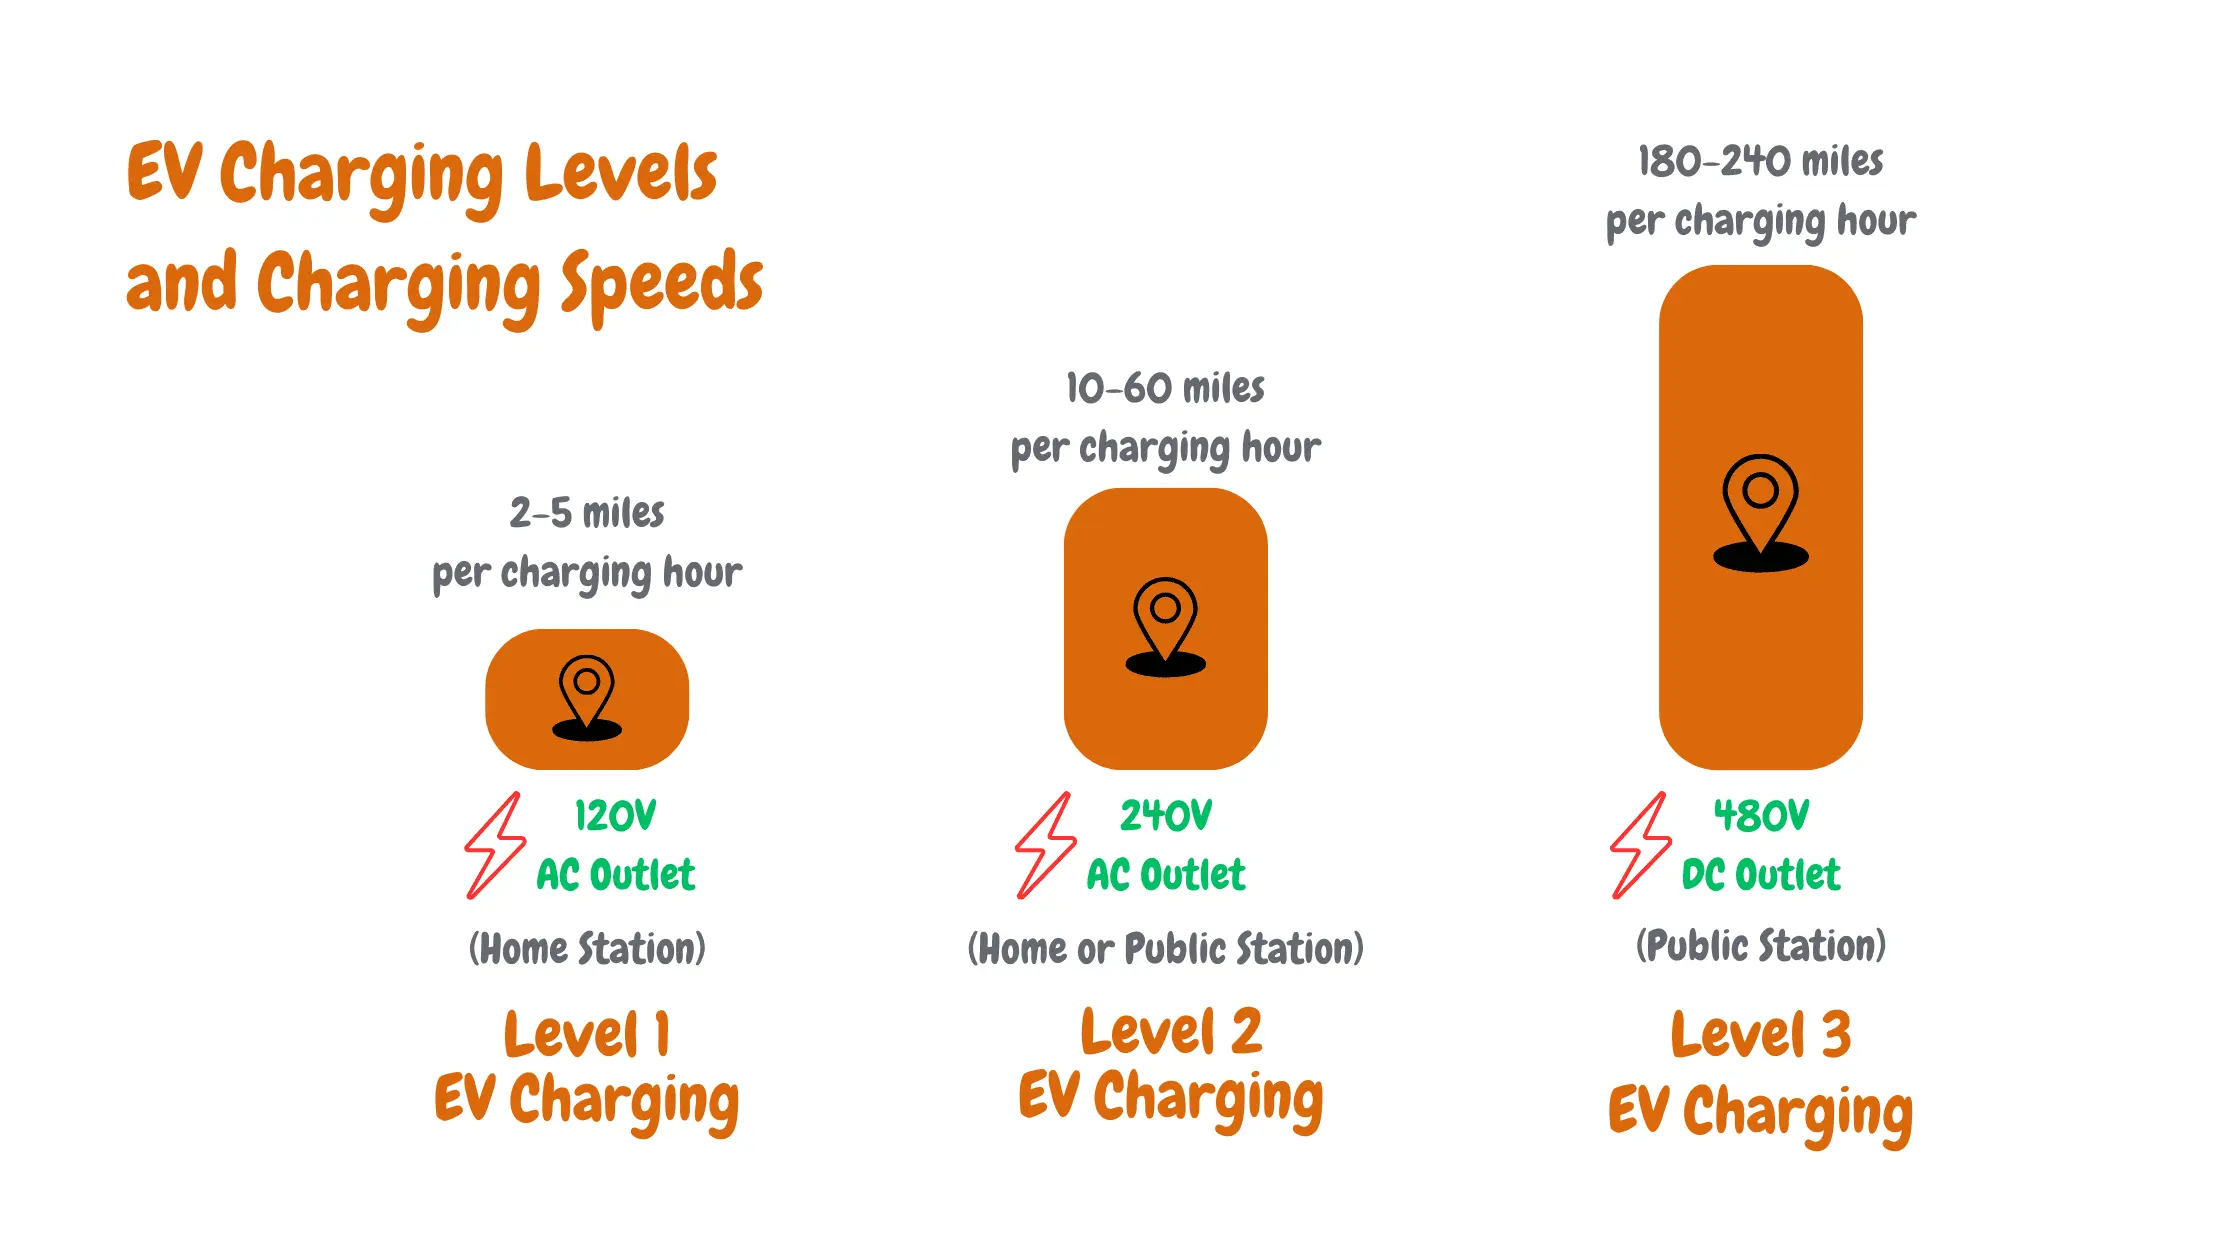
For a home EV charger, there are two EV charging levels available for you:
Level 1 chargers plug into a standard home outlet and are the simplest option for EV owners, especially if they have a 120V electrical panel. They charge slowly, typically adding 3–5 miles of range per hour, making them suitable for short daily drives or overnight charging.
Most Level 1 setups don’t require a special circuit, which is why we recommend them for DIY EV charger installations, but the outlet should be in good condition to ensure safe and reliable charging. Learn more about Level 1 EV charging.
Level 2 chargers require a dedicated 240-volt circuit and are designed for faster charging, typically adding 20–30 miles of range per hour. They are recommended for homes with 240V electrical panels. To meet NEC Article 625 requirements, the circuit breaker must be sized at 125% of the charger’s continuous load. For example, a 40-amp charger requires a 50-amp breaker.. Learn more about Level 2 EV charging.
EVSE Amperage
When selecting an EV charger, it’s important to consider the EV charger’s amperage, as it determines how fast your vehicle can charge and how much load it adds to your home electrical system.
Level 1 chargers typically draw 12–16 amps from a standard 120-volt outlet. They charge slowly but usually don’t require any special wiring or panel upgrades.
Most Level 2 chargers range from 16 to 80 amps, with higher-amperage units charging faster. Ensure your home’s electrical panel can safely handle the continuous load, and consider hardwiring for chargers above 48 amps to maximize efficiency and reliability.
Connection Type
The type of electrical connection determines installation requirements and convenience.
Level 1 chargers plug directly into a standard 120-volt outlet, making installation simple and portable. No dedicated circuit is usually required, but the outlet should be in good condition.
Level 2 chargers can be installed as hardwired units or as plug-in units using a NEMA outlet rated for the dedicated EV charger breaker rating.
Hardwiring is often preferred for high-amperage chargers because it provides a secure, permanent connection and maximizes power delivery. Plug-in units offer flexibility and easier replacement or relocation.
EV Charger Plug Type
Make sure the EVSE connector is compatible with your electric vehicle charging inlet.
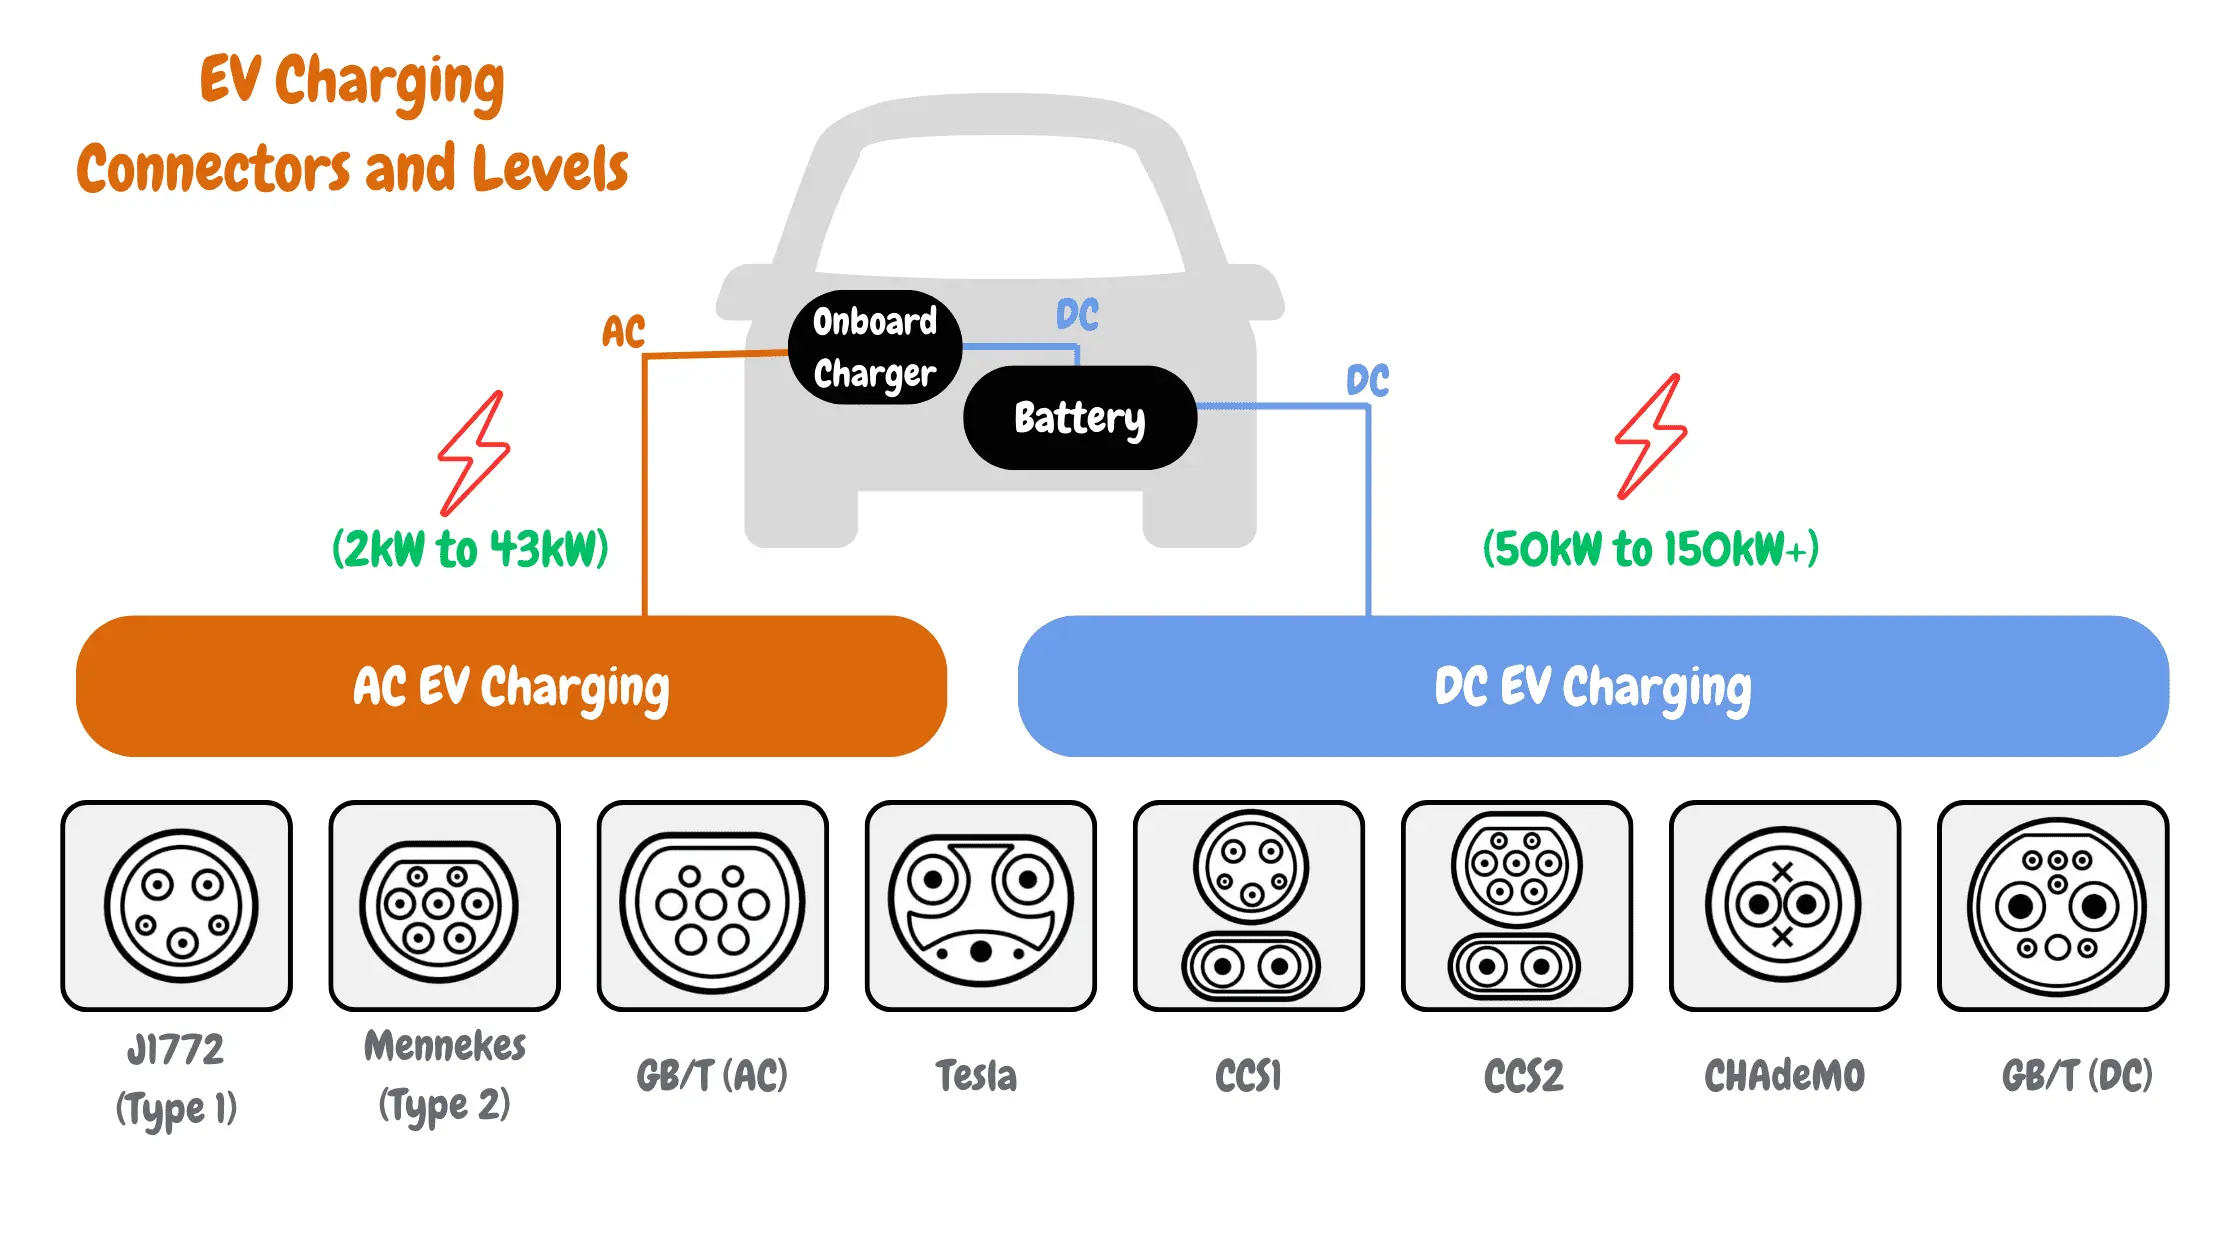
Most non-Tesla EVs use J1772, while Tesla uses NACS, though EV charging adapters are widely available. EV charger connector compatibility ensures proper handshake, avoids charging issues, and ensures safe, efficient operation.
Brand Selection
Choosing a charger from a reputable brand is essential for reliability, safety, and ongoing support. Well-known brands often provide better customer service, complementary EV charging accessories, warranties, and compliance with electrical standards, which helps protect both your home and your EV investment. Click here to search EV chargers by brand.
Vehicle Compatibility
It’s equally important to ensure the charger is compatible with your EV’s make and model. Matching the charger to your electric vehicle’s onboard charging capacity ensures the charging speed is optimized, your battery is protected, and the system operates safely. Using an incompatible charger can limit charging efficiency or, in rare cases, cause electrical issues. Click here to search EV chargers by vehicle type.
Budget Considerations
When buying a home EV charger, consider both the unit cost and installation. Basic chargers typically cost between $300–$700 and offer simple charging without smart EV charging features. Mid-range models, around $700–$1,200, often include Wi-Fi connectivity, scheduling, and energy monitoring. Premium chargers, $1,200 and up, can include advanced features like solar integration, dynamic load management, and smart home compatibility.
Installation costs vary depending on EV charger type, distance from the electrical panel, whether a dedicated circuit is needed, and indoor vs. outdoor setup. It’s best to consult a licensed electrician for an accurate estimate. Additionally, check for local incentives or rebates, which can reduce your out-of-pocket expenses.
Key Features to Evaluate
When choosing a charger, consider charging speed first; it should match your EV’s onboard charger to maximize efficiency. Smart features like Wi-Fi or Bluetooth connectivity allow remote monitoring and control via apps. Scheduling can help you charge during off-peak hours to save on electricity, and energy monitoring tracks usage to manage costs.
Also, check the connector type to ensure compatibility with your EV, and if installing outdoors, choose a charger with proper weather resistance. Many chargers now include built-in EV charging security features such as PIN protection, RFID access, or app-based user management to prevent unauthorized use.
Considerations Before Installing Your EV Charger
Before diving into the exciting world of home EV charger installation, let’s take a moment to assess whether the DIY route is the right fit for you. There are two main paths you can take: tackling the project yourself or partnering with a qualified electrician.
DIY EV Charger Installation
If you’re comfortable with electrical work and enjoy tackling home improvement projects, DIY EV charger installation might be a viable option for you. Here’s what you need to consider:
- Skills and Tools: Possessing basic electrical knowledge and experience is crucial. You’ll need EV charger installation tools like wire strippers, crimpers, a voltage tester, and possibly a drill and saw, depending on the installation complexity. Familiarize yourself with the National Electrical Code (NEC) and relevant safety regulations.
- Safety First: Ensure you understand and follow all safety protocols to avoid potential hazards. Invest in proper personal protective equipment (PPE) like gloves and safety glasses. Remember, even seemingly minor mistakes can have serious consequences.
Hiring Certified EV Charger Installers
While the DIY path offers potential cost savings, there are situations where professional installation is the wiser choice. Here’s why:
- Complex EV Charger Installations: If your electrical system requires significant modifications, navigating the process alone can be daunting. Hiring a qualified electrician ensures the work meets safety standards and adheres to local building codes.
- Limited Expertise: If electrical tasks make you uneasy, prioritize safety and peace of mind. A professional brings their experience and knowledge to the table, guaranteeing a smooth and hassle-free installation.
- Warranty and Support: Most professional installations come with warranties, offering valuable protection and peace of mind in case of unforeseen issues. Additionally, you’ll have access to expert support should you need assistance in the future. Some EV chargers mandate certified installers for EV charger warranty coverage.
Ultimately, the decision rests on your individual comfort level, skills, and available resources. Weigh the pros and cons carefully, and remember, prioritizing safety should always be your top concern.
Planning for your Home EV Charger Installation
Now that you’ve chosen your home EV charger, it’s time to map out your installation strategy. This crucial step ensures a smooth process, avoids potential hiccups, and keeps safety at the forefront.
So, let’s dive into the key aspects of planning your home EV charger installation.
Where to Install a Home EV Charger
If your garage, carport, or driveway is not accessible, convenient, and safe, and you are thinking of installing your home EV charger in another location, consider the following:
- Accessibility: Ensure your chosen spot allows easy access to your EV’s charging port, with enough cable length for maneuvering. Consider parking patterns and driveway layouts.
- Safety: Keep the charger away from flammable materials, water sources, and high-traffic areas. Adhere to local building codes and fire safety regulations.
- Weatherproofing: If installing outdoors, choose a weatherproof charger and ensure proper protection from rain, snow, and harsh sunlight.
- EV Charger electrical requirements: Check Electrical Capacity. The electrical requirements for a home EV charger typically include a dedicated circuit with sufficient amperage (32A or 40A for Level 2), compatible voltage (usually 240 volts for Level 2), and proper grounding. Check if your home’s electrical panel can support the additional load (usually 100A or 200A) and that the wiring meets local building codes. Consult with a certified electrician for assessment and recommendations.
Do I need a permit to install a home EV Charger?
Want to simplify the process?
- Contact Your Local Authority: Reach out to your local building department or electrical inspector to understand specific permit requirements in your area.
- Prepare for the permit application Process: Gather necessary documentation, including charger specifications, installation plans, and electrical diagrams, and submit them for review and approval.
- Seek professional Assistance: Hiring a licensed electrician often streamlines the permitting process, as they are familiar with local regulations and can handle the paperwork on your behalf.
DIY Residential EV Charger Installation Guide
This section provides a general overview of how we install our EV chargers, but remember, we are professionals. If you intend to install your home EV charger yourself, safety is paramount. Proceed with caution, ensure you possess the necessary skills and knowledge, and strictly adhere to safety regulations and the National Electrical Code (NEC).
Tools Required for Residential EV Charger Installation.
Before embarking on your DIY journey, assemble the necessary tools and materials:
- Safety Gear: Invest in personal protective equipment (PPE) like gloves, safety glasses, and arc flash suits for added protection.
- Electrical Tools: Ensure you have appropriate tools like wire strippers, crimpers, a voltage tester, and potentially a drill and saw, depending on your installation complexity.
- Charger-Specific Kit: Most Level 2 charger manufacturers offer DIY installation kits containing necessary cables, brackets, and hardware specific to their model.
How to Install Your Home EV Charger
Highlighted below are the general steps we take when installing home EV chargers, and specific steps may vary based on your chosen charger and electrical setup. Always consult your specific EV charger installation instructions and relevant safety guidelines.
Here are the generalized steps we take when installing a home EV Charger:
Prepare the Installation Site
Choose a suitable location, considering accessibility, safety, and weatherproofing (if applicable). Mark the mounting points and cable route.
Electric Car Charger Home Wiring Diagram
To help you plan your EV charger electrical processes, here are electric car charger home wiring diagrams for both plug-in and hardwired Level 2 EV charger installations, along with explanations for each component.
Plug-in EV Charger Wiring Diagram
The plug-in EV charger wiring diagram below illustrates how we install plug-in EV chargers.
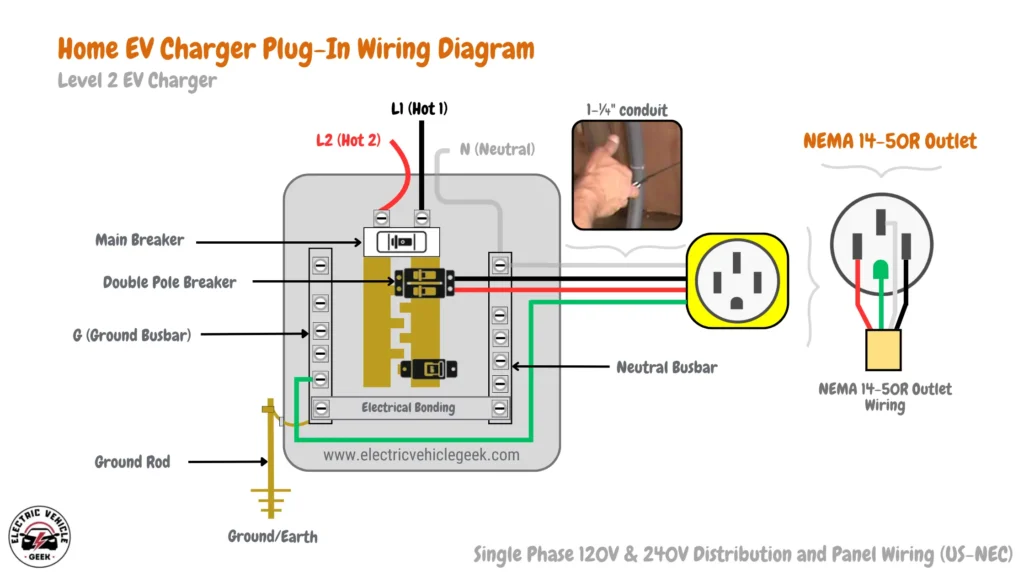
Plug-in EV Charger Installation Components:
Highlighted below are the components of a plug-in charger installation, as shown in the plug-in EV charger wiring diagram above:
- Single Phase Panel: Your residential electrical panel typically operates on a single phase with voltage ranging from 120 to 240 volts.
- Main Breaker: The primary circuit breaker in your home’s electrical panel.
- Dedicated Dual-Pole Breaker (Non-GFCI Two-Pole Circuit Breaker): A separate breaker dedicated solely to the EV charger circuit.
- Ground Bus: A central point where all grounding wires connect.
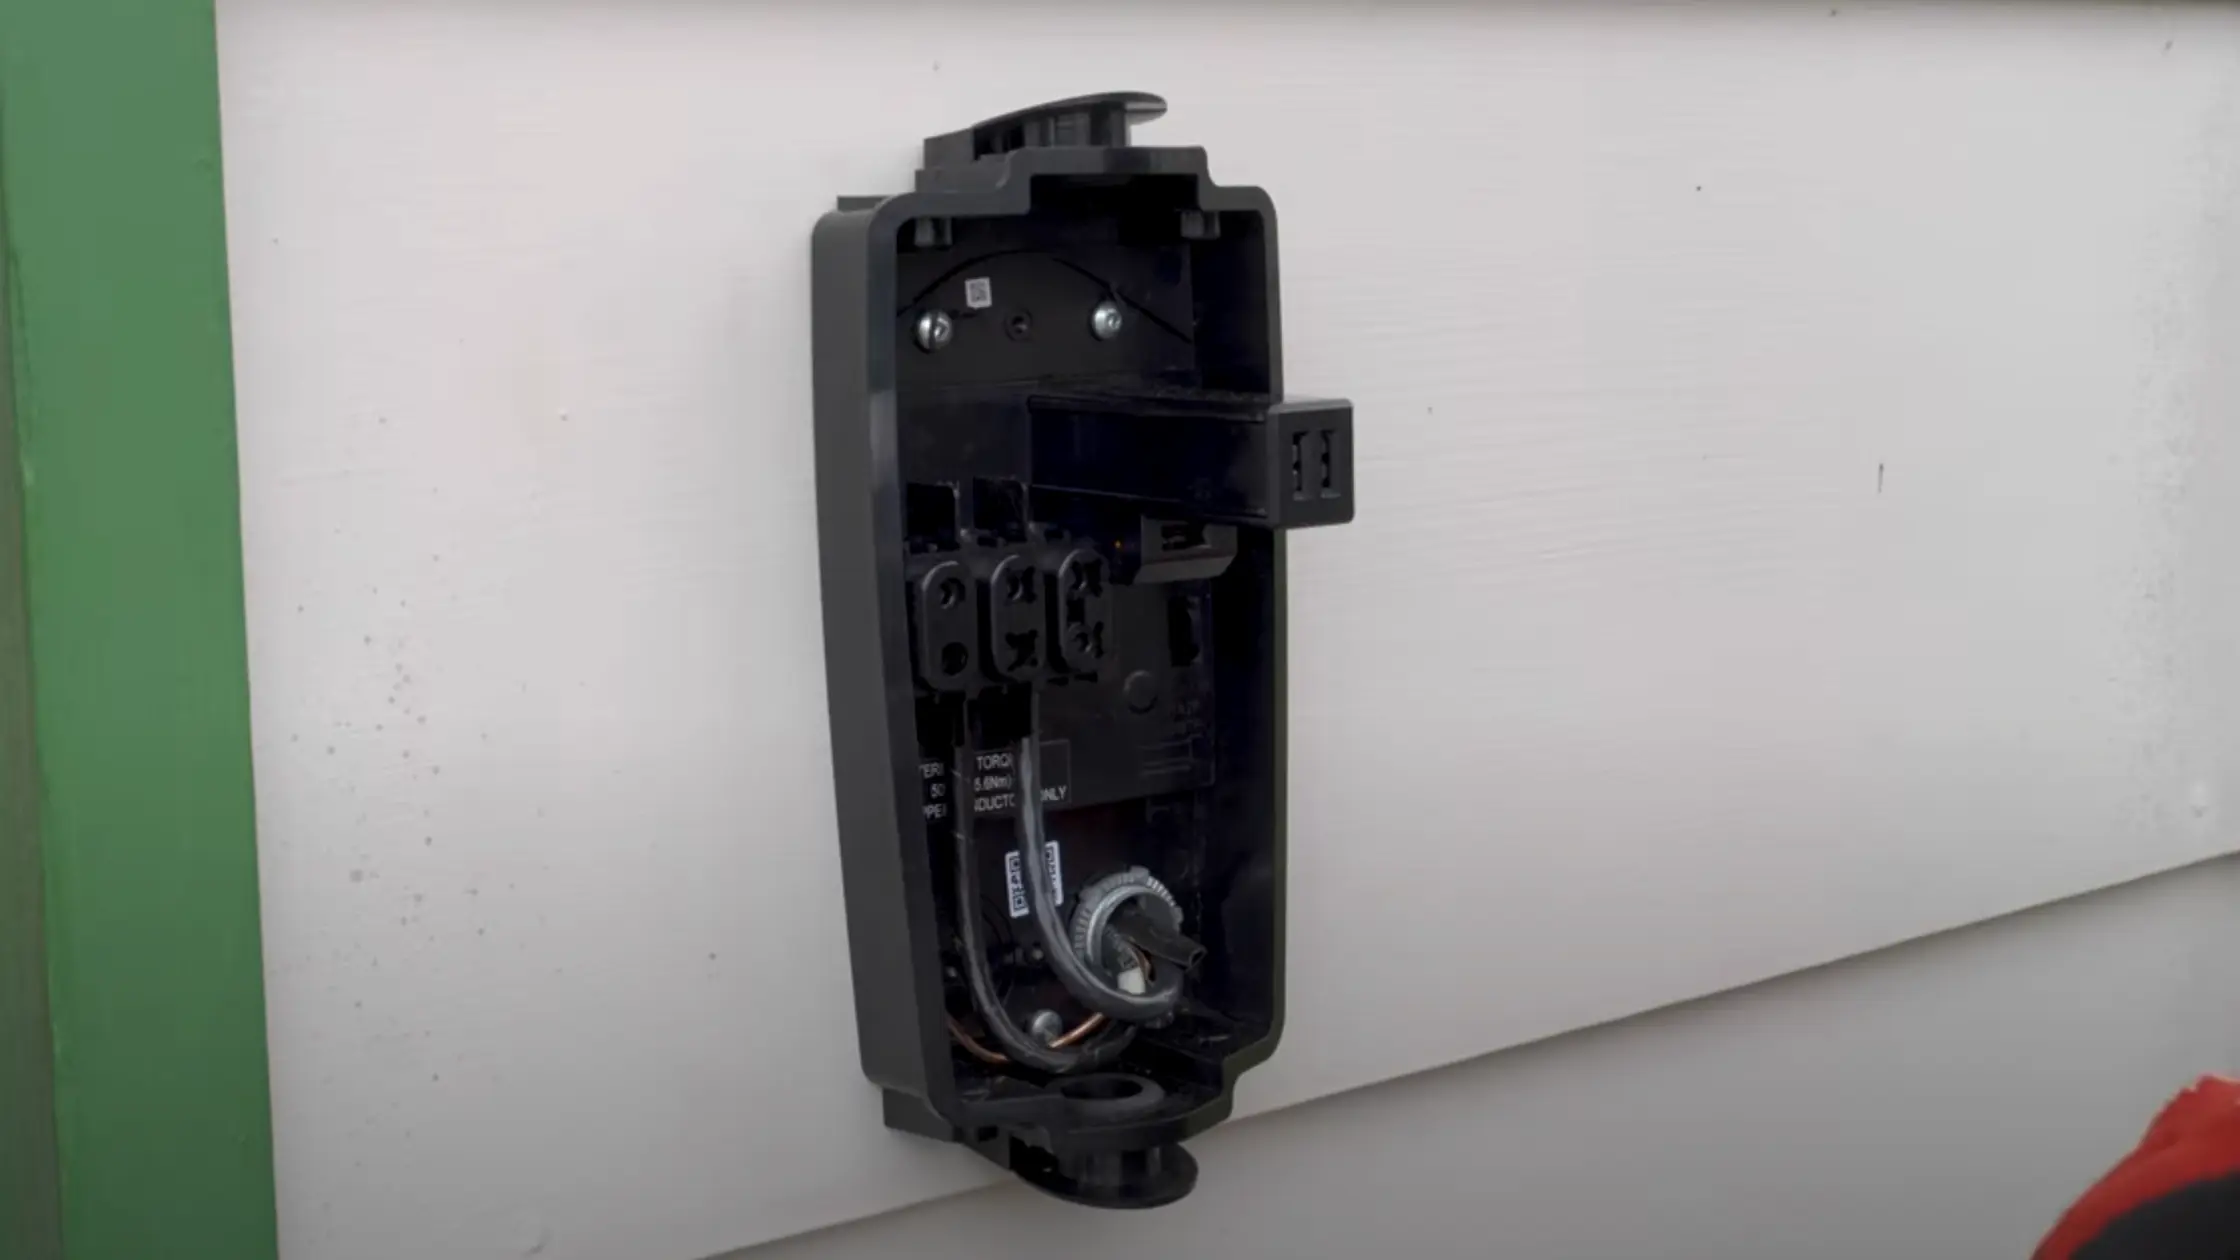
- NEMA 14-50R Receptacle Outlet: The standard outlet for plug-in EV chargers, providing 240 VAC.
- P1, P2, Ground/Earth: Terminals on the NEMA 14-50R outlet corresponding to hot (P1 & P2) and ground connections.
- 1-¼” Conduit: Conduit pipe protecting the wiring from physical damage and environmental factors.
How to Install a Plug-in EV Charger
As shown in the plug-in EV charger wiring diagram above:
- A dedicated dual-pole breaker is installed in your breaker panel, connected to the main breaker.
- The breaker connects to the ground bus with a grounding wire.
- A 1-¼” conduit runs from the breaker panel to the chosen location for the NEMA 14-50R outlet.
- Inside the conduit, three wires are routed: two hot wires (P1 & P2) and a ground wire.
- The conduit terminates at the NEMA 14-50R outlet, where the wires are connected to the corresponding P1, P2, and Ground/Earth terminals.
- The EV charger plugs directly into the NEMA 14-50R outlet, receiving 240 VAC for charging.
- We recommend installing the NEMA 14-50R outlet 20-26 inches from the ground for accessibility.
Plug-in EV Charger Safety Measures.
EV charging involves high-voltage electricity, increasing the potential for leakage and the risk of shock. RCDs provide crucial protection against this danger. Additionally, plug-in home EV chargers are often expensive and susceptible to damage from voltage spikes. SPDs offer an extra layer of security, ensuring the longevity and safety of your charging equipment.
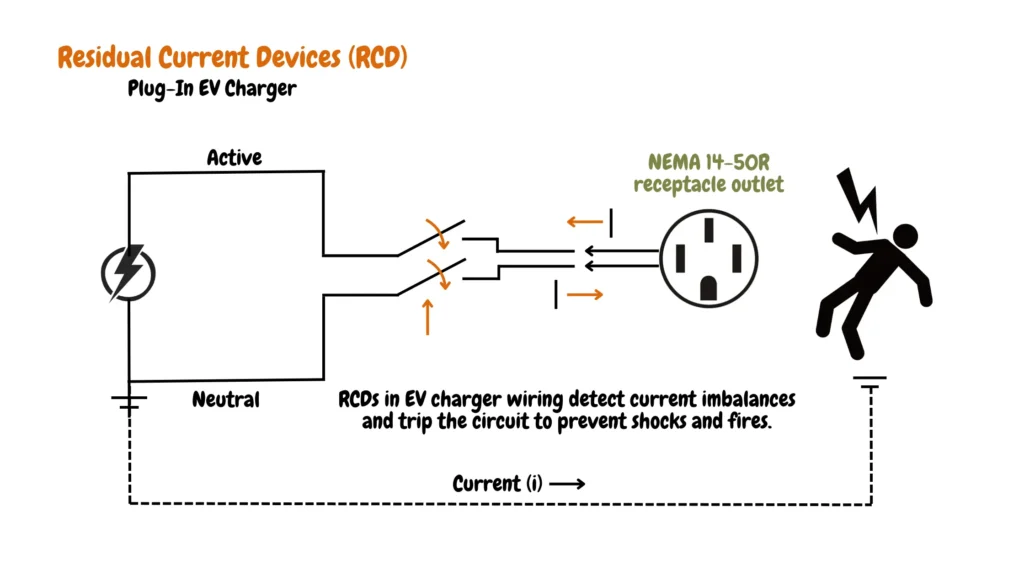
Residual Current Device (RCD) in Plug-in EV Charger Installation.
As shown in the Residual Current Devices (RCD) wiring diagram for EV chargers shown below, the RCD Detects imbalances in electrical current, and the RCD swiftly cuts power if a leak or shock hazard is detected, preventing potential injuries. Required for EV charging circuits, RCDs mitigate risks associated with high-voltage systems.
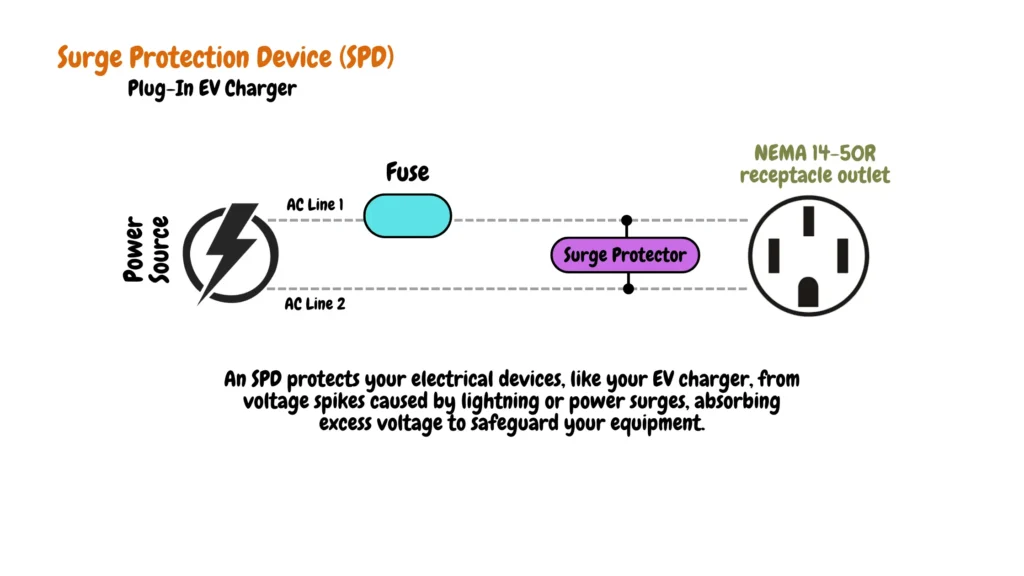
Surge Protection Device (SPD) in Plug-in EV Charger Installation.
We also recommend installing a surge protection device on your EV charger, as shown in the illustrative image below, to shield your EV charger and other electrical equipment from voltage spikes triggered by lightning or power surges. The SPD absorbs excess voltage, safeguarding sensitive electronics from damage.
Hardwired EV Charger Wiring Diagram
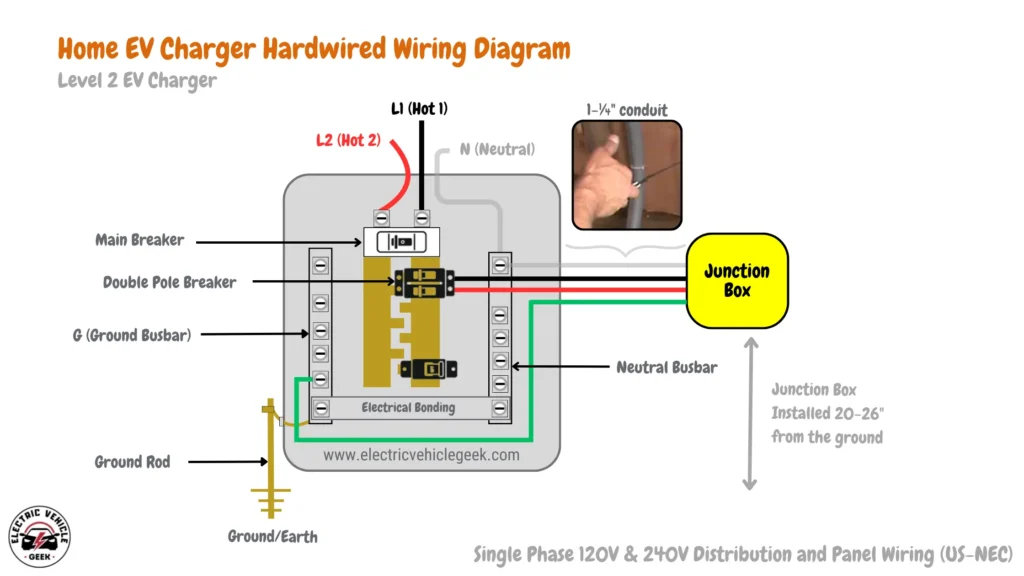
Hardwired EV Charger Wiring Components
- Single Phase Panel: Your home’s electrical panel, typically single-phase 120v/240v for residential use
- Main Breaker: The main circuit breaker in your home’s electrical panel.
- Dedicated Dual-Pole Breaker (Non-GFCI Two-Pole Circuit Breaker): A separate breaker dedicated solely to the EV charger circuit.
- Ground Bus: A central point where all grounding wires connect.
- Home EV Charger Terminal Block: The internal connection point for the charger’s wiring, where P1, P2, and Ground/Earth are connected. High-gauge wire (6 AWG Wire) suitable for handling the EV charger’s current, we recommend purchasing 90° C+ capable of handling the heat generated, typically wires that can handle 90° C+.
- 1-¼” Conduit: Same as the plug-in diagram.
- : Same as the plug-in diagram.
How to Install a Hardwired EV Charger
To install a hardwired EV charger as shown in the hardwired EV charger wiring diagram above, start by running a 1-¼” conduit from the breaker panel to your chosen location for the charger.
Inside the conduit, route three 6 AWG wires: two hot wires (P1 & P2) and a ground wire, all rated for 90°C or higher. Then, terminate the conduit at the EV charger’s terminal block, connecting the wires to the corresponding P1, P2, and Ground/Earth terminals.
Since it’s hardwired, the EV charger is directly connected to the circuit, bypassing the need for an outlet.
Hardwired EV Charger Safety Measures
When it comes to ensuring safety in hardwired EV charger installations, two critical components stand out: the Residual Current Device (RCD) and the EV Charger Surge Protection Device (SPD).
Residual Current Device (RCD) in Hardwired EV Charger Installations

The RCD plays a pivotal role in detecting minute imbalances in electrical current, promptly shutting off power to prevent potential leakage or shock hazards. With its rapid response time measured in milliseconds, the RCD acts as a crucial safeguard against serious injuries or fatalities. Its installation is mandatory for hardwired EV chargers due to the inherent risks associated with high-voltage systems.
Surge Protection Device (SPD) in Hardwired EV Charger Installations
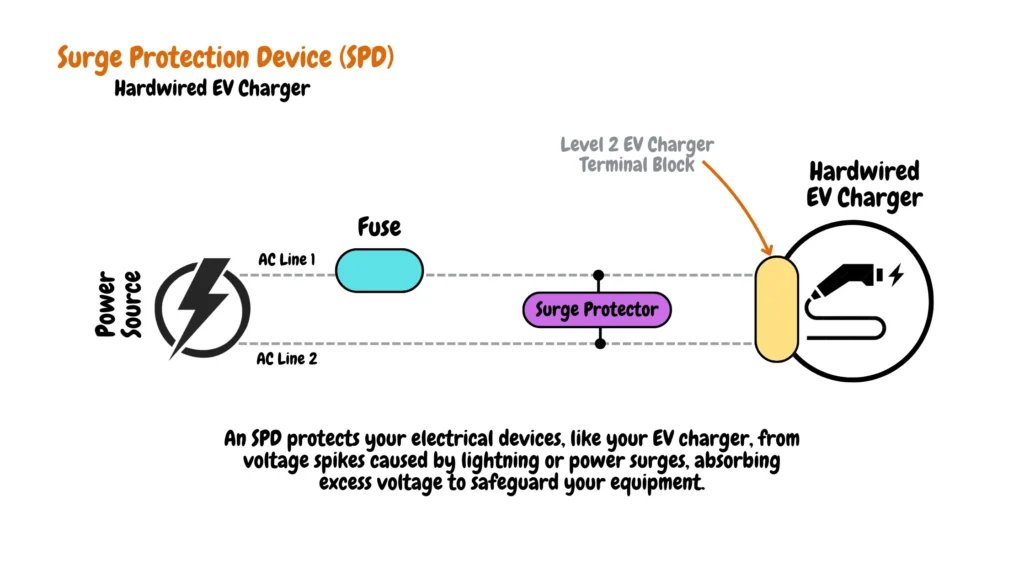
Complementing the RCD, the Surge Protection Device (SPD) provides essential defense against voltage spikes caused by lightning, power surges, or similar events. These spikes pose a significant threat to sensitive electronics, potentially resulting in costly damage or replacement. By serving as a sacrificial barrier and absorbing excess voltage, the SPD shields the EV charger and other valuable equipment, minimizing the risk of harm and ensuring continued operation.
Hiring a Certified Home EV Charger Installer
While the DIY approach can be rewarding for some, partnering with a qualified electrician offers several advantages for your home EV charger installation. This section highlights the benefits of professional installation and guides you on finding the right pro for the job.
Why Choose A Certified Home EV Charger Installation?
Opting for professional installation empowers you to reap the benefits of your home EV charger with complete peace of mind. Here’s why:
- Expertise and Experience: Licensed electricians possess the knowledge, skills, and experience to handle complex electrical work safely and efficiently. They stay updated on the latest regulations and ensure code compliance, minimizing potential risks.
- Safety First: Professional installers prioritize safety throughout the process. They use proper personal protective equipment, follow strict safety protocols, and conduct thorough testing to ensure your electrical system and home remain protected.
- Warranty and Support: Many professional installations come with warranties on both the work and the charger itself, offering valuable protection and peace of mind in case of unforeseen issues. Additionally, you’ll have access to expert support should you need assistance in the future.
- Time-Saving Convenience: Hiring a professional saves you valuable time and effort. They handle all aspects of the installation, from planning and permitting to wiring and final testing, leaving you free to focus on other priorities.
Finding the Right Certified Home EV Charger Installer
Now that you’re convinced of the benefits, it’s time to find the perfect electrician for your project. Here’s how:
- Ask for Recommendations: Seek referrals from friends, family, neighbors, or online communities who have recently installed home EV chargers. Positive word-of-mouth can be a great starting point.
- Check Qualifications and Credentials: Ensure the electrician is licensed and insured in your area. Verify they have experience with EV charger installations and familiarity with your specific charger model.
- Get Multiple Estimates: Compare quotes from different electricians to find one that offers competitive pricing and aligns with your budget and project needs.
- Ask Questions: Don’t hesitate to ask questions about the electrician’s experience, approach, timeline, and warranty terms. A transparent and communicative professional is key to building trust.
- Check Online Reviews: Look for online reviews and testimonials from past clients to gauge the electrician’s reputation and customer satisfaction.
Frequently Asked Questions.
Can I install my own EV charger at home?
Possible, but prioritize safety! Consult a qualified electrician if unsure.
Can you plug an EV directly into a 220V outlet?
No, use approved chargers for safety and optimal charging.
Should I install an EV charger at home?
Yes! Installing an EV charger at home offers convenience, cost savings, and ensures your EV is always ready for use.
How does an EV charger connect to your house?
An EV charger connects to your house through a dedicated circuit connected to the electrical panel.
Can a local electrician install an EV charger?
Yes, a qualified local electrician can install an EV charger, ensuring proper wiring and safety.
Can I install a fast EV charger at home?
Yes, fast EV chargers can be installed at home for quicker charging times.
What to consider when installing an EV charger?
Consider factors like location, electrical capacity, and permit requirements when installing an EV charger.
How much power does a home EV charger need?
Level 2 Home EV chargers typically require a 240V outlet, while Level 1 home EV chargers require a 120V outlet; both chargers require sufficient amperage depending on the charger’s specifications.
How much does it cost to install an EV charger?
EV charger installation costs vary based on factors like charger type, wiring requirements, and labor, typically ranging from $500 to $2500.
Can I have 2 EV chargers?
Yes, you can have multiple EV chargers installed at home to accommodate multiple vehicles or charging needs. We recommend considering EV chargers that support dual EV charging to save on hardware and installation costs

James Ndungu is a certified EV charger installer with over five years of experience in EVSE selection, permitting, and installation. He holds advanced credentials, including certification from the Electric Vehicle Infrastructure Training Program (EVITP) and specialized training in EV charging equipment and installation, as well as diplomas in EV Technology and Engineering Fundamentals of EVs. Since 2021, James has tested dozens of EV chargers and accessories, sharing expert insights into the latest EV charging technologies.