Tesla Gen 3 Wall Connector Review

The latest Tesla Wall Connector adds smart features and now supports non-Tesla EVs. It offers fast, reliable charging, up to 44 miles of range per hour, with a 24-ft cable, app control, over-the-air updates, indoor/outdoor use, and a 4-year residential warranty. But is it worth it?
This is our expert review of the Tesla Gen 3 Wall Connector, Tesla’s flagship Level 2 charging solution for homes, apartments, hospitality properties, and workplaces in 2026.
I’m a certified EV charger installer with over 5 years of experience in EVSE selection, permitting, and installation, and I’ve been regularly testing EV chargers and accessories since 2021.
As of 2026, the Tesla Wall Connector (Gen 3) remains the premier choice for Tesla-only households, offering a streamlined, highly reliable charging experience with its native NACS plug at a more affordable price. In contrast, the Universal Wall Connector caters to multi-brand EV owners by supporting advanced features such as bidirectional charging and broader compatibility across EV makes, positioning it as a more versatile but costlier option.
We’ve been closely monitoring Tesla Wall Connector firmware updates over the past year. Tesla has released numerous updates addressing charging reliability, connectivity, power management, and compatibility issues. Notable releases in late 2025 resolved scheduling and power-sharing bugs affecting some multi-charger installations, while the current 26.2.x firmware branch focuses on improving network reliability. The latest updates (26.2.0 and 26.2.1) fix a long-standing issue that prevented reliable Wi-Fi auto-negotiation on routers using WPA3 encryption, helping ensure more stable connectivity for remote monitoring and management features.
The updates also improved integration with Powerwall 3, especially for solar-only charging logic, and introduced Managed Charging via Powerwall to precisely match charging output with utility rate plans. Early in the year, Tesla added WPA3 Wi-Fi support, significantly improving connectivity with modern mesh networks, though some versions around 25.34.x briefly introduced WPA3-related incompatibilities and “Red Ring” errors, which were addressed in later patches.
Other enhancements included better third-party vehicle via “Guaranteed Charge” integration, Net Energy Metering (NEM) performance improvements, and early signs of OCPP (Open Charge Point Protocol), indicating broader future compatibility. Stability releases fixed minor issues, such as “clicking” sounds caused by the contactor cycling in some Gen 3 units when the unit is idle.
Together, these updates reflect Tesla’s ongoing commitment to refining charging reliability, smart energy management, and network stability across its Wall Connector lineup.
A new Charging Compatibility Mode was also introduced in late 2025 to help prevent handshake errors when using adapters for non-Tesla EVs, ensuring smoother charging for non-Tesla vehicles like the Rivian R1S and Ford F-150 Lightning.
Security was significantly enhanced following the 2025 Pwn2Own hacking contest. To prevent EV charger hacking, Tesla implemented a hardware-level anti-downgrade mechanism to block firmware rollback attacks and patched a remote code execution vulnerability, protecting your home network from potential lateral threats.
We recommend the Tesla Wall Connector in 2026. Despite widespread supply chain challenges in 2025, it has maintained stable pricing compared to competing NACS chargers, making it one of the most affordable and reliable Tesla chargers on the market, backed by a 4-year warranty.
For Tesla owners, the Tesla Wall Connector offers the best value in 2026, combining fast charging, robust app integration, enhanced security, and network reliability in a compact, cost-effective package.
The Wall Connector is compatible with all Tesla vehicles, including the Model S, Model 3, Model X, and Model Y. It also supports non-Tesla EVs with the NACS (North American Charging Standard) plug. If your EV has a J1772 charging inlet, you can charge it using a Tesla-to-J1772 adapter. This wide compatibility makes the Tesla Wall Connector a flexible choice for households or businesses with a mix of electric vehicles.
The Tesla Gen 3 Wall Connector delivers adjustable charging speeds from 12 to 48 amps, allowing you to match the output to your home’s electrical system for safe, efficient charging. While it’s less powerful than the older Gen 2 model (which reached up to 80 amps), it still delivers plenty of charging speed for daily use.
Similar to the Tesla Universal Wall Connector, the Tesla Gen 3 Wall Connector can add up to 44 miles of range per hour, far outpacing the Tesla Mobile Connector, which adds about 3 miles per hour.
For road trips, Superchargers can deliver around 200 miles of range in just 15 minutes, while Destination Chargers offer performance similar to the Wall Connector but are typically found at hotels and other public locations. Overall, the Gen 3 Wall Connector remains the best choice for fast, reliable home charging with Tesla-level quality and safety.
Key Features of the Tesla Wall Connector Gen 3
Below are the key features that make the Tesla Wall Connector Gen 3 a standout home EV charging solution.
- Adds up to 44 miles of range per hour with 11.5 kW (48-amp) output
- Auto-sensing charge handle opens the Tesla charge port with one touch
- Tesla app integration for remote monitoring, scheduling, and usage tracking
- Wi-Fi connectivity enables over-the-air updates, remote diagnostics, and access control
- Durable indoor/outdoor-rated enclosure for flexible installation
- Power Management features help reduce installation costs and optimize charging speed
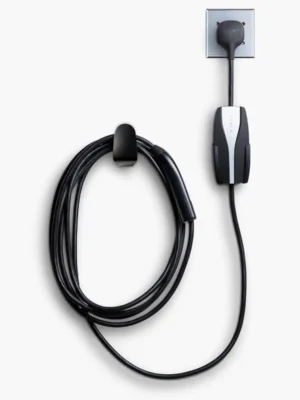
- Extra-long 24-foot charging cable for maximum reach
- Backed by a 4-year residential warranty
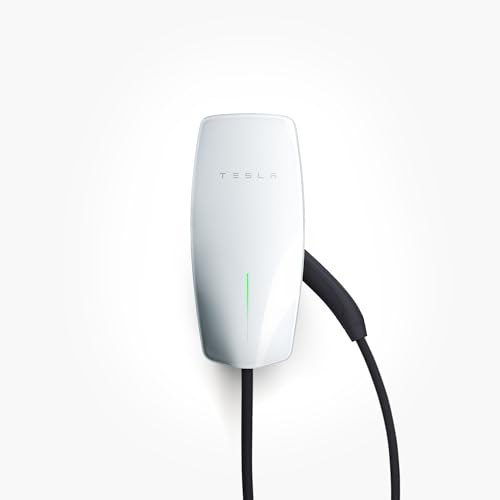
I had mine installed in under an hour. The 24-foot cable reaches easily, whether I park head-in or back-in. It’s mounted outdoors at a residential property in Los Angeles, where winters are short and mild (48°F to 68°F) and summers are hot, dry, and sunny (64°F to 84°F). Due to the hot sun and seasonal coastal moisture in Los Angeles, I loop the cable over a mounted pool noodle to prevent stress points and keep it off the ground. After two years, there are no signs of kinks, cracks, or UV- or weather-related wear on the cable insulation or connector. Compared to the Tesla Mobile Connector, which delivers only about 3-4 miles of range per hour on a standard 120V outlet, the Wall Connector provides up to 44 miles of range per hour. I rarely use public EV chargers anymore.
One of the best features of the Tesla Wall Connector is its built-in Wi-Fi, which adds smart functionality like remote monitoring, firmware updates, and power sharing, all through the same Tesla app you already use to manage your vehicle. This tight integration gives it an edge over most third-party NACS chargers, which often offer only basic functionality. With the Wall Connector, you can view real-time charging status, review detailed usage history, and control multiple chargers on the same circuit right from your phone.
However, the setup process isn’t always seamless. During installation, I ran into a frustrating Tesla Wall CWi-Fitor Wi-Fi issue that isn’t well known: my iPhone couldn’t connect to the charger’s Wi-Fi network. After some trial and error, I found that my iPhone’s “Private Wi-Fi Address” setting was interfering with the connection. Turning off that feature allowed me to manually join the Tesla Wall Connector’s setup network and continue with commissioning, something Tesla doesn’t mention in their instructions.
Another common issue users face is related to Wi-Fi compatibility. Tesla Wall Connectors primarily support 2.4 GHz networks and may not connect properly to 5 GHz networks or routers that use WPA3 security. Just be careful if you upgrade to a modern router; many newer models default to 5 GHz or WPA3, which can cause connection failures. To avoid setup issues, make sure your router is broadcasting a 2.4 GHz signal with WPA2 encryption enabled.
Once the setup was complete, the Wall Connector maintained a stable connection in the background. Even when my internet connection goes down, charging continues uninterrupted, since Wi-Fi is only used for updates and diagnostics. Everything has stayed up to date without me having to do a thing; Tesla handles firmware updates automatically over Wi-Fi. The smart features make charging more convenient, but I wish I had known about a few setup quirks in advance. It would’ve saved me a lot of trial and error.
When we were shopping for a Tesla EV charger for our Los Angeles home, we wanted one with key EV charger safety features built in, mainly to avoid adding extra protective devices to our already crowded electrical panel. The Tesla Wall Connector checked most of the boxes. Its safety features include built-in access control, thermal monitoring, load management to prevent circuit overloads, and integrated GFCI protection, which meant we didn’t need a separate GFCI breaker since ours is hardwired. However, we installed a dedicated EV charger circuit breaker (per NEC 625.42) to protect the EV charger branch circuit. It’s also worth noting that the Wall Connector supports automatic Wi-Fi firmware updates to keep its safety and security features up to date.
One of our main concerns was electrical stability: before installing the Tesla Wall Connector, we’d occasionally see a 40 kA spike on L2 in our panel, so we knew a whole-home surge protection device (SPD) was necessary, regardless of the charger’s built-in safety features. While the Tesla Wall Connector includes some internal surge protection to suppress small voltage fluctuations during normal use, Tesla doesn’t publish specs on its effectiveness, and it’s not rated to handle major surges from lightning, utility-side faults, or grid switching. That’s why we installed a dedicated SPD at the panel for true surge defense.
Commercial Application
The Tesla Gen 3 Wall Connector combines high power output, scalable fleet deployment, and smart energy management to deliver one of the best EV chargers for small businesses. Its integration with the Tesla Ecosystem, including Tesla Powerwall 3 and solar, flexible access control, and potential for revenue generation, makes it an ideal choice for businesses seeking a cost-effective, reliable, and future-ready Level 2 solution.
Best Tesla Cybertruck EV Charger
For Tesla Cybertruck owners, the Tesla Universal Wall Connector is the best NAC charger you should consider. This advanced version of the Tesla Wall Connector offers bi-directional charging, future-proofing your installation by enabling not only efficient charging of your Cybertruck but also the possibility to discharge power back to the grid or your home. With this feature, you can maximize your EV’s energy storage, enhancing both sustainability and flexibility.
The Universal Wall Connector maintains all the benefits of the Tesla Wall Connector Gen 3, including fast charging speeds and customizable amperage, while also ensuring your setup is ready for emerging EV charging technologies. It’s the perfect solution for those who want to stay ahead of the curve while enjoying a seamless, efficient charging experience with their Tesla Cybertruck.
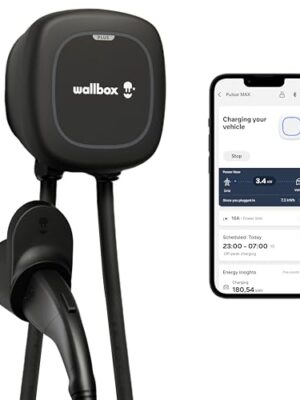
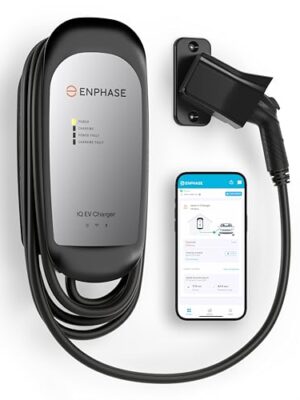
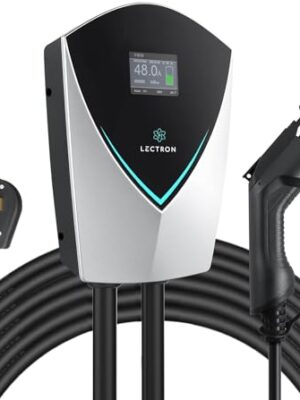
Tesla Gen 3 Wall Connector Versus Other NACS Chargers
The following chart compares key specifications (charging power, weight, operating temperature range, cable length, and warranty) of the Tesla Gen 3 Wall Connector with other EV chargers using the same NACS connector type (direct competitors).
Tesla Wall Connector Installation (Hardwired Wiring Diagrams)
The Tesla Wall Connector Hardwired Wiring Diagrams below provide a detailed guide for installing the Tesla Wall Connector at various amperage levels, including the 12 Amp, 16 Amp, 24 Amp, 32 Amp, 40 Amp, and 48 Amp EV Charger configurations. These diagrams outline the appropriate wire sizes (Tesla Wall Connector terminal blocks support 12-4 AWG copper wire), circuit breaker recommendations, and conduit recommendations for each amperage setting to ensure optimal performance and safety.
We’ve installed EV chargers across the state, and one thing we’ve learned firsthand is that inspection requirements can vary. Some inspectors still require 4 AWG solid copper or 3 AWG aluminum wire, even if your Tesla Wall Connector is set to a lower amperage in the app. In contrast, others allow smaller conductors if the circuit breaker and wire size are properly matched to the configured amperage. The discrepancy often comes down to whether local code officials require wiring to support the charger’s maximum rated output, regardless of its adjustable amperage settings.

Inside the Tesla Gen 3 Wall Connector wirebox during installation, showing high-voltage wiring and grounding connections before the main unit is attached.
It’s a common oversight we’ve seen, especially with adjustable-amperage EV chargers like the Tesla Wall Connector. To avoid inspection delays or costly rework, we always recommend hiring a local, licensed electrician or a local certified EV charger installer. They’ll ensure your wire gauge complies with local code requirements and is properly matched to your breaker size, wire run length, and installation conditions, so your setup passes inspection the first time.
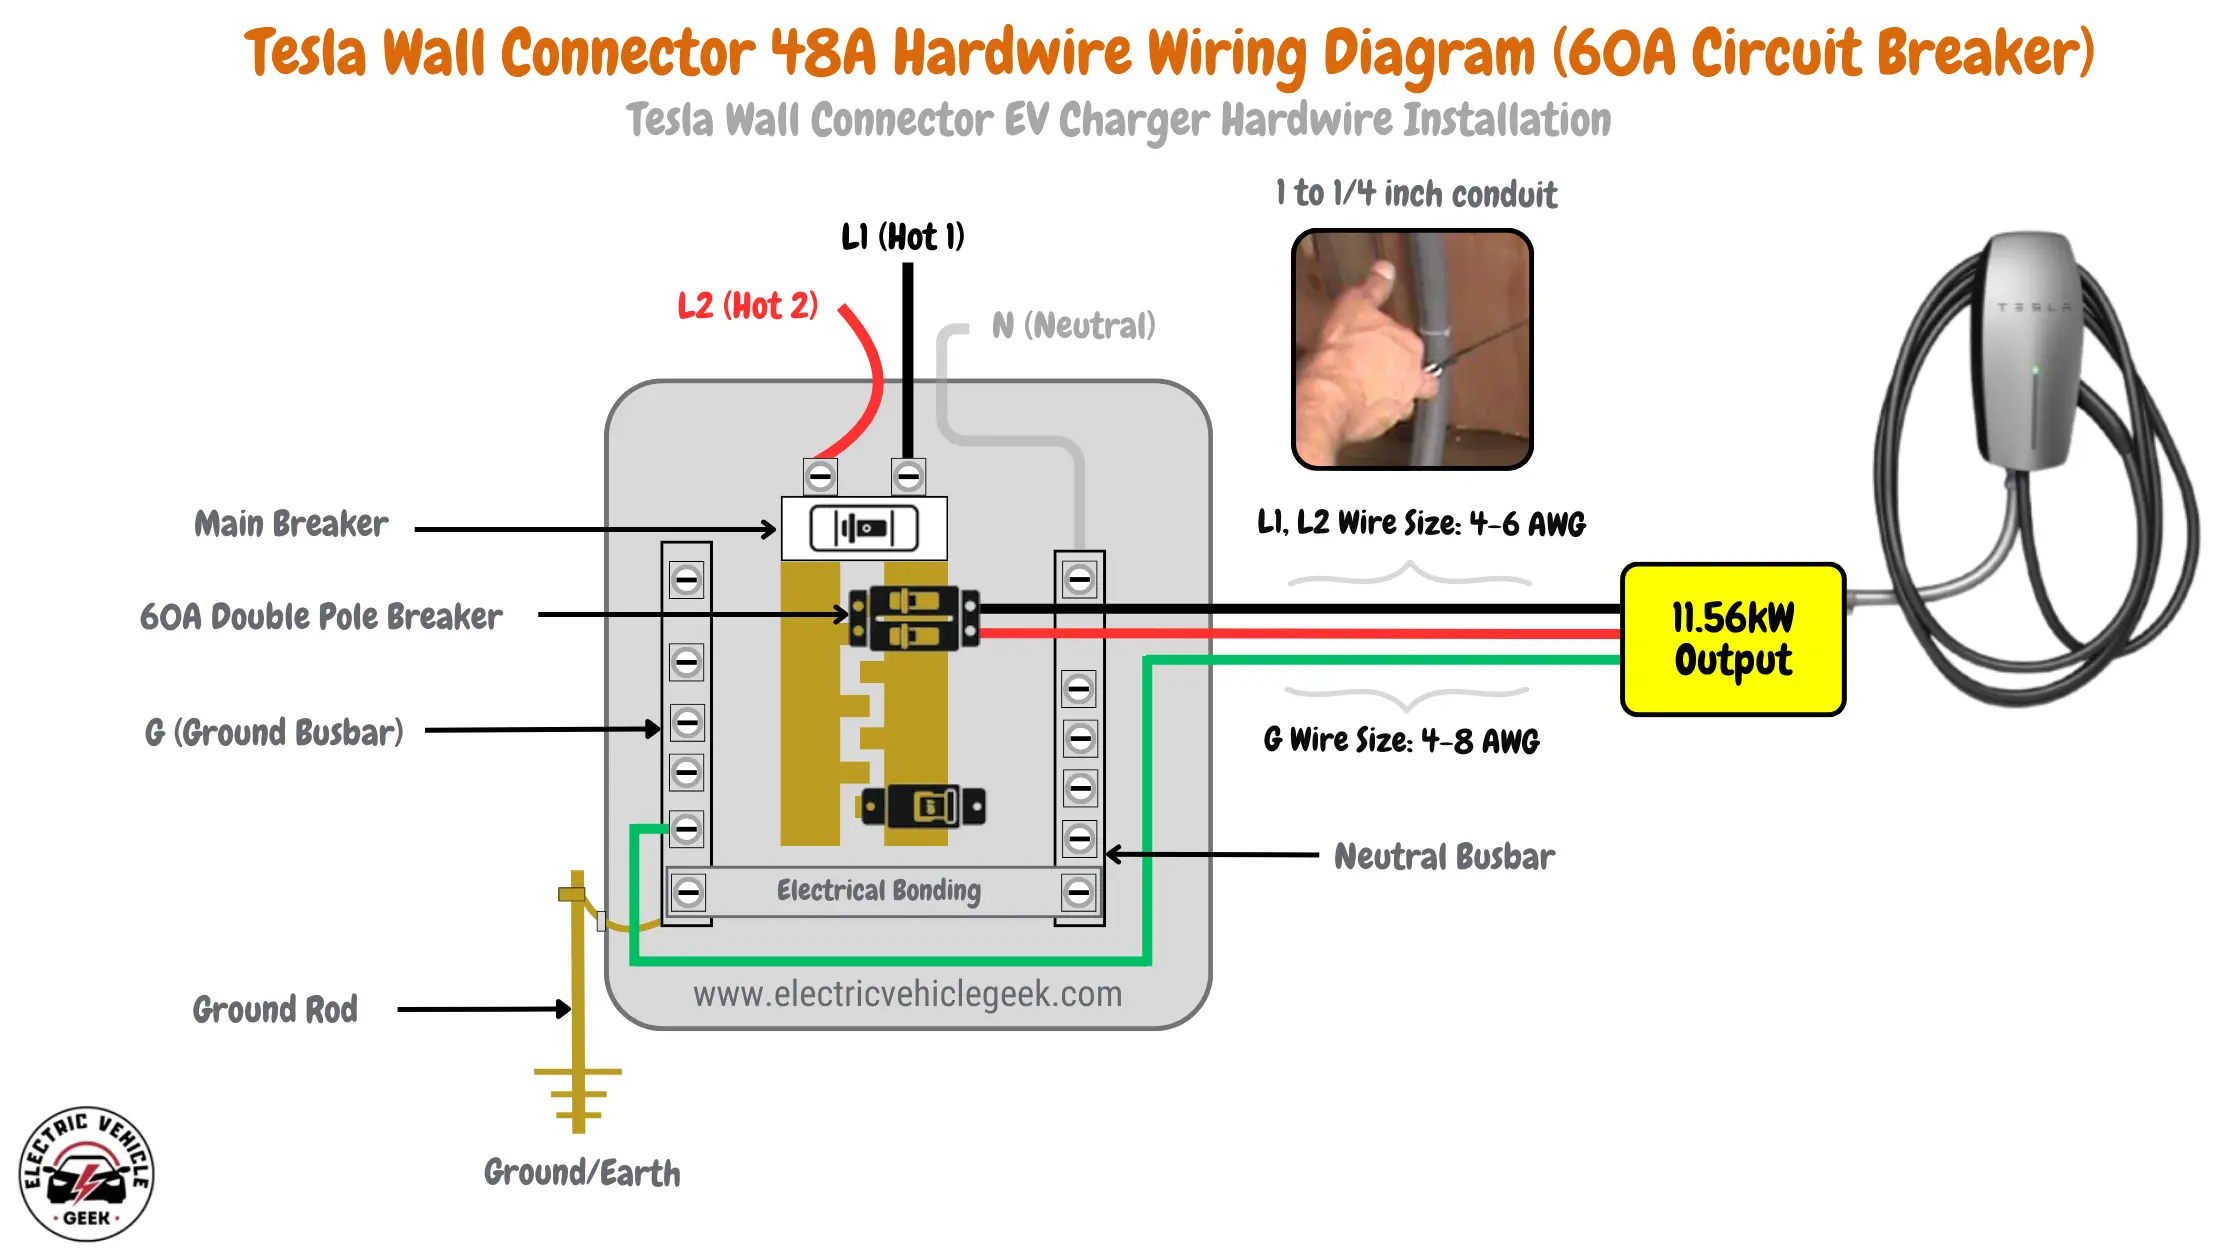
48A Hardwire Wiring Diagram (60A Circuit Breaker)
The following diagram outlines the installation of a Tesla Wall Connector at 48 amps. To achieve a maximum output of 48 amps, use 4-6 AWG wires for L1 and L2, and 4-8 AWG for the ground (G). A 60A circuit breaker ensures safe operation. This setup provides a charging output of 11.56 kW. The recommended conduit size for wire protection is 1 to 1 1/4 inches.
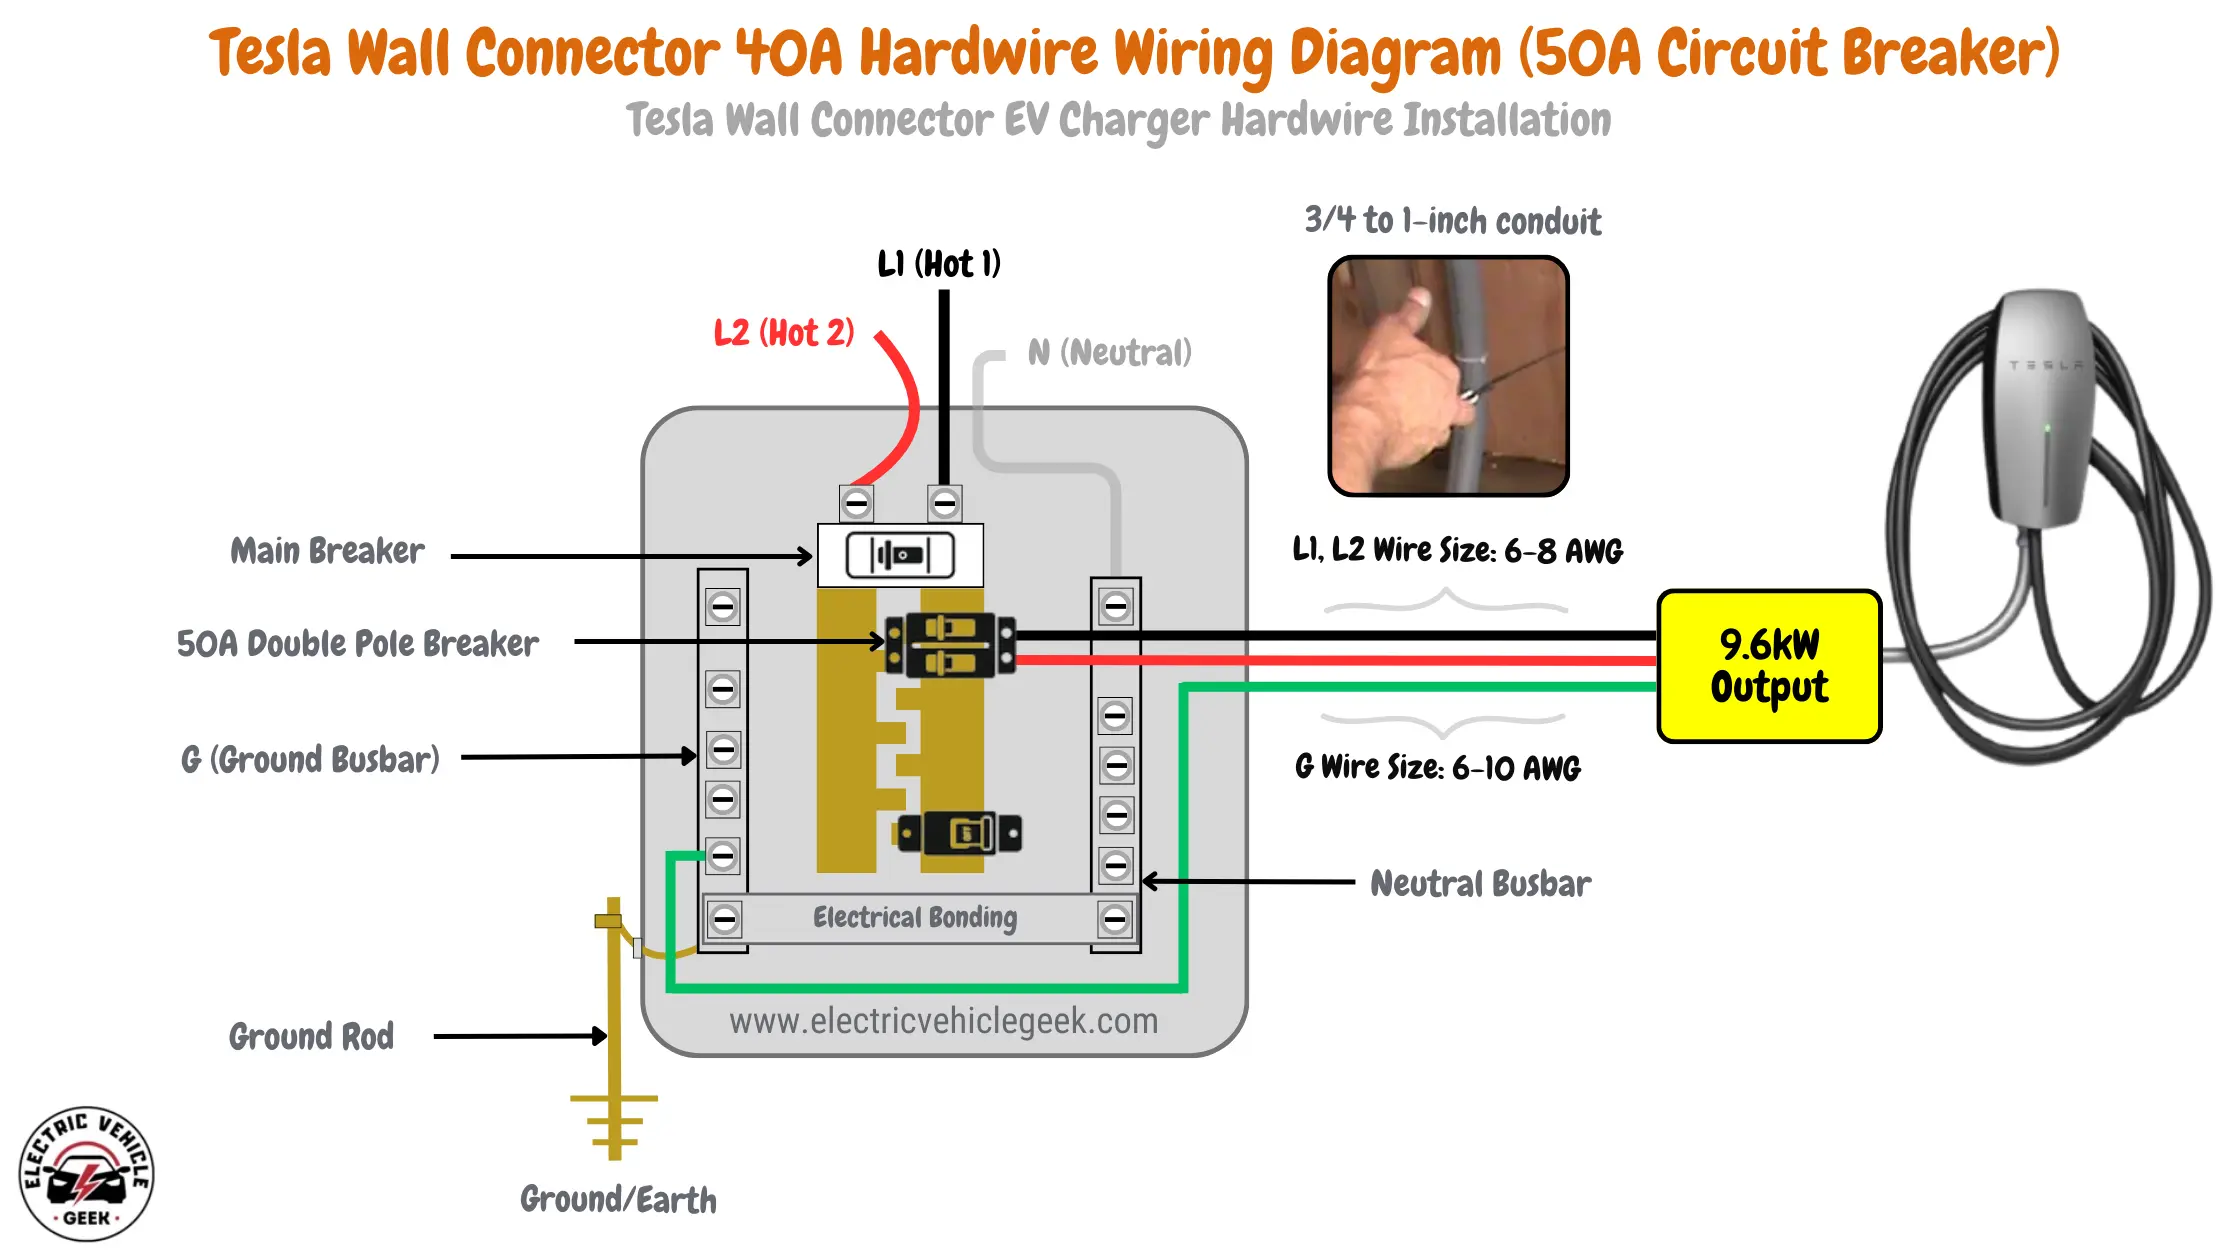
40A Hardwire Wiring Diagram (50A Circuit Breaker)
For a maximum output of 40A, the Tesla Wall Connector uses 6-8 AWG wires for L1 and L2, and 6-10 AWG wires for the ground (G). The system requires a 50A circuit breaker for proper protection. This setup provides a charging output of 9.6 kW. For wire protection, the conduit size should be between 3/4 and 1 inch.
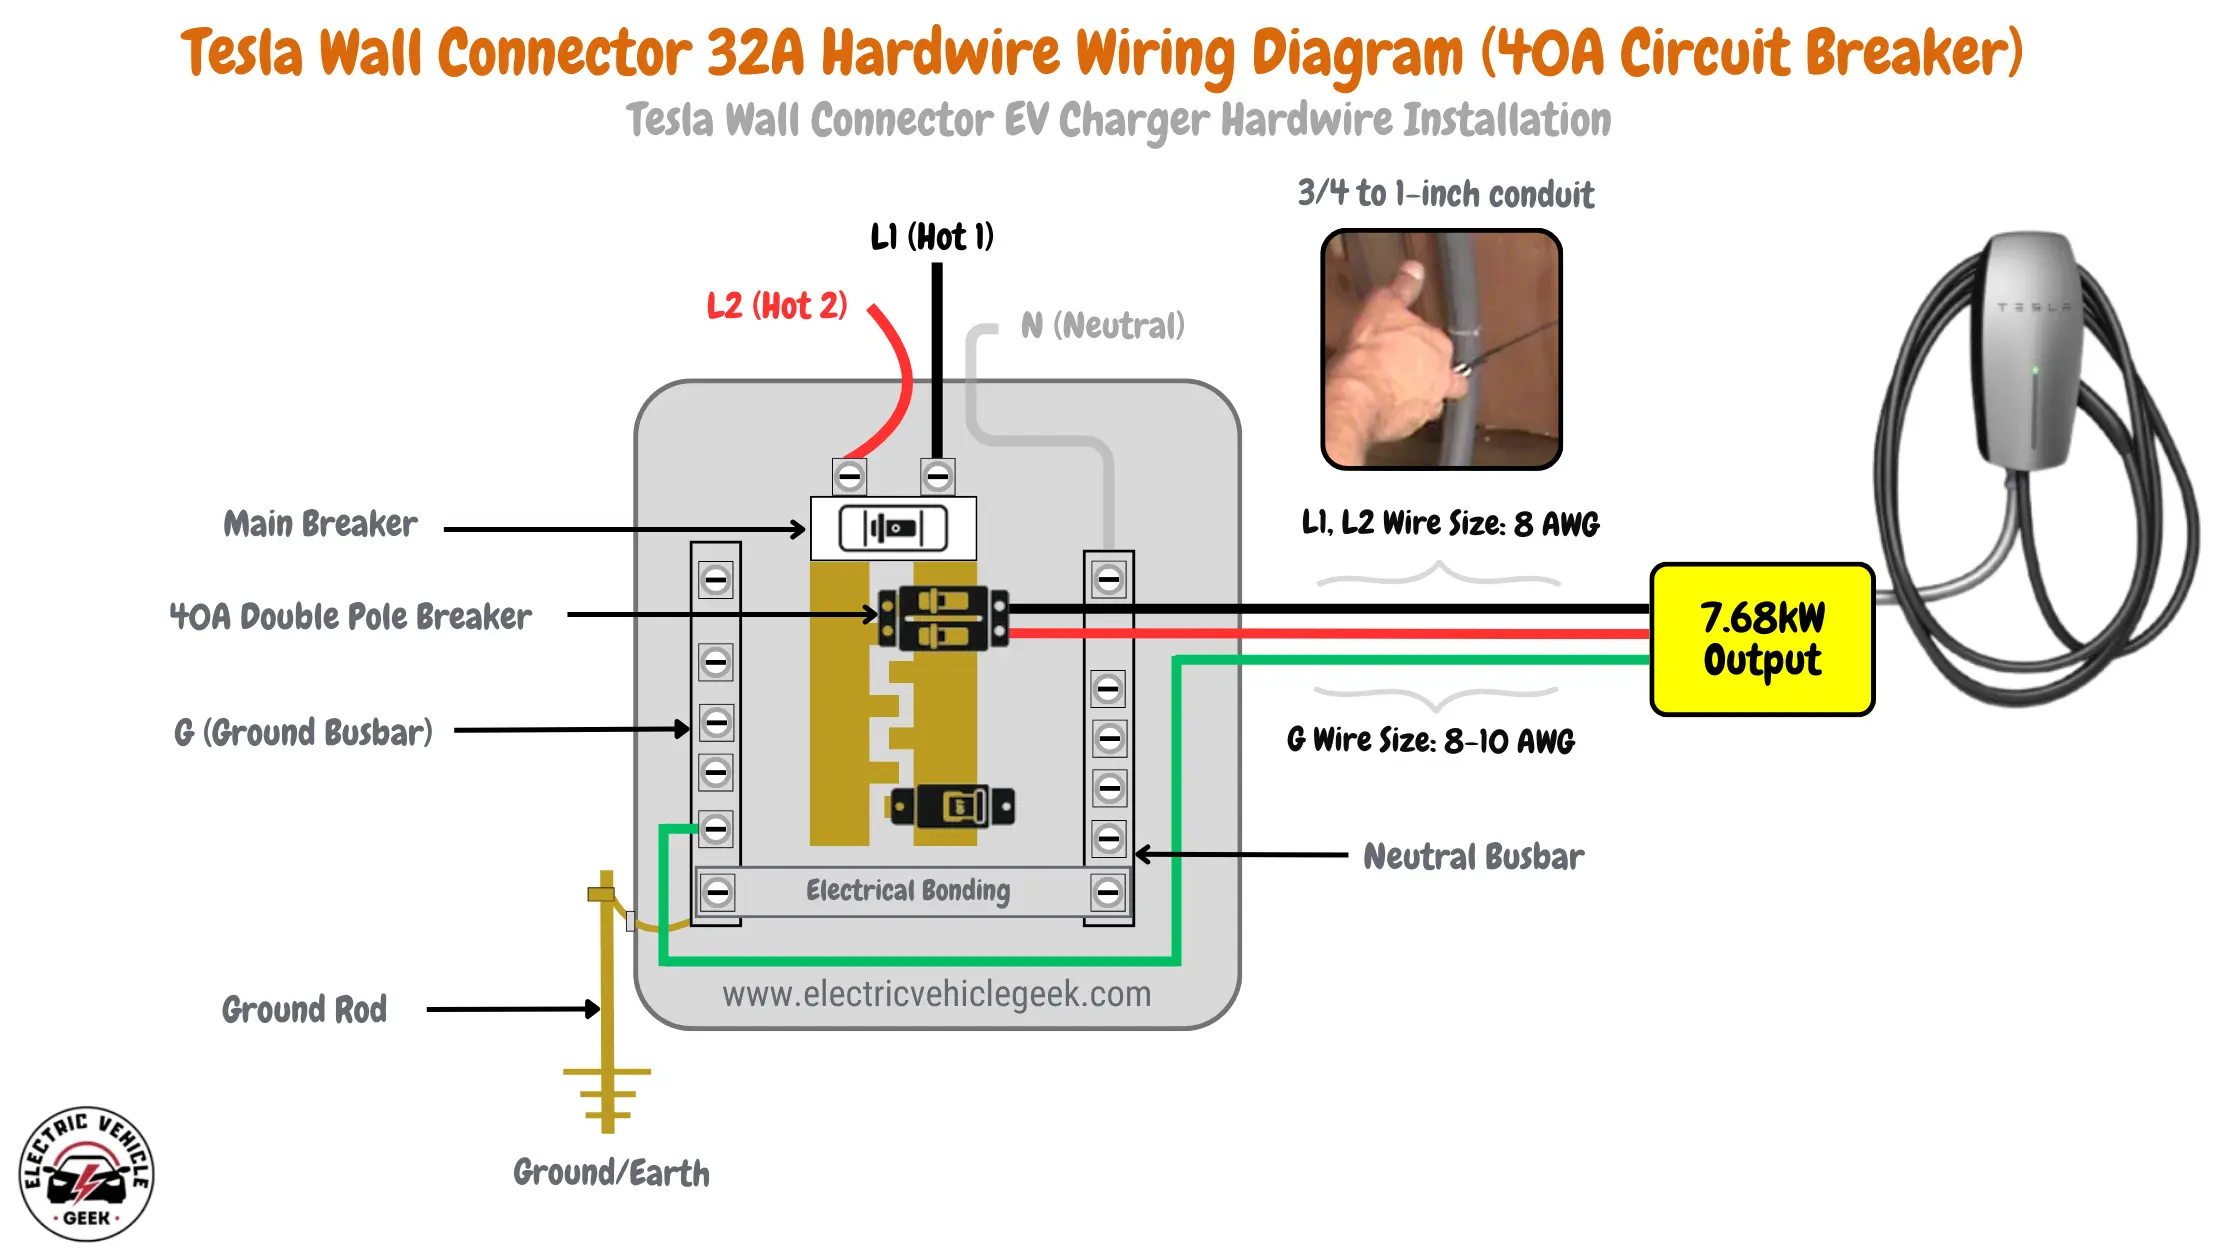
32A Hardwire Wiring Diagram (40A Circuit Breaker)
To achieve a maximum output of 32A, the Tesla Wall Connector should be installed using 8 AWG wires for L1 and L2, and 8-10 AWG for the ground (G). A 40A double-pole circuit breaker is required, providing a charging output of 7.68 kW. The recommended conduit size is between 3/4 and 1 inch.
24A Hardwire Wiring Diagram (30A Circuit Breaker)
For a maximum output of 24A, the installation requires 10 AWG wires for L1 and L2, and 10-12 AWG for the ground (G). A 30A circuit breaker ensures safe operation and provides a charging output of 5.76 kW. The conduit size should be 1/2 to 1 inch.

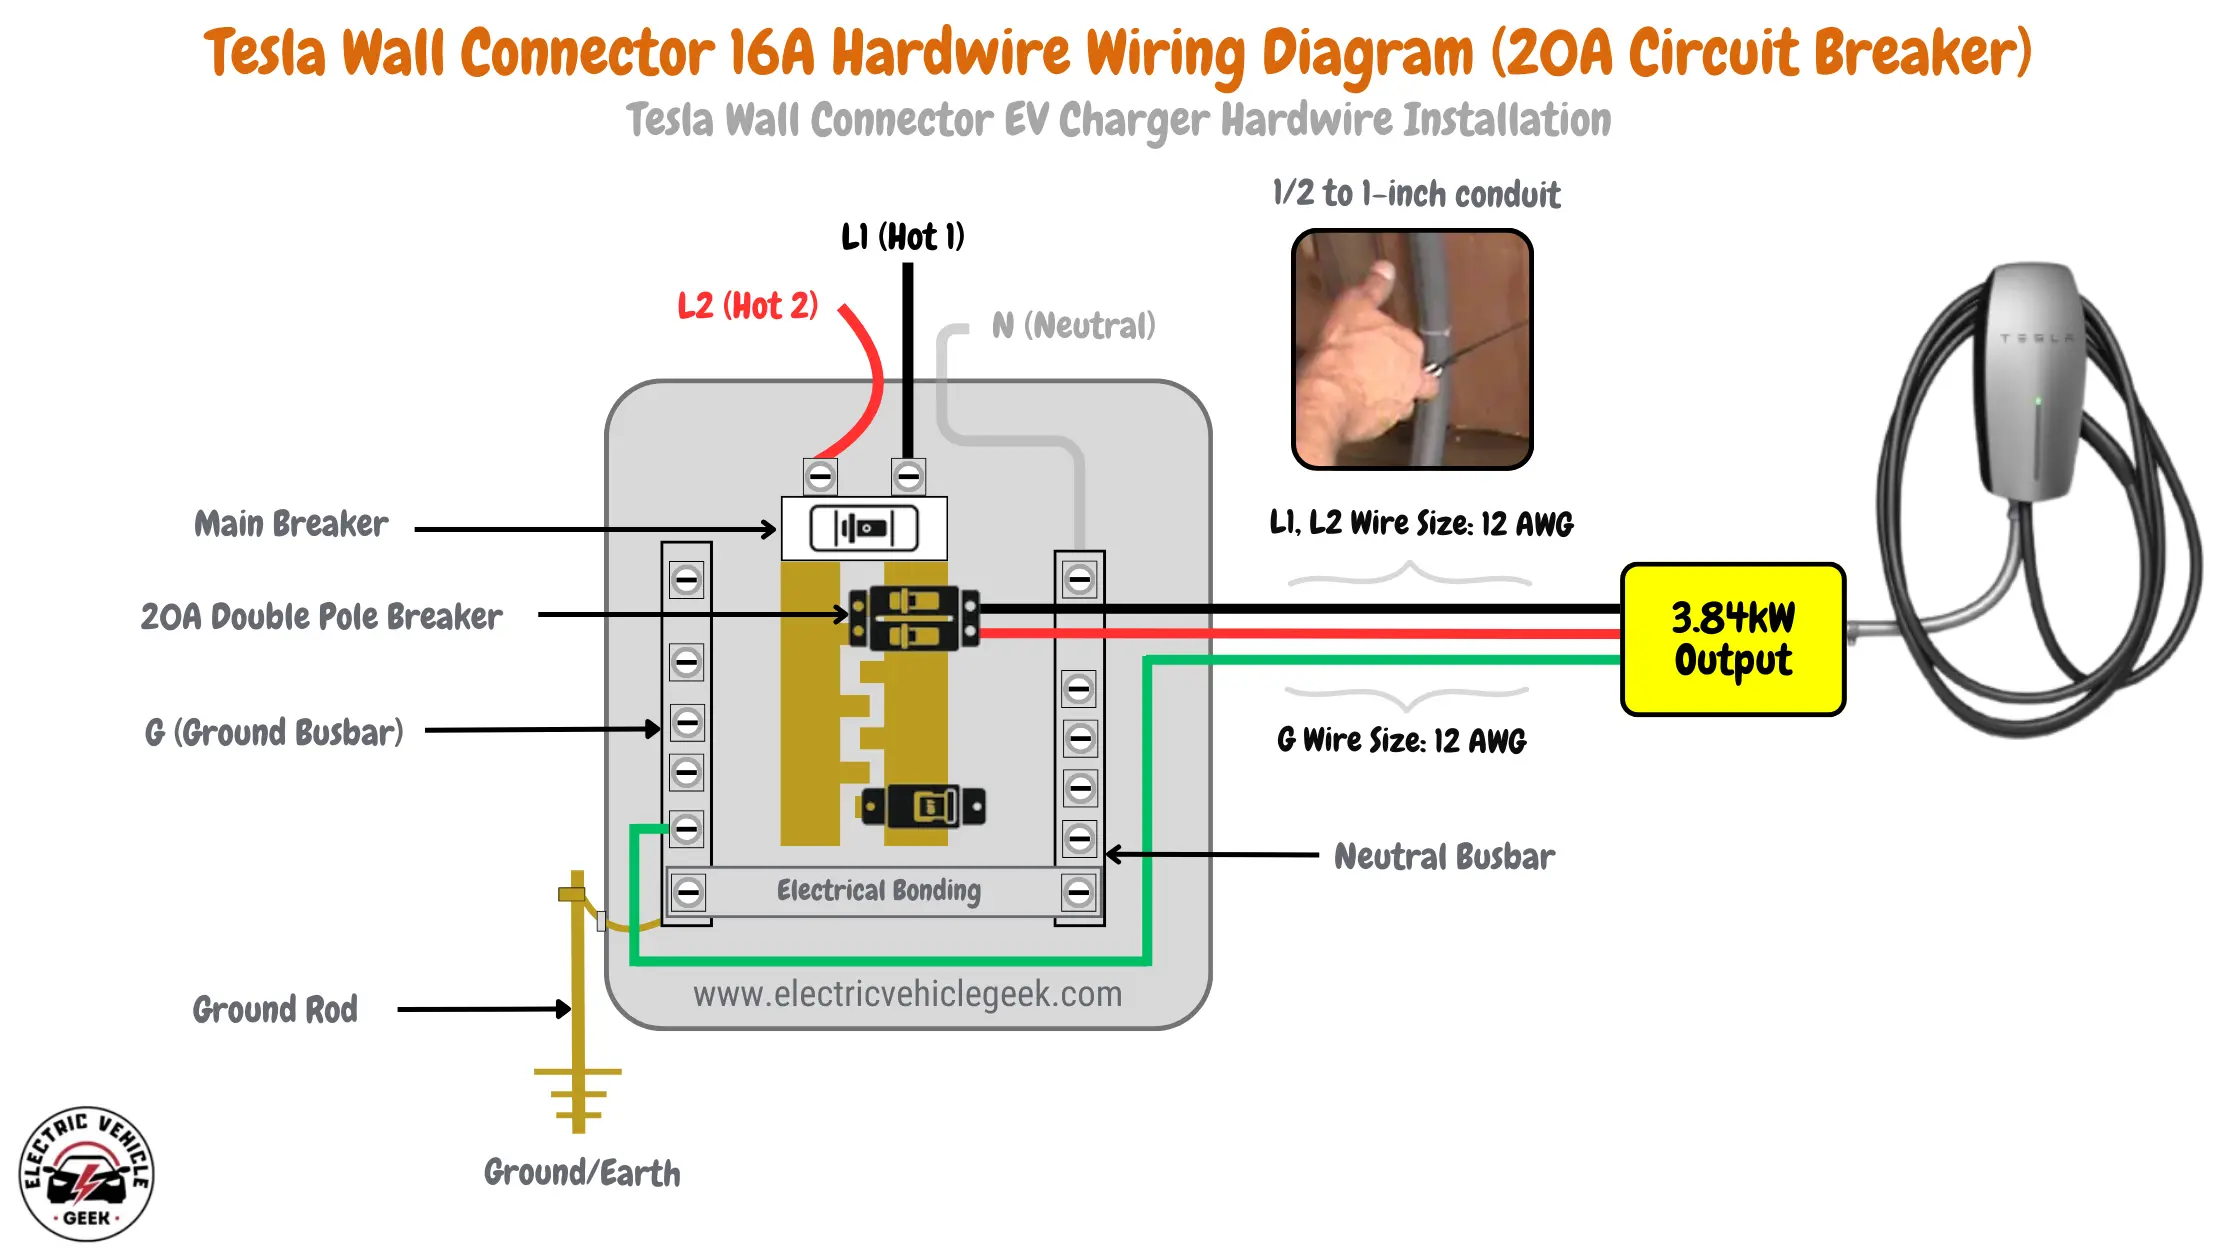
16A Hardwire Wiring Diagram (20A Circuit Breaker)
For a maximum output of 16A, use 12 AWG wire for L1 and L2, and 12 AWG for the ground (G). The system requires a 20A circuit breaker for safety and supports a charging output of 3.84 kW. The conduit size should be between 1/2 and 1 inch.
12A Hardwire Wiring Diagram (15A Circuit Breaker)
For a maximum output of 12A, use 12 AWG wires for L1 and L2, and 12 AWG for the ground (G). The system requires a 15A circuit breaker for safety, supporting a charging output of 2.8 kW. The conduit size should be between 1/2 and 1 inch.

Surge Protection for Tesla Wall Connector Installations
The Tesla Wall Connector features built-in surge protection, designed to mitigate minor voltage disturbances during normal operation. However, Tesla does not disclose the level or rating of its internal surge suppression, and this built-in protection is not designed to absorb high-energy surges caused by lightning strikes, grid switching, or repeated utility-side faults.
We’ve seen several cases of Tesla Wall Connectors being damaged by surges, particularly when power is restored after an outage, often after multiple low-to-moderate surges compound over time. These events can compromise the Wall Connector or other components on the EV charging circuit.
To mitigate this risk and enhance system resilience, we recommend installing an external Type 2 surge protection device (SPD).
You have two NEC-compliant options:
- Whole-house SPD installed at the main service panel to protect the whole-house electrical equipment, including the Tesla Wall Connector
- A dedicated SPD installed on the Tesla Wall Connector’s branch circuit, especially for subpanel setups, detached garages, or surge-prone areas
See also:
- EV Charger Surge Protection Guide – for NEC-compliant SPD installations and best practices
- EV Charger Surge Protection Devices – curated SPD options rated for 240V EV circuits
Integrating Whole-house Surge Protection
For most Tesla Wall Connector installations in a typical U.S. home, whole-house surge protection is the recommended first line of defense. A 4-wire (L1, L2, Neutral, and Ground) Type 2 SPD, rated for 240V systems, should be installed in parallel to the Tesla Wall Connector dedicated double-pole breaker and positioned as close as possible to the main service panel’s primary breaker, the source of incoming utility power.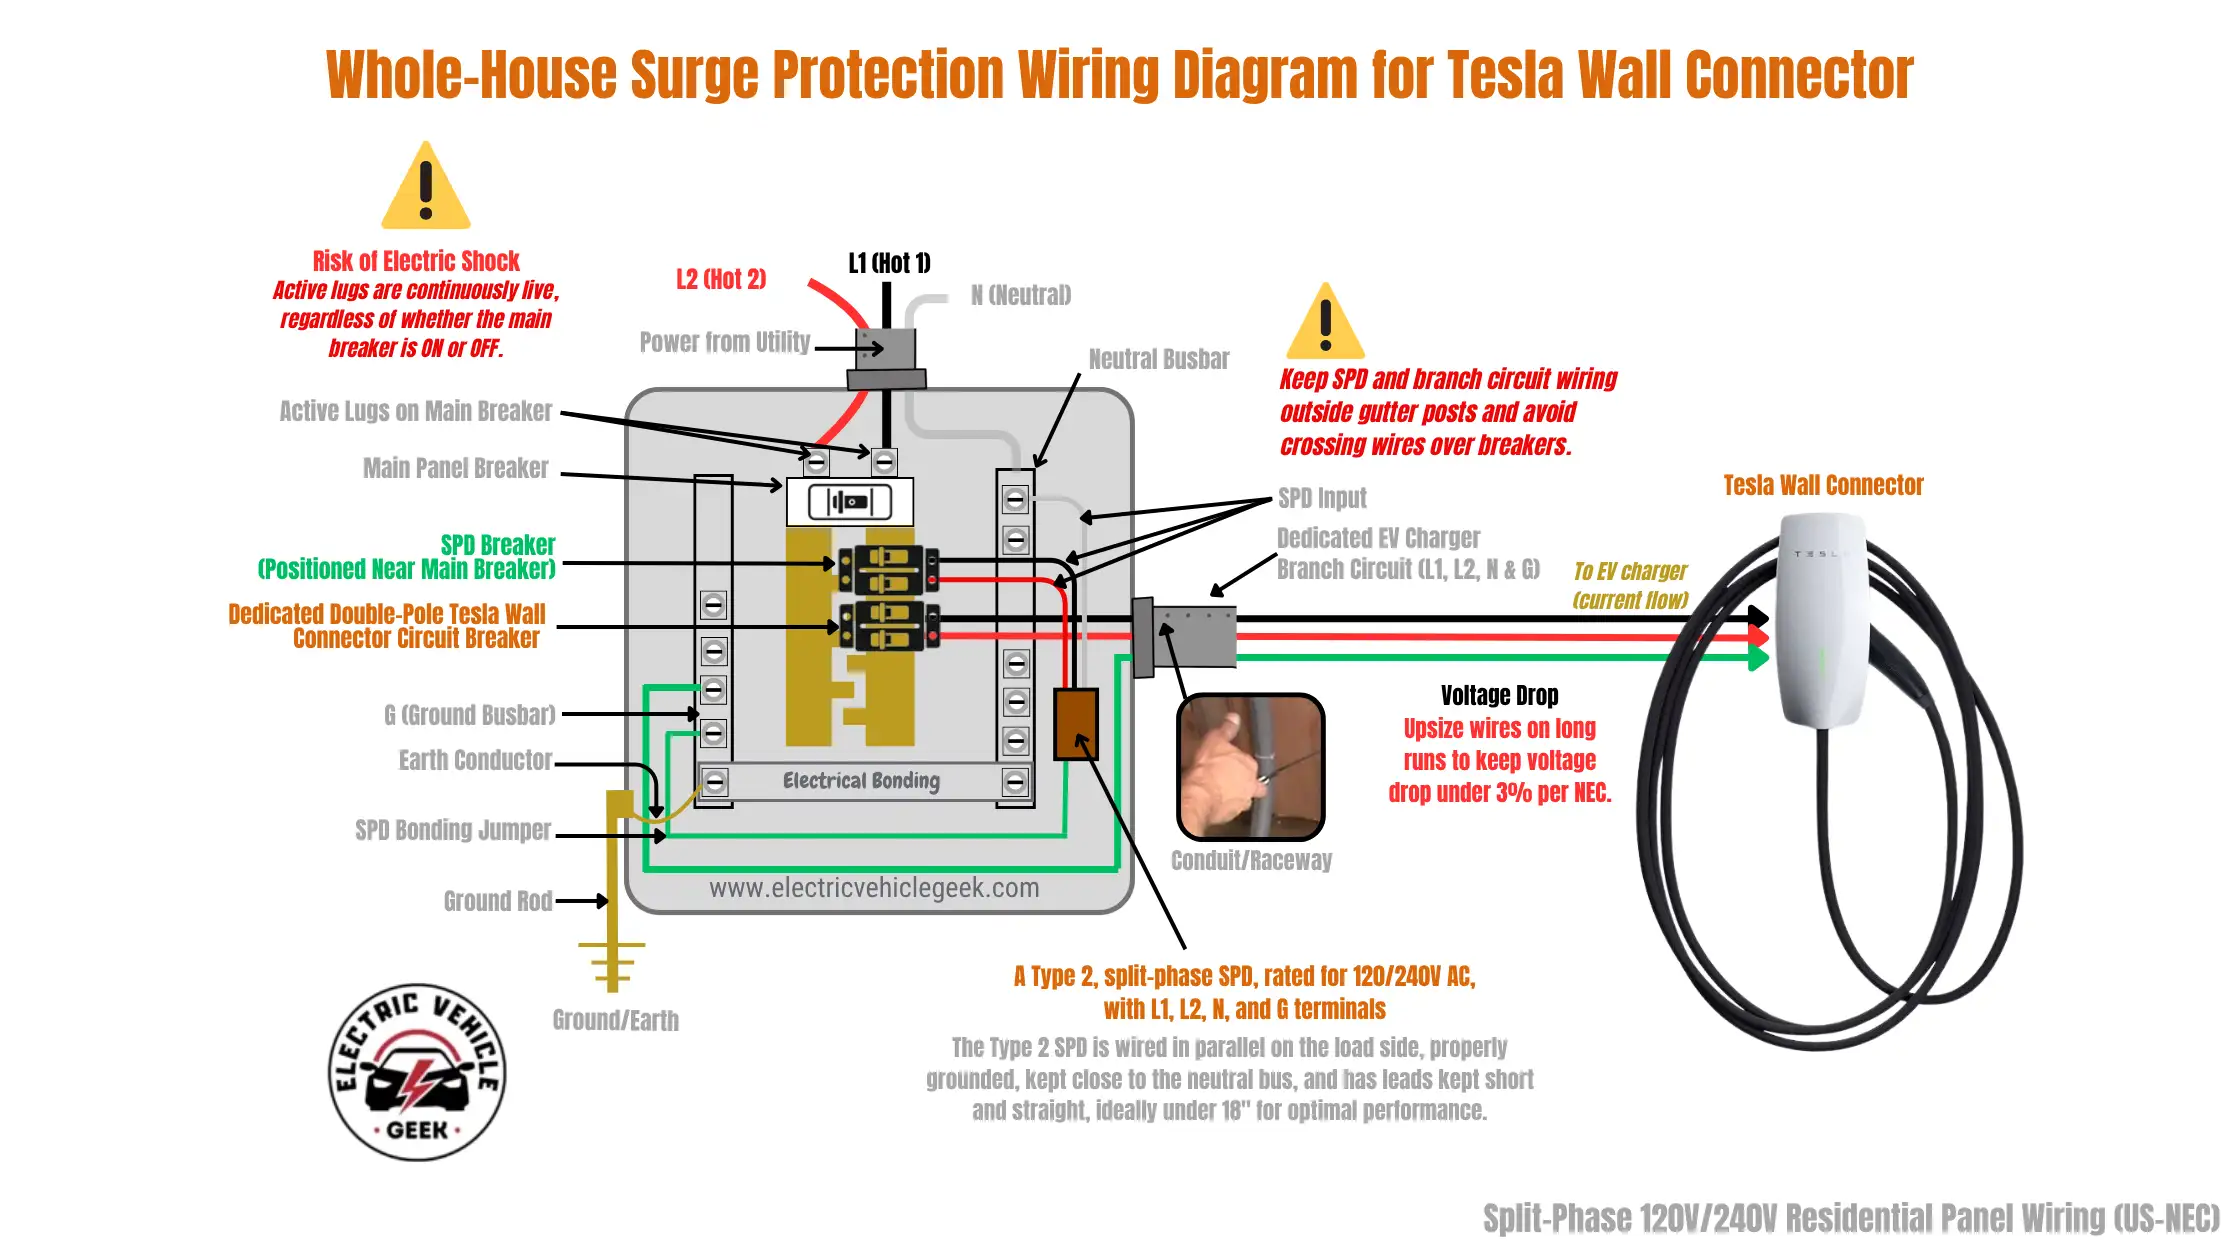
The SPD connects to L1 and L2, with the neutral lead terminated at the panel’s neutral busbar and the ground lead bonded to the ground busbar. Although the Tesla Wall Connector uses a 3-wire branch circuit (L1, L2, and Ground), a 4-wire SPD is still recommended to provide surge protection for all downstream circuits, not just the Tesla Wall Connector branch circuit.
I route the SPD leads separately from high-current branch circuits inside the panel to reduce electromagnetic interference (EMI) and avoid loops that could compromise the SPD’s performance or introduce safety risks.
Best Whole-house Surge Protection Device for Tesla Wall Connector Installations
For whole-home protection, especially when running one or more Tesla Wall Connectors with Power Sharing on the same panel, we recommend the Siemens BoltShield FSPD140. It’s one of the most reliable Type 2 SPDs for protecting the entire load center, including EV charger branch circuits. This model replaces the older FS140 and features faster response times, updated MOVs, and broader compatibility with newer panels.

In our case, we’d occasionally see a 40k-amp spike on L2 even before installing the Tesla Wall Connector. The FSPD140 consistently absorbed those hits without tripping any breakers or affecting our chargers. It’s a low-cost layer of protection that safeguards not just your Tesla Wall Connector, but everything else connected to your home electrical panel, from appliances to smart home systems.
Dedicated Surge Protection for Tesla Wall Connector Installations
When the Tesla Wall Connector is installed in a subpanel or when the main panel lacks available breaker space, a dedicated Type 2 SPD configured for a 3-wire branch circuit (L1, L2, and Ground) is recommended. This setup provides targeted surge protection for the EV charger circuit. It’s especially important in detached garages, outdoor subpanels, or commercial-grade environments where uptime, electrical isolation, and surge resilience are critical.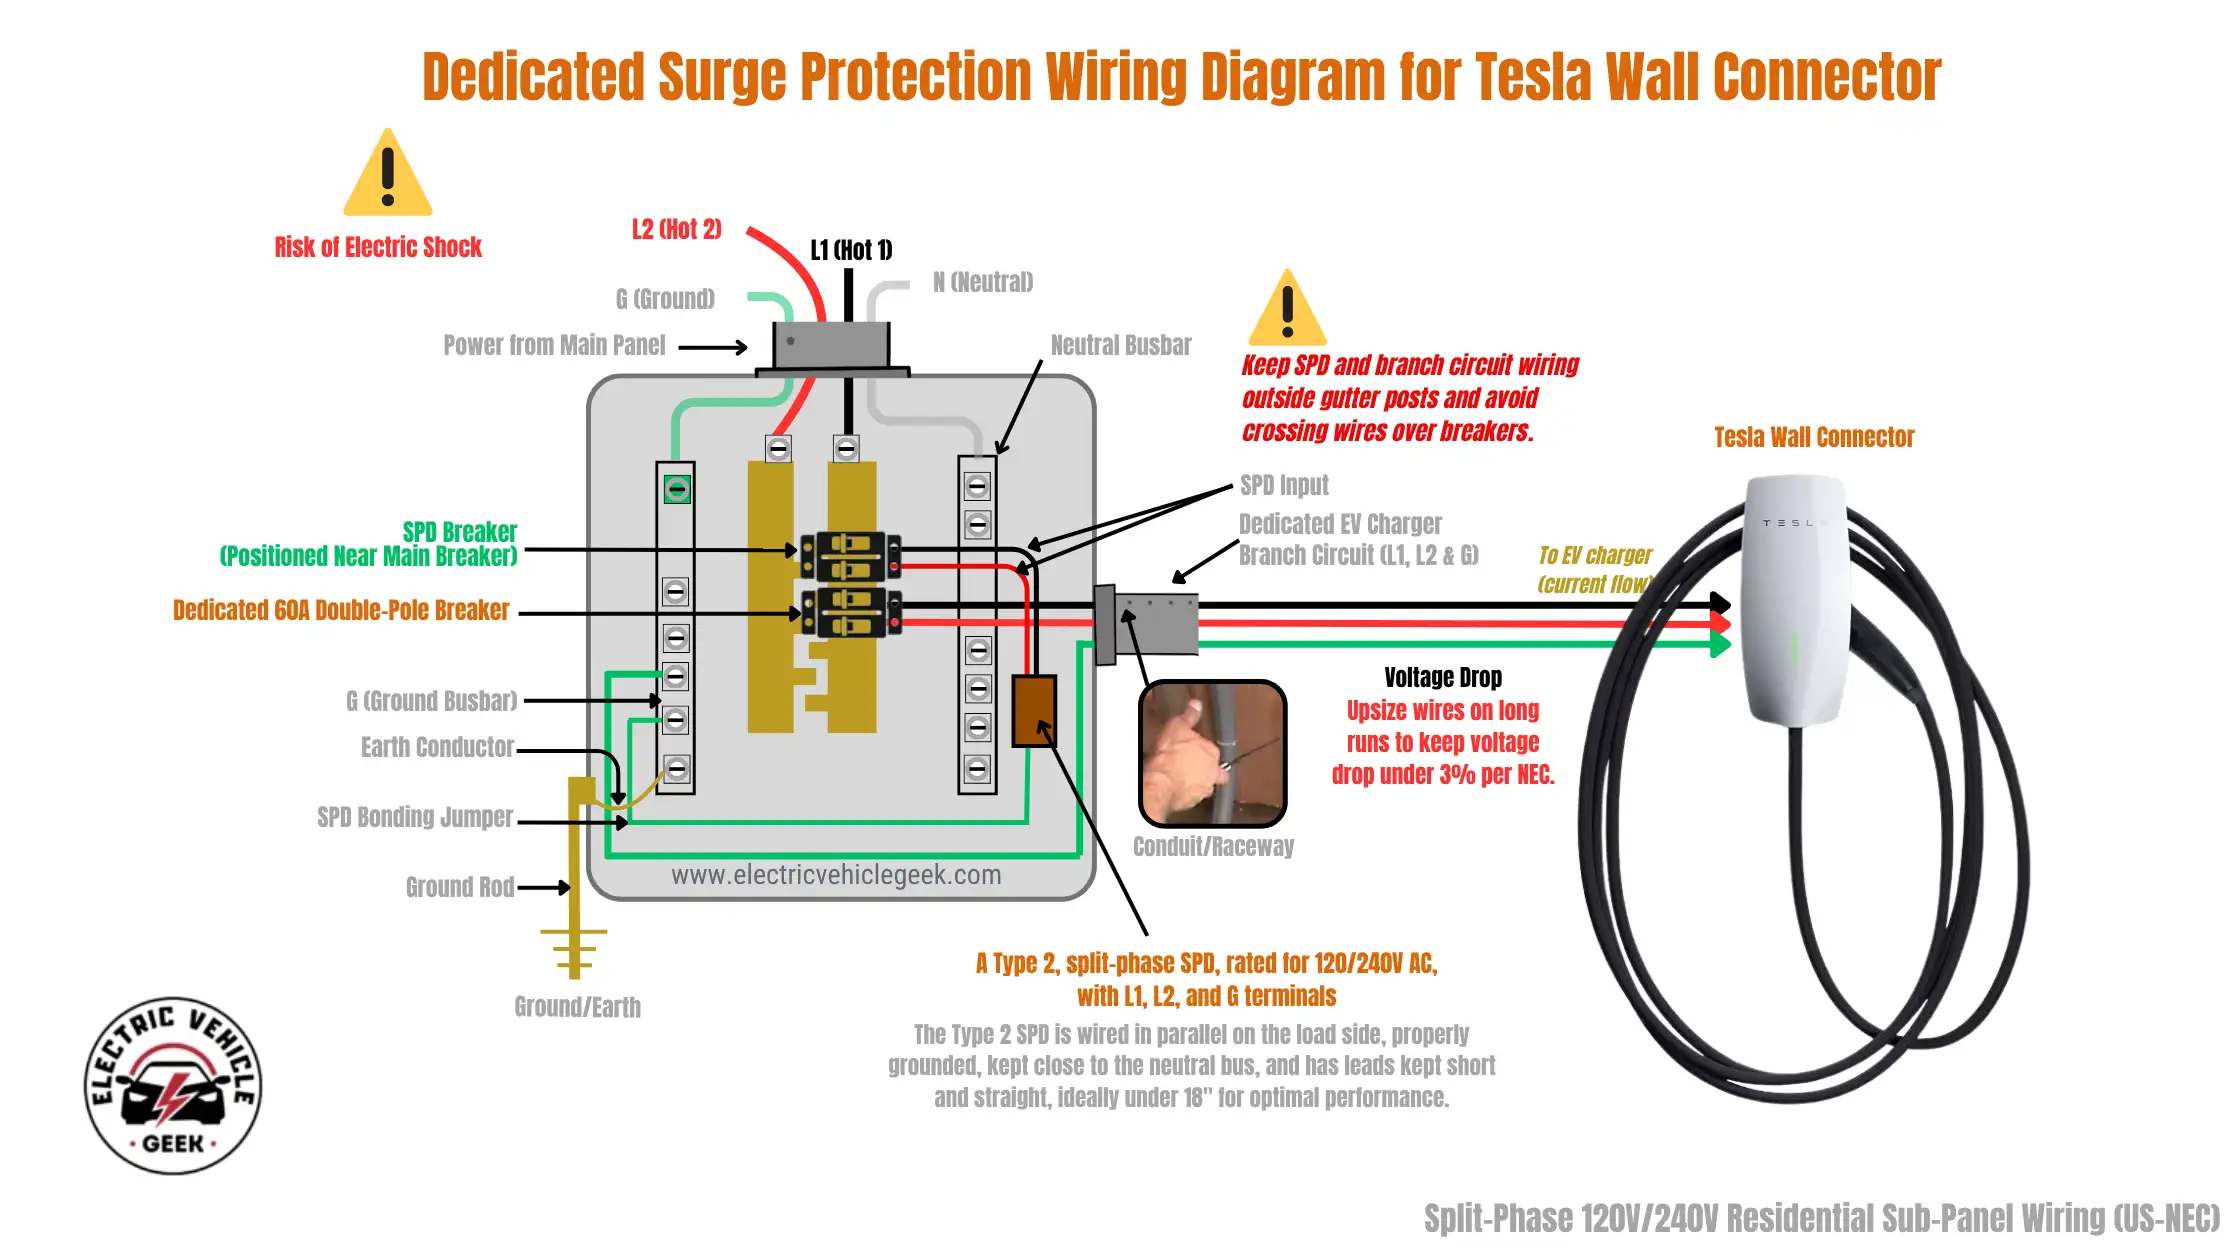
As shown in the wiring diagram above, the Tesla Wall Connector is hardwired using a 3-wire branch circuit (L1, L2, and Ground). In this configuration, we recommend installing a 3-wire Type 2 surge protection device (SPD), rated for 240V systems. The SPD should be wired in parallel and positioned as close as possible to the dedicated Tesla Wall Connector double-pole breaker. Its ground lead is bonded to the subpanel’s ground busbar, providing effective, localized surge protection.
This 3-wire SPD configuration aligns with the Tesla Wall Connector’s conductor requirements and provides effective localized surge protection. For best performance, the SPD’s leads should be kept short and straight, ideally under 18 inches.
Multiple Tesla Gen 3 Wall Connector Deployment
Tesla Gen 3 Wall Connectors use dedicated branch circuits for each charger to enable group power management, meaning every Gen 3 Wall Connector requires its own breaker and individual wiring back to the electrical panel, as shown in the illustrative diagram below.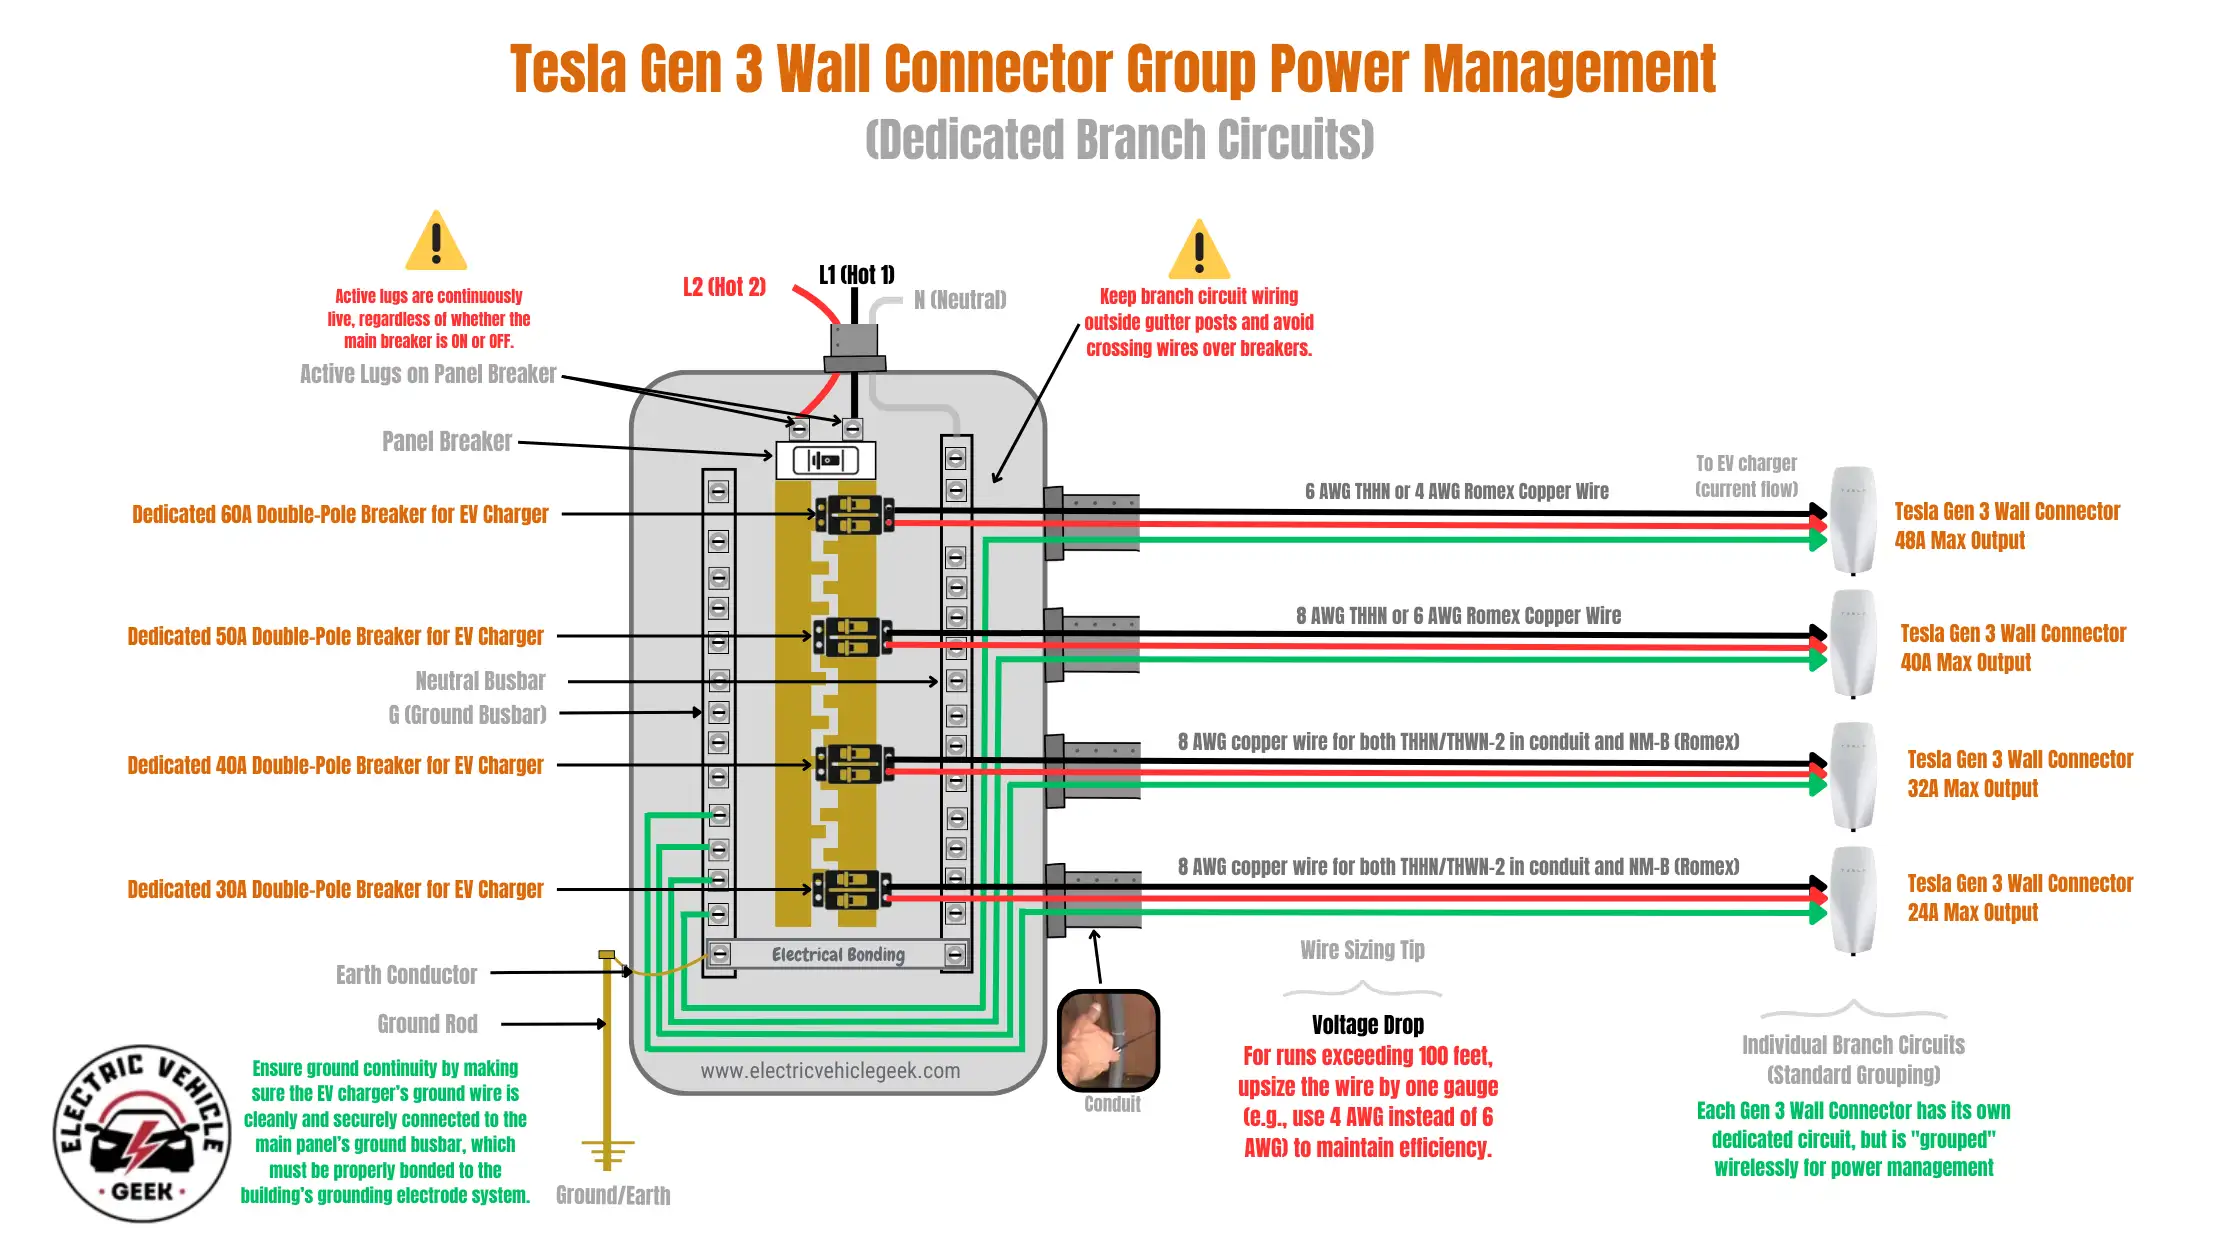
Unlike the Universal Wall Connector, Gen 3 chargers cannot daisy chain, so each unit must be installed independently. Despite this, the chargers connect wirelessly in a mesh network, allowing coordinated power management across all units.
In a multi-charger setup, one unit acts as the “Leader,” monitoring the site’s total power limit, while the other chargers, or “Followers,” automatically adjust their output to prevent overloading the panel. This ensures each vehicle receives the maximum available current without exceeding the electrical service capacity, even when multiple cars are charging simultaneously.
While this approach requires more conduit, copper, and panel space compared to the Universal model, it offers high redundancy and reliability. If a breaker trips or a wire fails, the other chargers remain operational. Installers also have flexibility in sizing each circuit to match the charger’s maximum output and the overall site power, allowing mixed amperage runs if needed.
We recommend the Tesla Gen 3 Wall Connector for small-business garages, multi-unit residential buildings, or commercial lots where chargers are spread across walls or levels, and panel space is sufficient for individual circuits. Its combination of wireless power management, independent branch circuits, and integration with Tesla’s energy ecosystem makes it a reliable and scalable solution for multiple EV chargers. For sites with limited panel space, high charger density, or a need to minimize conduit and copper use, the Tesla Universal Wall Connector is the preferred option, as it supports daisy chaining and flexible multi-charger deployments.
Learn why the Universal Wall Connector is our #1 recommended Level 2 EV charger for small businesses, while the Tesla Gen 3 remains a strong alternative among Tesla chargers, alongside other high-quality options from different brands.
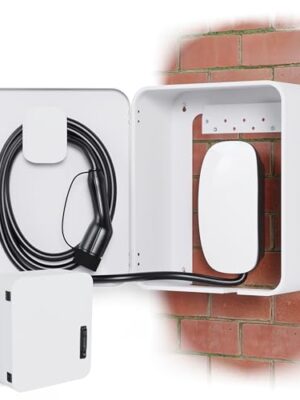
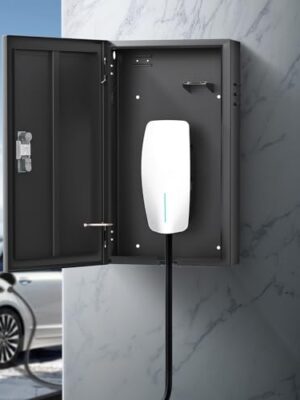
Compatible Tesla Gen 3 Charger Lock Box
We recommend adding a Tesla charger lock box to your setup for added security and organization. A lockbox protects your Tesla Wall Connector from theft, weather, and damage while keeping the cables neatly stored. It’s an easy upgrade that keeps your charger safe and secure, indoors and outdoors.
Tesla Gen 3 Wall Connector Rebates & Tax Credits
The Tesla Gen 3 Wall Connector is a Wi-Fi-enabled smart charger approved for Tesla-centric utility programs and eligible for the 30% federal tax credit. It doesn’t always appear on standard third-party smart-charging rebate lists, so your eligibility depends on which programs your utility runs.
Plan availability varies. Use our EV Charger Rebate Finder to enter your zip code and check which federal, state, and utility incentives apply.
 The Tesla Wall Connector offers fast, reliable charging with adjustable amperage and a 24-foot cord. It’s easy to install but requires professional installations. Pros include Wi-Fi connectivity and compatibility with Tesla electric vehicles compared to third party EV chargers. However, it lacks bi-directional charging for Cybertruck compatibility.
- Fast, reliable charging (up to 44 miles per hour)
- Adjustable amperage for flexible installation
- 24-foot cord for installation flexibility
- Wi-Fi connectivity for over-the-air updates
- Power-sharing for multiple chargers
- Requires professional installation
- No bi-directional charging for Tesla Cybertruck powersharing compatibility
Specification: Tesla Gen 3 Wall Connector Review
| Charging Performance | ||||||||||||||||||||||
|---|---|---|---|---|---|---|---|---|---|---|---|---|---|---|---|---|---|---|---|---|---|---|
| ||||||||||||||||||||||
| Electrical & Installation | ||||||||||||||||||||||
| ||||||||||||||||||||||
| Communication & Smart Features | ||||||||||||||||||||||
| ||||||||||||||||||||||
| Safety & Protection | ||||||||||||||||||||||
| ||||||||||||||||||||||
| Durability & Environment | ||||||||||||||||||||||
| ||||||||||||||||||||||
| Interface & Access | ||||||||||||||||||||||
| ||||||||||||||||||||||
| Physical Specifications | ||||||||||||||||||||||
| ||||||||||||||||||||||
| Compliance & Standards | ||||||||||||||||||||||
| ||||||||||||||||||||||
| Warranty Information | ||||||||||||||||||||||
| ||||||||||||||||||||||
There are no reviews yet.