This guide covers the installation of 24-amp electric car chargers in your home and lists the best 24-amp electric car charger options available. These chargers are often referred to as 30-amp EV chargers because they require a 30-amp circuit breaker.
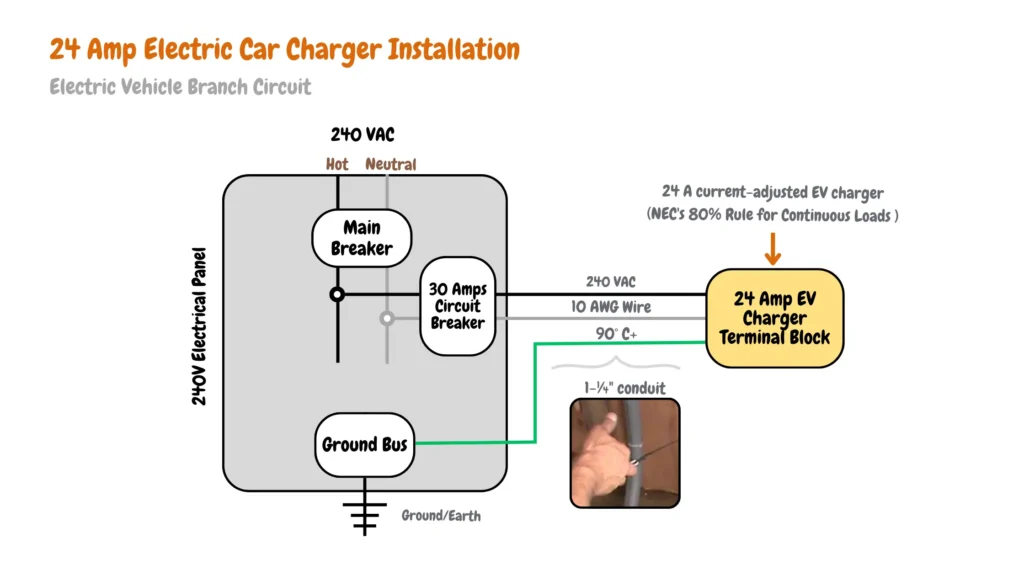
The National Electrical Code (NEC) recommends limiting continuous loads like EV charging to 80% of the breaker’s capacity. So, a 30-amp breaker safely supports a 24-amp charger (0.8 x 30 amps) = 24 amps.
Table of Contents
- Charging Speed of 24-Amp Electric Car Chargers
- Installation of 24-amp Electric Car Chargers
- Key Takeaways
- Best 24-Amp Electric Car Chargers
- Best Tesla 24 Amp Charger
Charging Speed of 24-Amp Electric Car Chargers
A 24-amp electric car charger typically delivers around 5.8 kilowatts (kW) of power (24 amps x 240 volts). The actual charging speed depends on the vehicle’s battery capacity and efficiency. On average, a 24-amp charger can add about 20-25 miles of range per hour of charging, making it suitable for overnight home EV charging or quick top-ups throughout the day.
Installation of 24-amp Electric Car Chargers
You can install a 24 amp electric car charger in your main electrical panel or opt for a dedicated EV charging subpanel depending on your electric vehicle branch circuit complexity, you will need a 30 amp dedicated circuit breaker, and 10 AWG wires to connect the 30 amp circuit breaker with the 24-amp electric car charger as shown in the 24-amp electric vehicle branch circuit diagram below:
Key Takeaways
Best 24-Amp J1772 EV Chargers


Best 24-Amp Tesla EV Chargers


Best 24-Amp Electric Car Chargers
Grizzl-E Classic Level 2 EV Charger
We recommend the Grizzl-E Classic as our #1 24-amp EV charger for its low price points without the compromise of the EV charger functionality and build compared with its competitors.
We recommend the Grizzl-E Classic Level 2 EV Charger for the following reasons:
- The Grizzl-E Classic is known for its straightforward design. It lacks complex features like scheduling or Wi-Fi connectivity, making it easy to set up and use.
- Unlike the Home Flex Hardwired Level 2 EV Charger requiring professional installation, the Grizzl-E Classic is designed for a relatively simple installation process, especially if you already have the appropriate outlet (NEMA 14-50 or NEMA 6-50) available.
- The Grizzl-E Classic typically uses LED lights or a basic display to indicate charging status. This eliminates confusion for beginners who might be overwhelmed by more intricate interfaces.
- The Grizzl-E Classic boasts a sturdy aluminum case, making it suitable for indoor or outdoor use. This provides peace of mind for beginners who might be concerned about accidental damage.
- The Grizzl-E Classic comes equipped with built-in safety features like ground fault circuit interruption (GFCI) and over-temperature protection, ensuring a safe charging experience.
For EV owners who prefer smart EV charging features such as mobile app control, real-time EV charging data, smart scheduling, Time-of-Use (TOU) compatibility, smart grid integration, and voice control they can opt for the Grizzl-E Smart Level 2 charger which also supports 24-amp EV charging electrical vehicle branch circuits.
The Grizzl-E Smart Level 2 charger supports all features of the Grizzl-E classic Level 2 EV charger and also adds on smart EV charging features, Smart EV charging offers tech-savvy drivers, cost-conscious owners, and eco-friendly users remote control, money-saving options, and a greener charging experience.
Grizzl-E Level 2 EV Charger (24-Amp) Installation
Installing both the Grizzl-E Classic and the Smart Level 2 charger requires the use of a NEMA 6-50 or a NEMA 14-50 outlet depending on your electric vehicle branch circuit configurations and the specifics of the charger itself. You will also need a 30-amp dedicated circuit breaker and 10 AWG wires to connect the 30-amp circuit breaker and the NEMA outlet (NEMA 6-50 or NEMA 14-50 outlet).
Now that you understand the requirements, let’s focus on the two installation processes.
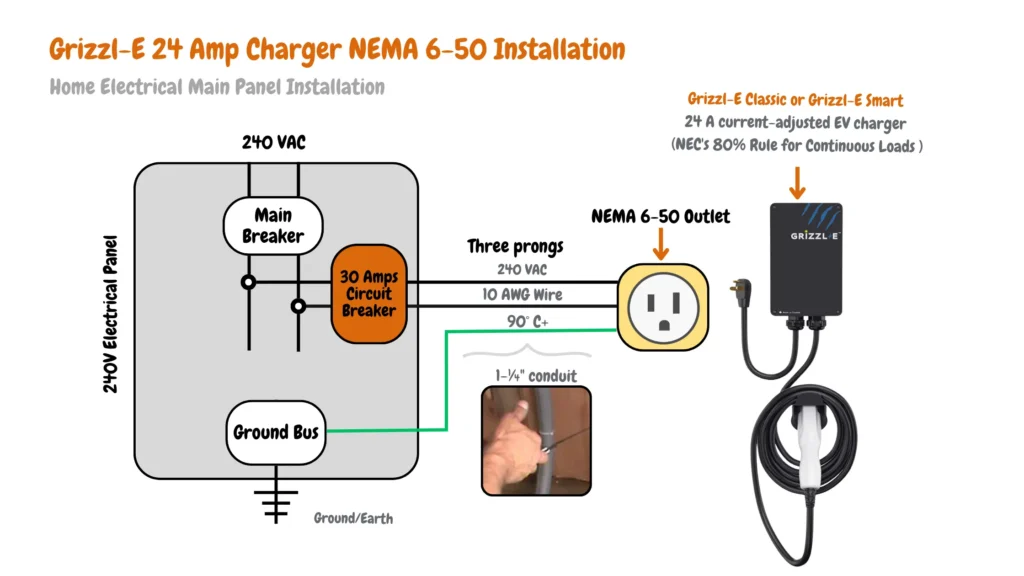
NEMA 6-50 24-Amp Grizzl-E Charger Installation
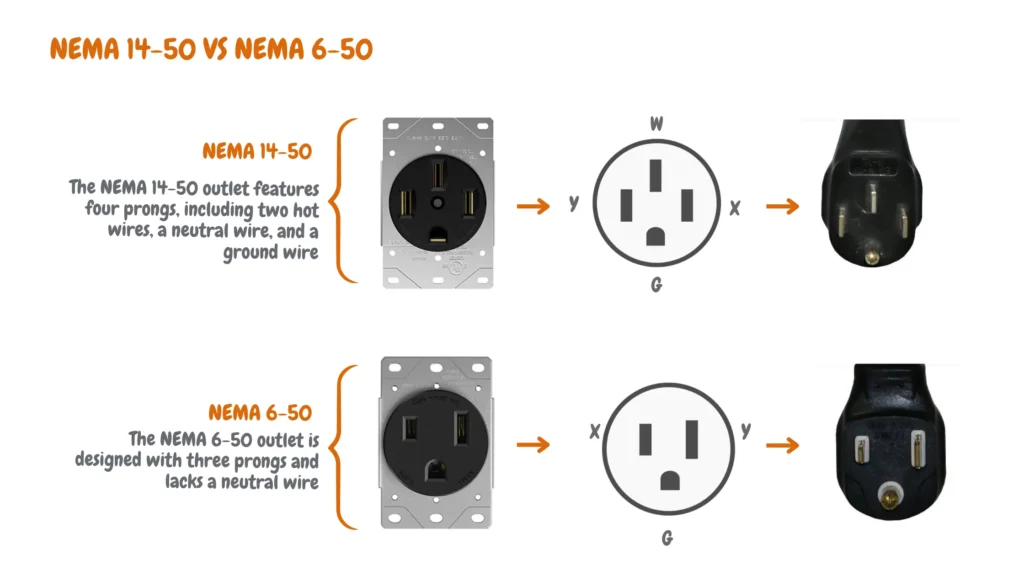
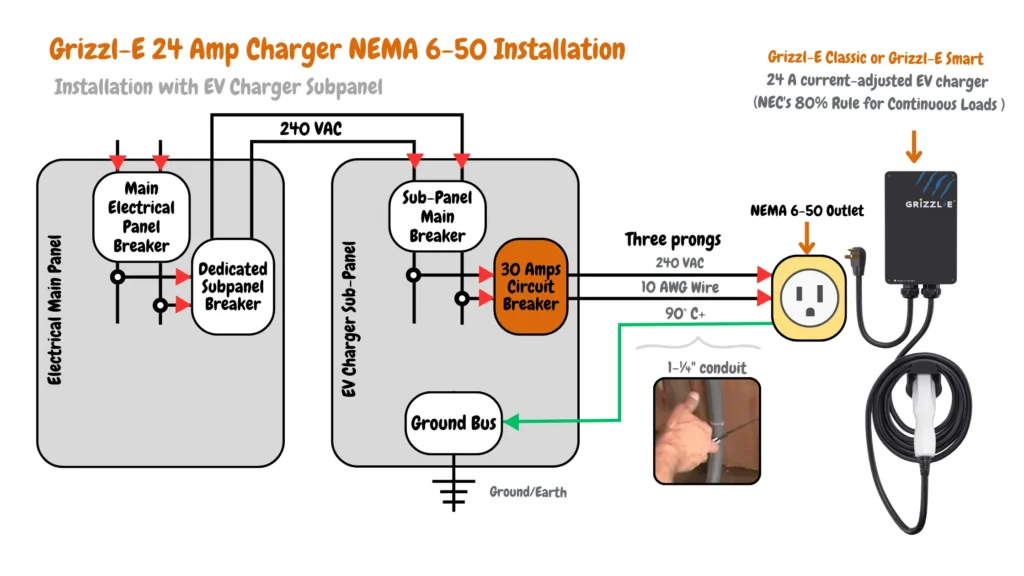
This setup utilizes a NEMA 6-50 outlet, a three-pronged connector (Two hot conductors and one ground) commonly rated for 50 amps. However, in this case, the circuit and charger are limited to delivering a maximum of 24 amps for safe and efficient charging of your electric vehicle which won’t have an effect on using the NEMA 6-50 outlet.
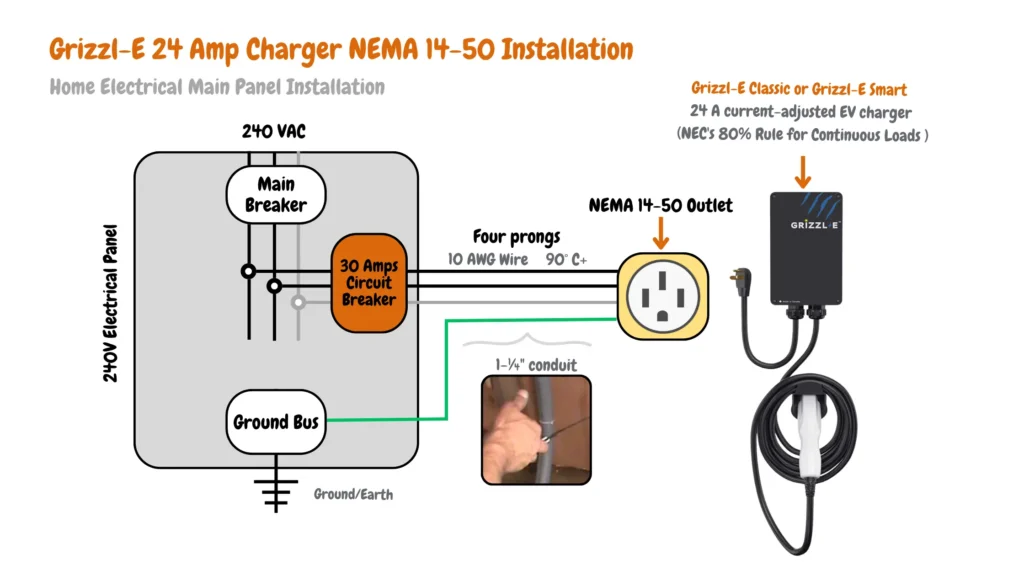
NEMA 14-50 24-Amp Grizzl-E Charger Installation
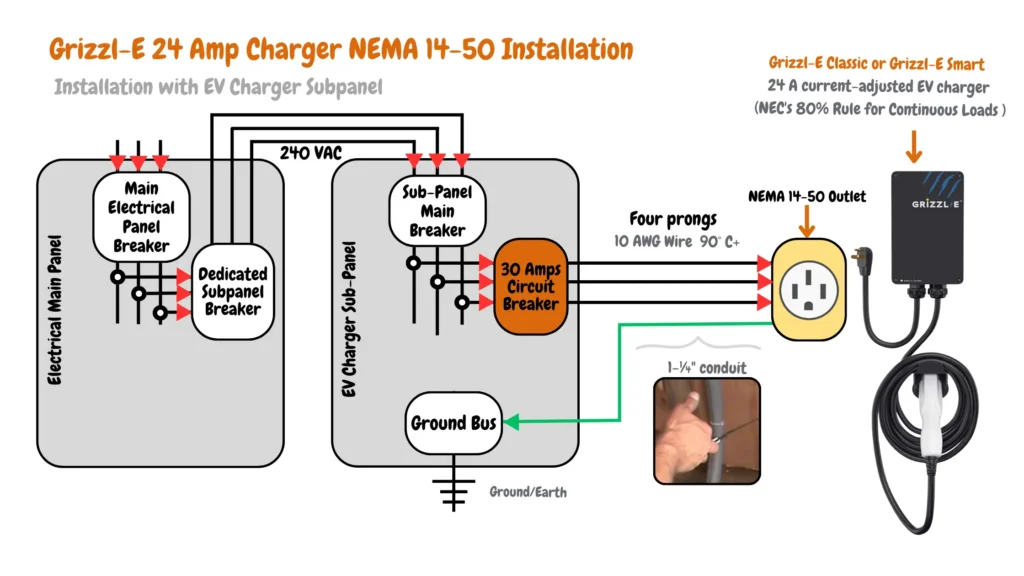
This option utilizes a NEMA 14-50 outlet, a four-pronged connector (Two hot conductors, one neutral, and one ground) typically rated for 40 amps, however, it’s perfect for 24-amp EV charger installations, similar to the NEMA 6-50 setup, the circuit and charger are limited to providing a maximum of 24 amps of charging current.
Grizzl-E Home Electrical Main Panel Installation
Depending on your electrical panel capacity, the complexity of your electric vehicle branch circuit, and the location of your charging spot, there are two ways you can install a 24-amp Grizzl-E charger, you can install the charger from your main electrical panel, or use a sub panel to extend the location or capacity of the main electrical panel.
Grizzl-E 24 Amps NEMA 6-50 Electrical Panel Installation
Grizzl-E 24 Amps NEMA 14-50 Electrical Panel Installation
24-Amp Grizzl-E EV Charger Subpanel Installation
Installing the 24-Amp Grizzl-E EV Charger with various NEMA outlet configurations via a sub panel is an efficient solution for home charging needs. Whether using the NEMA 6-50 or NEMA 14-50 outlet, this setup involves connecting the subpanel directly to the main electrical panel with a dedicated breaker to handle the charger’s power requirements.
Grizzl-E 24 Amps NEMA 6-50 EV Charger Subpanel Installation
Grizzl-E 24 Amps NEMA 14-50 EV Charger Subpanel Installation
ChargePoint Home Flex Hardwired Level 2 EV Charger
While the Grizzl-E Classic is a fantastic basic charger (our #1 recommendation for affordability), the ChargePoint Home Flex takes home charging to the next level for tech-savvy EV owners. Here’s why it might be the perfect fit for you:
- Smart Features: Monitor charging status, schedule charging sessions for off-peak hours (potentially saving you money!), and receive alerts remotely through the ChargePoint app.
- Future-Proof Technology: Stay connected with the latest advancements in EV charging. The ChargePoint Home Flex is designed for easy updates and integration with future smart grid technologies.
- Convenient Installation: The hardwired design offers a clean and permanent solution compared to plug-in options.
If you value convenience, want to optimize charging costs, and appreciate cutting-edge technology, the ChargePoint Home Flex is an excellent choice. While it has a slightly higher upfront cost compared to the Grizzl-E Classic, the smart features and future-proof design might be worth the investment in the long run.
24-Amp ChargePoint Home Flex Hardwired EV Charger Installation
The installation of the 24-Amp ChargePoint Home Flex Hardwired EV Charger does not utilize outlets; instead, it requires hardwiring. There are two primary methods for installing the charger: directly from your main electrical panel or through a dedicated subpanel, which is necessary if your main panel lacks sufficient capacity or if you need to extend the charger’s location closer to its intended use point.
24 Amps ChargePoint Home Flex Electrical Panel Installation
24-Amp ChargePoint Home Flex Subpanel Installation
Best Tesla 24 Amp Charger
We have listed the best Tesla 24 amp chargers below for Tesla owners looking for a reliable 24-amp charger to charge their Tesla, While the 24-amp chargers highlighted above are fantastic options for most electric vehicles (EVs) in North America, they won’t work directly with your Tesla. This is because these chargers utilize the J1772 connector, which is the standard for most EVs but not for Teslas. Tesla uses a proprietary connector type specifically designed for their vehicles.
Below, we’ve identified and tested the top-rated Tesla 24 amp chargers:
Tesla Wall Connector
The Tesla Wall Connector (24 amp version) is a tailored home charging solution designed specifically for Tesla vehicles, offering reliability and convenience. It mounts directly on the wall for a tidy installation, ensuring a seamless, plug-and-play experience when connecting to your Tesla. Safety is a priority with built-in protections for both your vehicle and home electrical system. Optional app control via the Tesla app allows for remote monitoring, scheduling of charging sessions, and receiving notifications.
Tesla Wall Connector 24 Amp Charger Installation
Unlike most J1772 chargers that offer plug-and-play options, the Tesla Wall Connector (24 Amp) requires professional hardwiring directly to your home’s electrical panel. This approach ensures a safe and reliable connection specifically designed for Tesla’s charging needs. However, depending on your existing electrical panel’s capacity, you might need to consider an additional installation option:
- Installation in your Home Electrical Panel: This is the most common scenario if your panel has enough spare capacity (amperage) to accommodate the Wall Connector’s 24-amp draw. A qualified electrician can assess your panel and perform the installation.
- Dedicated Subpanel Installation: If your main electrical panel is already maxed out, you might need a dedicated subpanel installed specifically for the Wall Connector. This subpanel would be fed from your main panel and provide the necessary dedicated circuit for the charger.
Why These Two Choices Exist:
- Safety and Performance: Hardwiring ensures a more secure and reliable connection compared to a plug-in option. This is crucial for the high currents involved in EV charging.
- Matching Power Needs: The installation method depends on your existing electrical capacity. A dedicated subpanel ensures the Wall Connector has its own dedicated circuit, preventing it from overloading your main panel.
24 Amps Tesla Wall Connector Electrical Panel Installation
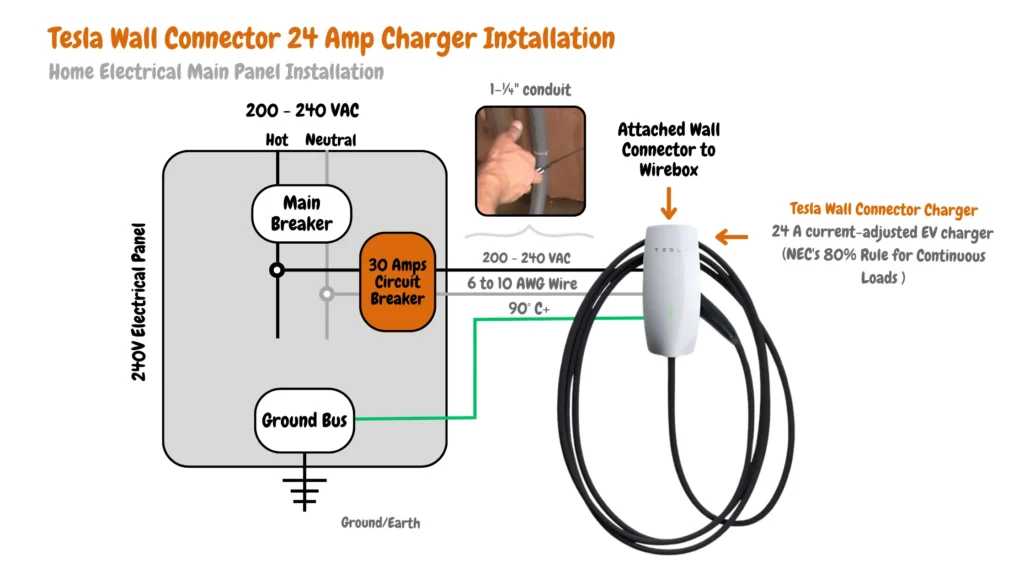
The wirebox is connected to the Tesla Wall Connector, with clear labels for hot, neutral, and ground wires, and a specified voltage of 200-240 VAC. The diagram emphasizes compliance with NEC’s 80% rule for continuous loads.
24-Amp Tesla Wall Connector Subpanel Installation
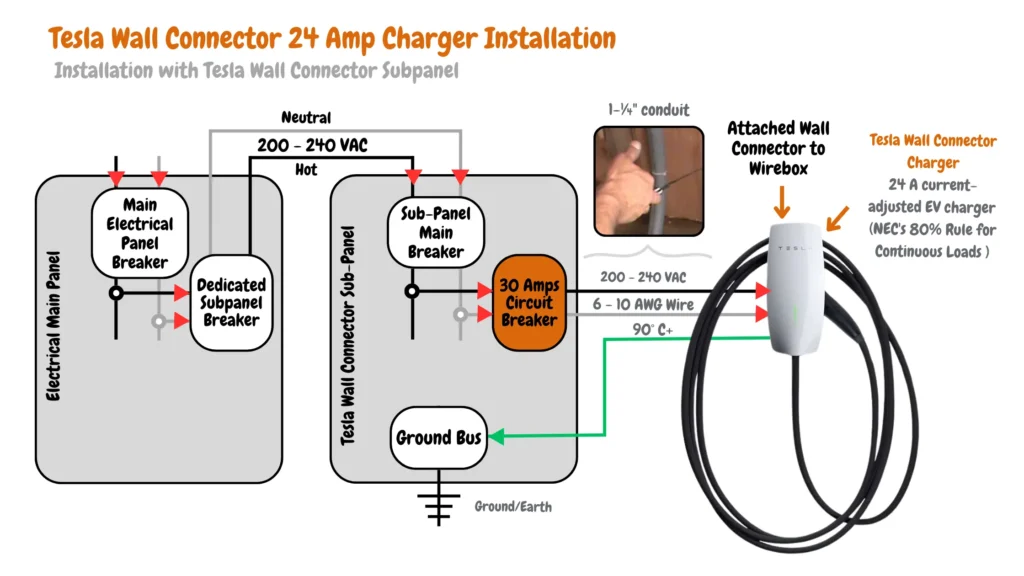
The Tesla Wall Connector is connected via a wirebox, with clear labels for hot, neutral, and ground wires, and a voltage specification of 200-240 VAC. The diagram emphasizes adherence to NEC’s 80% rule for continuous loads and details connections between the main electrical panel, subpanel, and charger.
Tesla Universal Wall Connector
The Tesla Universal Wall Connector is tailored as an ideal choice for new electric vehicle (EV) owners, combining simplicity and adaptability to enhance the charging experience:
Designed for ease of use, it features a built-in adapter that accommodates both Tesla’s proprietary connector and the J1772 standard used by most other EVs in North America. This eliminates the need for additional adapters and ensures compatibility with a wide range of EVs. Installation is straightforward with professional hardwiring, providing a clean and permanent charging solution that integrates seamlessly into any garage or home environment.
The future-proof design of the Universal Wall Connector ensures it remains relevant as EV technology evolves. It supports adjustable charging power, allowing optimization based on your home’s electrical capacity and desired charging speed. This flexibility not only enhances compatibility with current Tesla models but also prepares you for future EVs using the J1772 standard. Optional integration with the Tesla app further enhances convenience by enabling remote monitoring, scheduling of charging sessions, and receiving notifications, making it an excellent investment for new EV owners seeking a hassle-free charging experience.
24-Amp Tesla Universal Wall Connector Installation
The installation of the 24-Amp Tesla Universal Wall Connector involves setting up a charging solution that integrates seamlessly with both Tesla vehicles and other EVs using the J1772 standard. This process typically requires either a direct connection from the main electrical panel or installation through a dedicated sub-panel. Each method ensures efficient power supply to the Wall Connector, accommodating varying electrical capacities and optimizing charging speeds based on specific home requirements.
24 Amps Tesla Universal Wall Connector Main Electrical Panel Installation
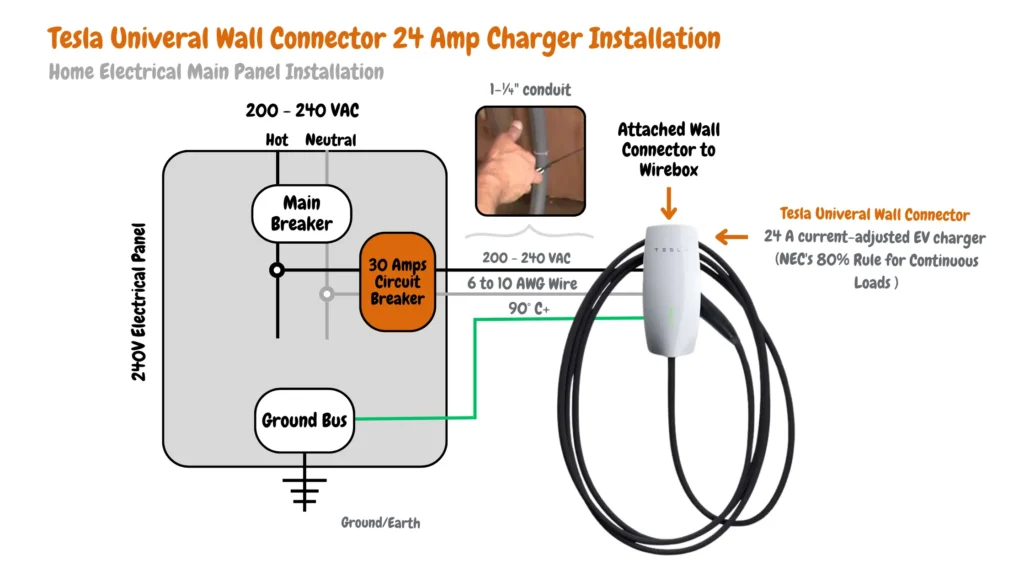
The Tesla Universal Wall Connector is connected via a wirebox, with clear labels for hot, neutral, and ground wires, and a voltage specification of 200-240 VAC. The diagram emphasizes compliance with NEC’s 80% rule for continuous loads and shows connections within the 240V electrical panel.
24-Amp Tesla Universal Wall Connector Subpanel Installation
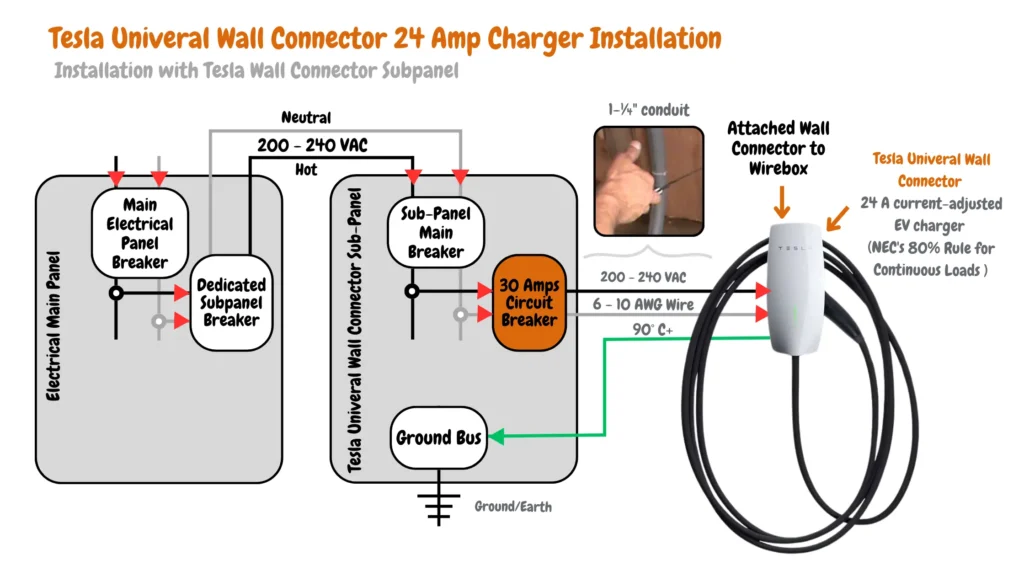
The Tesla Universal Wall Connector is connected via a wirebox, with clear labels for hot, neutral, and ground wires, and a voltage specification of 200-240 VAC. The diagram emphasizes compliance with NEC’s 80% rule for continuous loads and outlines the connections between the main electrical panel, subpanel, and charger.
ChargePoint Home Flex Hardwired NACS Level 2 EV Charger
The ChargePoint Home Flex boasts advanced smart features for remote monitoring, scheduling sessions during off-peak hours, and receiving alerts via the ChargePoint app. It supports fast charging speeds compatible with most EVs in North America, including Tesla models when paired with a J1772 adapter. Installation requires professional hardwiring and guarantees durability with a weather-resistant design, making it suitable for diverse environments.
Despite its higher cost relative to the Tesla Wall Connector and dependency on app integration, the ChargePoint Home Flex remains a dependable choice, offering flexibility and reliability for Tesla owners who value technological sophistication in their charging solutions.
24-Amp ChargePoint Home Flex Hardwired NACS Charger Installation
Installing the 24-Amp ChargePoint Home Flex Hardwired NACS Charger involves two primary setups:
- Home Electrical Main Panel Installation: This installation integrates the ChargePoint Home Flex into your main electrical panel, requiring professional hardwiring. It supports fast charging and offers smart features like remote monitoring and scheduling via the ChargePoint app. This setup ensures a robust and reliable charging solution directly from your home’s main electrical system.
- Subpanel Installation: Installing the ChargePoint Home Flex via a dedicated subpanel provides flexibility when your main electrical panel lacks sufficient capacity. This configuration involves routing power through a subpanel with its own breaker, ensuring optimal performance and safety. It’s an ideal solution for extending your EV charging capabilities while maintaining electrical system integrity.
Both installations cater to different home setups, offering tailored solutions for seamless integration and efficient charging with the ChargePoint Home Flex Hardwired NACS Charger.
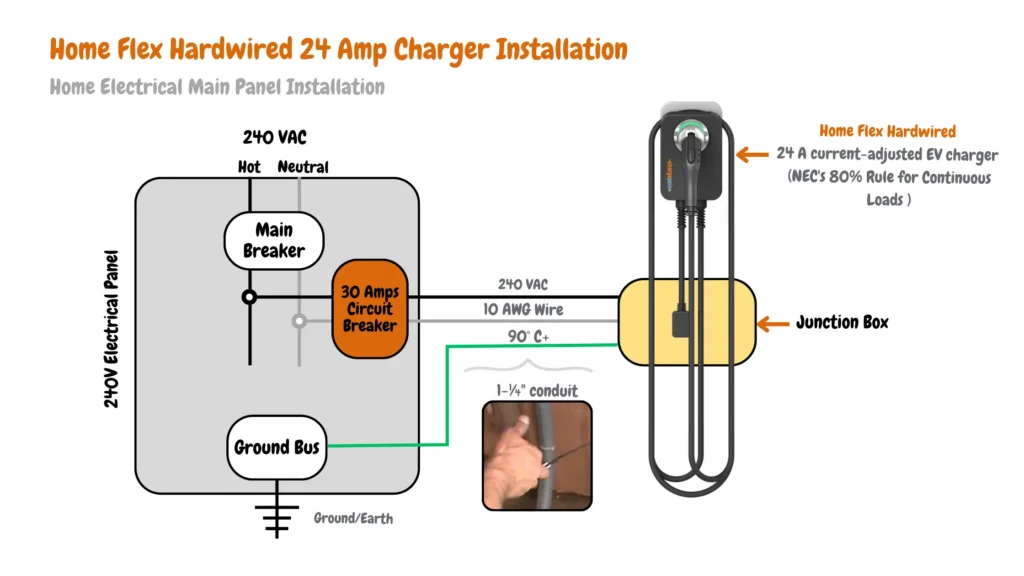
24 Amps ChargePoint Home Flex Hardwired NACS Charger Home Electrical Main Panel Installation
The Home Flex charger installation involves a junction box connection, with clear labels for hot, neutral, and ground wires, emphasizing 240 VAC connections. The diagram underscores compliance with NEC’s 80% rule for continuous loads and provides a comprehensive overview of the installation procedure.
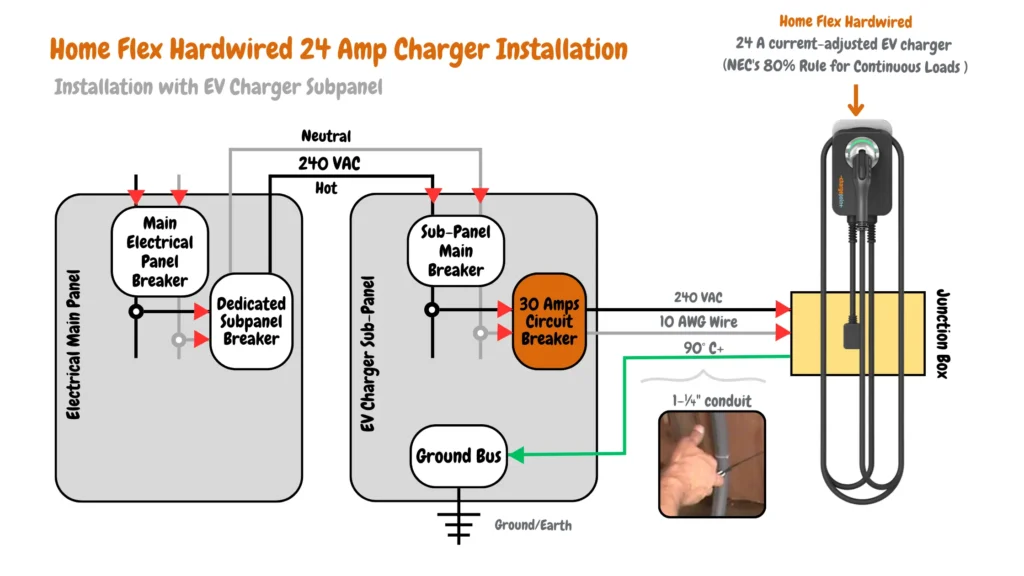
24-Amp ChargePoint Home Flex Hardwired NACS Charger Subpanel Installation
The ChargePoint Home Flex charger is connected via a junction box, with clear labels for hot, neutral, and ground wires, and a voltage specification of 240 VAC. The diagram emphasizes compliance with NEC’s 80% rule for continuous loads and outlines connections within the EV charger subpanel.

James Ndungu is a certified EV charger installer with over five years of experience in EVSE selection, permitting, and installation. He holds advanced credentials, including certification from the Electric Vehicle Infrastructure Training Program (EVITP) and specialized training in EV charging equipment and installation, as well as diplomas in EV Technology and Engineering Fundamentals of EVs. Since 2021, James has tested dozens of EV chargers and accessories, sharing expert insights into the latest EV charging technologies.
Last update on 2026-04-07 / Affiliate links / Images from Amazon Product Advertising API