
BMZX Tesla Charger Pedestal Review

The BMZX Tesla Charger Pedestal offers a cost-effective, durable solution for mounting Tesla Gen 2/3 Wall Connectors. Featuring easy installation, corrosion-resistant aluminum, and secure cable management, it’s perfect for home or commercial use.
The BMZX Tesla charger pedestal is one of the most affordable EV charger pedestals we’ve found for Tesla chargers. It’s a great choice for homeowners who need a reliable pedestal in locations where wall mounting isn’t practical, such as driveways, carports, or apartment/condo parking lots.
Specifically designed for Tesla Gen 2, Gen 3, and Universal Wall Connectors, the BMZX pedestal combines style, functionality, and cost savings, compared to Tesla’s official pedestal, which costs over three times more, the BMZX pedestal offers a budget-friendly solution for Tesla EV charger installations.
Key Features at a Glance
- Compatible with Tesla Gen 2/Gen 3/Universal Wall Connectors
- Corrosion-resistant aluminum alloy build
- Stands 51.3 inches tall and weighs 8.5 lbs
- Pre-drilled mounting holes – no measuring or drilling required
- Locking capability to prevent theft or unauthorized use
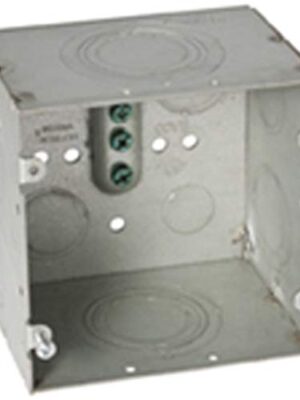
- Space inside the column for NEMA outlet installation
- Affordable alternative to the official Tesla pedestal
EV Charger Compatibility
This pedestal is purpose-built for Tesla Wall Connectors, featuring pre-cut mounting holes that align perfectly with Tesla Gen 2, Gen 3, and Universal Connectors. Installation is extremely straightforward, with no additional mounting brackets or drilling templates required.
Non-Tesla EV Charger Compatibility
You can also mount non-Tesla EV chargers on the BMZX Tesla charger pedestal. However, we recommend sticking with Tesla chargers, as the pedestal’s pre-drilled holes are specifically designed for Tesla Wall Connectors. For other EV charger brands, it’s best to look for an EV charger pedestal designed for your EV charger model.
To make things easier, we’ve reviewed several brand-specific pedestals:
- Autel EV charger pedestal reviews
- Lectron EV charger pedestal reviews
- Wallbox EV charger pedestal reviews
If your EV charger isn’t listed above, we’ve also reviewed universal EV charger pedestals that might be a good fit. Just ensure the mounting plate’s pre-drilled holes and size are compatible with your EV charger and that the pedestal can support its weight.
The BMZX Tesla charger pedestal is perfect for hardwired EV charger pedestal installations.
However, it also stands out as one of the few pedestals we recommend for plug-in EV charger installations. We successfully installed a NEMA outlet inside its vertical column as we will explain in the installation section, making it ideal for plug-in EV charger installations where a dedicated surface for mounting the outlet isn’t available.
This feature provides a clean, streamlined plug-in EV charger installation while neatly concealing the wiring. It also offers extra protection for the NEMA outlet against outdoor elements like rain, dust, and UV exposure. Unlike models such as the VIVO outdoor EV charging stand, which has a slim column preventing NEMA outlet installation, the BMZX pedestal provides functionality and aesthetics.
For users seeking a DIY-friendly EV charger stand with customization options—such as installing NEMA outlets and integrating EV charging accessories such as metering tools inside the vertical column—the BMZX pedestal allows for modifications that enhance the convenience, safety, and efficiency of charging. Its blend of practicality and a polished appearance makes it an excellent choice for homeowners.
Build Quality & Design
The BMZX Tesla charger pedestal is expertly crafted from precision-cut aluminum alloy, offering superior resistance to rust and weather damage. Unlike the VIVO outdoor EV charging stand, which is made of steel and more prone to corrosion, the BMZX pedestal remains durable and stable in various conditions. The welds are clean, the edges are smooth, and minimal oxidation is visible around the joints. While the pedestal uses a lighter-gauge metal compared to Tesla’s original model, it feels solid and secure once bolted down. For indoor installations or sheltered outdoor areas, its durability is more than adequate.
Standing at a height of 51.3 inches, the BMZX pedestal surpasses the minimum height requirements set by the National Electrical Code (NEC). The NEC mandates that outdoor EV charger installations be at least 24 inches above the ground, while indoor installations must be 18 inches. By exceeding these standards, the BMZX pedestal ensures compliance and provides optimal placement for your Tesla charger.
The pedestal also comes with a built-in charging cable holder, designed to keep your space organized, reduce cable wear, and eliminate trip hazards. Additionally, the locking mechanism allows you to secure the charger to the pedestal for added peace of mind.
For homeowners with EV chargers featuring cables longer than 25 feet, the pedestal includes a cable management system that ensures compliance with Article 635 of the NEC. While most Tesla EV chargers come with a 24-foot cable, this feature is perfect for those planning to install a longer cable, offering a neat, organized setup that meets NEC guidelines.
Stylistically, the BMZX pedestal aligns with Tesla’s minimalist design, seamlessly complementing your charger and enhancing the aesthetic of any space—whether in a modern garage, apartment complex, or corporate parking lot.
One consideration is that the pedestal’s support base may not be as robust for high-traffic, commercial installations where rough handling is common. However, for residential Tesla EV charger setups, it performs excellently, given the lower traffic and careful handling typical of home environments. If you’re planning to use the pedestal in a commercial setting, additional reinforcement and maintenance costs should be factored in to ensure long-term durability.
BMZX Tesla Charger Pedestal Installation
BMZX Tesla charger pedestal installation is straightforward, even for non-professionals. Here’s what the process looks like:
What’s in the Box
- 3 aluminum pedestal parts
- Allen wrench
- Pre-aligned mounting holes
- Hardware for assembly (does not include ground anchor bolts)
Installation Tools You’ll Need
- Power drill with masonry bit (for ground anchors)
- Level
- 4 concrete anchor bolts (if installed outdoors or into concrete)
- Adjustable wrench or socket set
Check out our comprehensive list of EV charger installation tools that may be required for installing the BMZX Tesla charger pedestal.
Step-by-Step BMZX Tesla Charger Pedestal Installation
We successfully installed a 48A Tesla Gen 3 Wall Connector to the BMZX Tesla charger pedestal. The first step in any installation is determining the electrical load your home can handle. In our case, we allocated 60A of electrical capacity, which is optimal for supporting a 48A Tesla Gen 3 connector—an ideal setup for fast charging speeds that most Tesla owners prefer.
To comply with the 80% NEC rule for continuous loads, we used a 60-amp dedicated circuit breaker. You’ll also need 4 AWG copper wires (including the ground wire), which should be conduit-fed using 1-inch conduit. The conduit will run from the electrical panel—housing the circuit breaker—through a trench to the pedestal’s underground inlet (3.93 inches x 1.7 inches).
The diagram below shows a schematic of our complete 48-amp Tesla Gen 3 connector mounted on the BMZX Tesla charger pedestal. The 48-amp configuration is commonly used for Tesla Gen 2, Gen 3, and Universal Wall Connectors in homes across the United States.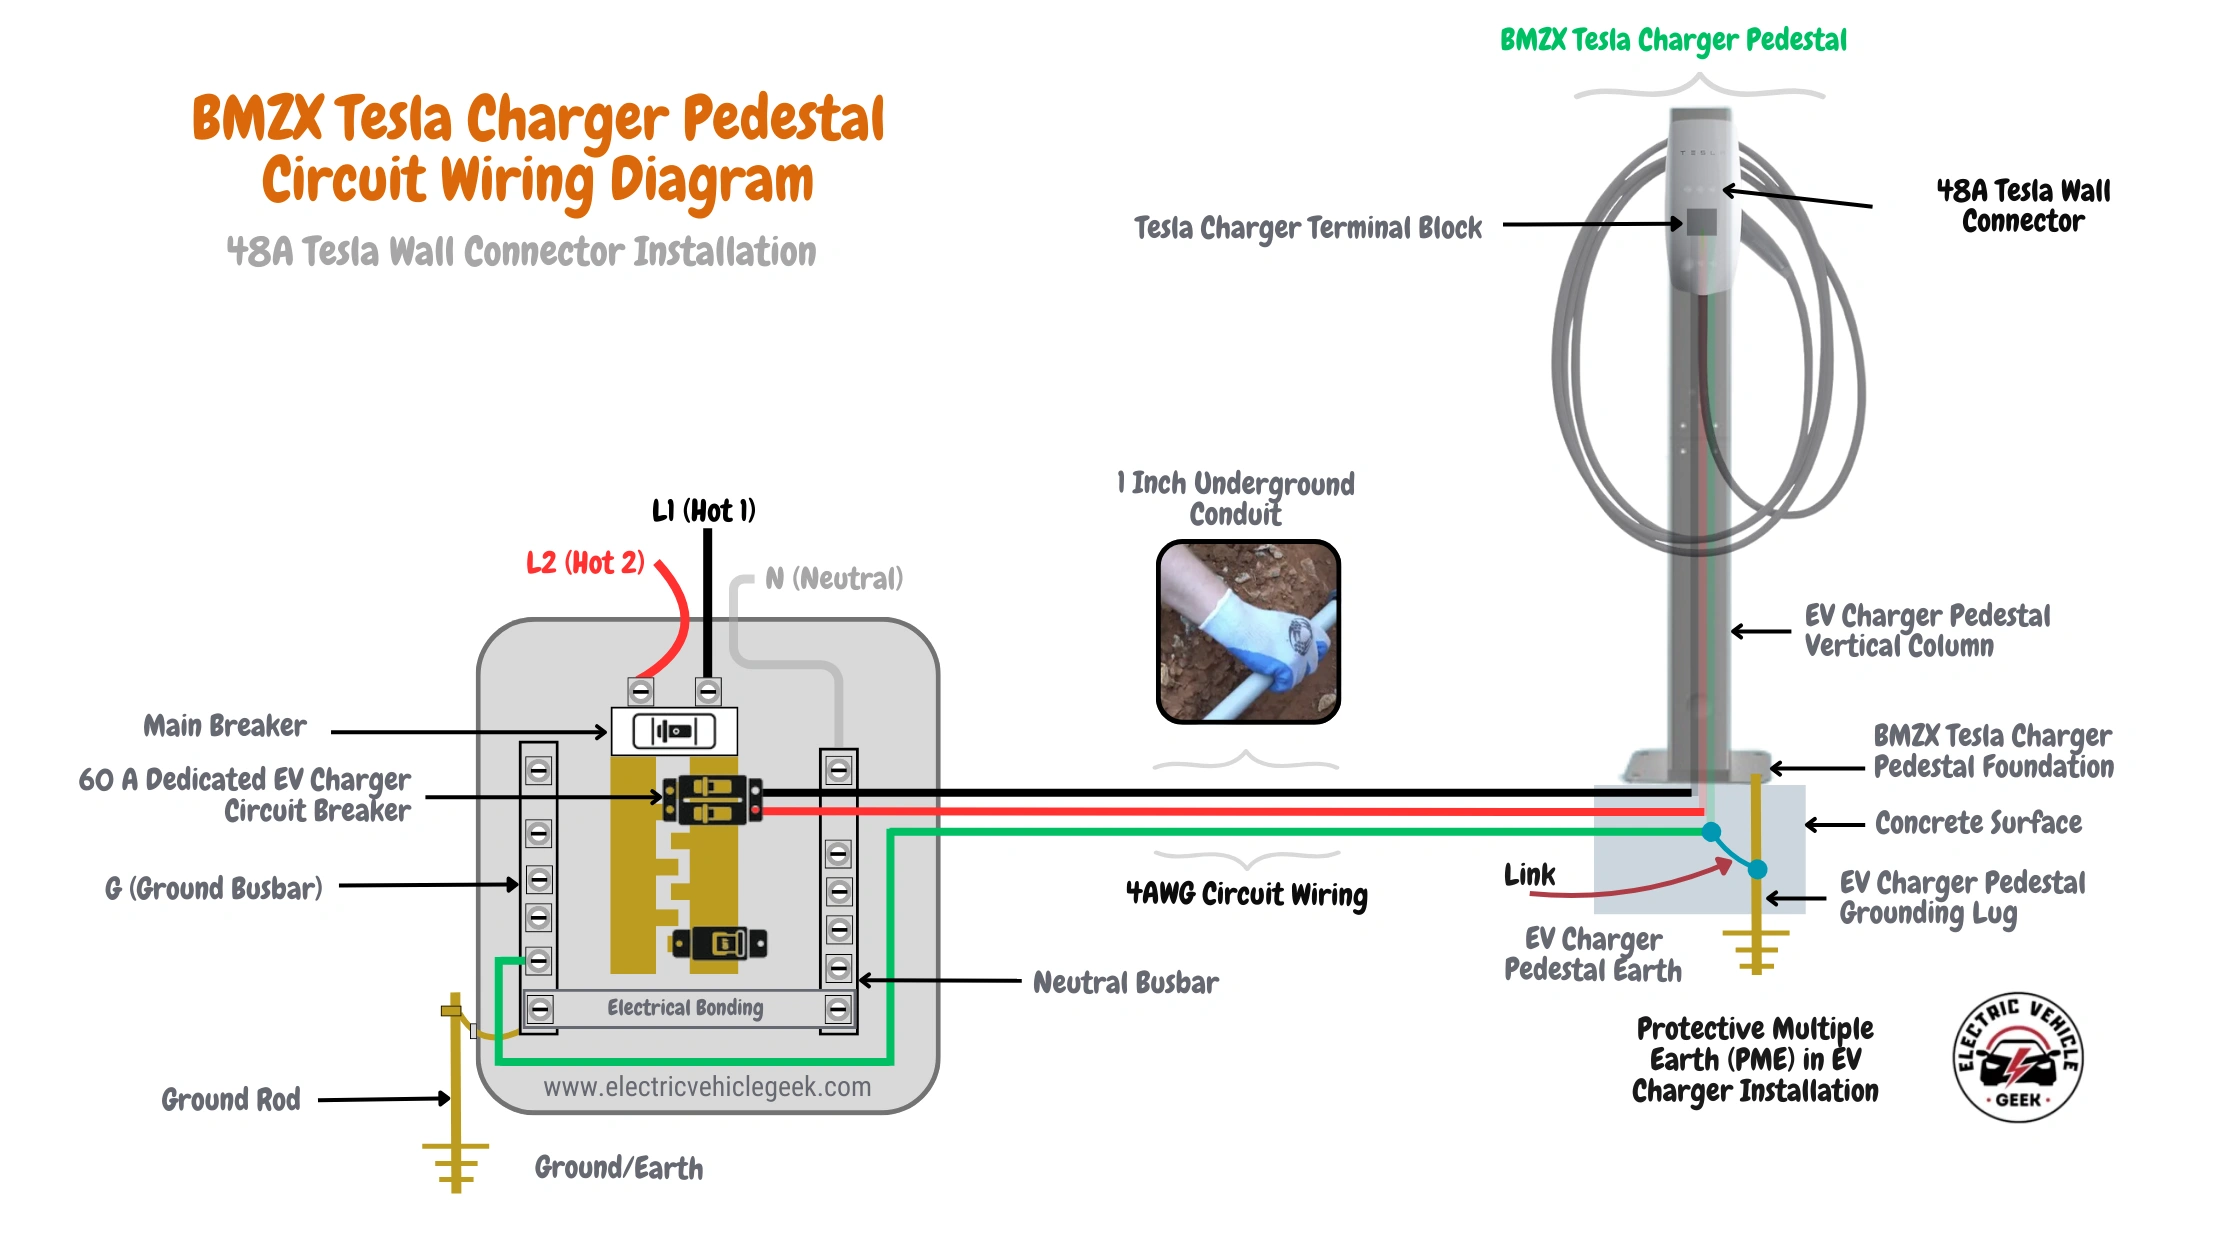
It’s essential to map out the shortest route from the main electrical panel to the BMZX Tesla charger pedestal. Longer wire runs increase the risk of voltage drop, which can lead to inefficient charging and potential safety issues.
Minimizing the wire length reduces electrical resistance, ensuring optimal performance and efficiency. A shorter route helps prevent overheating and unnecessary strain on the circuit, improving the longevity of your system. Keep the path direct and unobstructed for a safer, more effective installation.
Pedestal Assembly and Installation
Once the circuit wiring is prepared, follow these steps to assemble and install the BMZX pedestal:
- Assemble the Pedestal: Use the provided Allen wrench to connect the three sections of the pedestal. The joints fit securely, and the tightening mechanism ensures a clean and stable assembly.
- Position the Pedestal: Select a location on a flat, solid surface for the pedestal. Ideally, this should be in an accessible area, whether indoors or outdoors, for easy use and maintenance.
- Mark and Drill Bolt Holes: Place the base of the pedestal where you want to install it and use it as a template to mark the bolt holes. Then, drill four anchor holes into the concrete or floor to secure the pedestal.
- Secure the Base: Fasten the pedestal securely to the floor using anchor bolts. Once installed, the pedestal will remain stable and sturdy.
Wiring the BMZX Tesla Charger Pedestal
After assembling the BMZX Tesla charger pedestal, you can now proceed with the wiring.
- Feed the conduit from the electrical panel to the pedestal’s underground inlet (3.93 inches x 1.7 inches).
We recommend routing the conduit from the main electrical panel to the pedestal’s lower access point (3.93 inches x 1.7 inches). For conductors, we recommend using THWN or THWN-2 wire rated for 90°C to ensure safe performance in both dry and wet conditions. Since the NEC classifies outdoor and underground conduit runs as wet locations, THWN-2 offers superior durability and compliance. For direct burial applications, we also recommend Type USE (Underground Service Entrance) or URD (Underground Residential Distribution) cables, which can be installed either directly in the ground or within the conduit for a reliable, code-compliant solution.
- Pull the wiring through the pedestal’s vertical column and exit it through the 1.18-inch cable outlet at the top.
- Mount the Tesla Wall Connector by aligning it with the pre-drilled holes in the pedestal, securing it using the standard Tesla mounting hardware.
- Finally, connect the wires to the terminal of the Tesla Gen 3 Wall Connector, ensuring proper connections.
Tip: For outdoor installations, apply weatherproof caulk around the base and choose a weather-rated outlet cover to provide additional protection against the elements, such as rain, snow, and humidity.
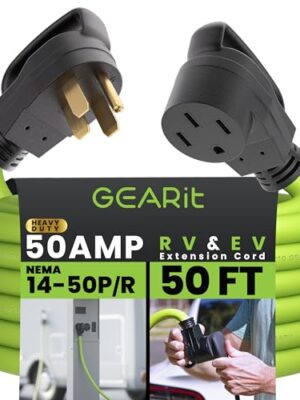
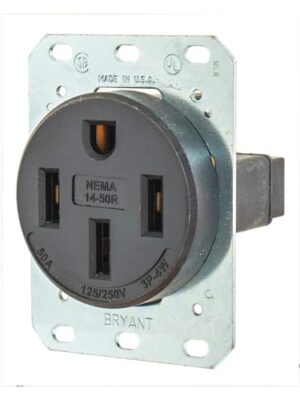
Optional: Installing a NEMA Outlet on the BMZX Tesla Charger Pedestal
For plug-in chargers, we successfully routed wiring through the base and installed a NEMA 14-50 outlet inside the pedestal’s vertical column before mounting the charger.
Unlike the 48A hardwired EV charger installations that require 4 AWG wires, a plug-in setup requires 6 AWG wires, you can either use a reducer connector to step down from 4 AWG to 6 AWG or choose 6 AWG wires for the entire circuit. Since plug-in EV chargers and NEMA outlets support up to 40A, the circuit should be protected by a 50A dedicated circuit breaker. This configuration requires 6 AWG copper wires.
The diagram below illustrates the setup of our complete 40-amp plug-in EV charger mounted on the BMZX Tesla charger pedestal, powered through a NEMA 14-50 outlet. This 40-amp configuration is the maximum for plug-in EV chargers and is widely used for fast Level 2 EV charging in homes across the United States.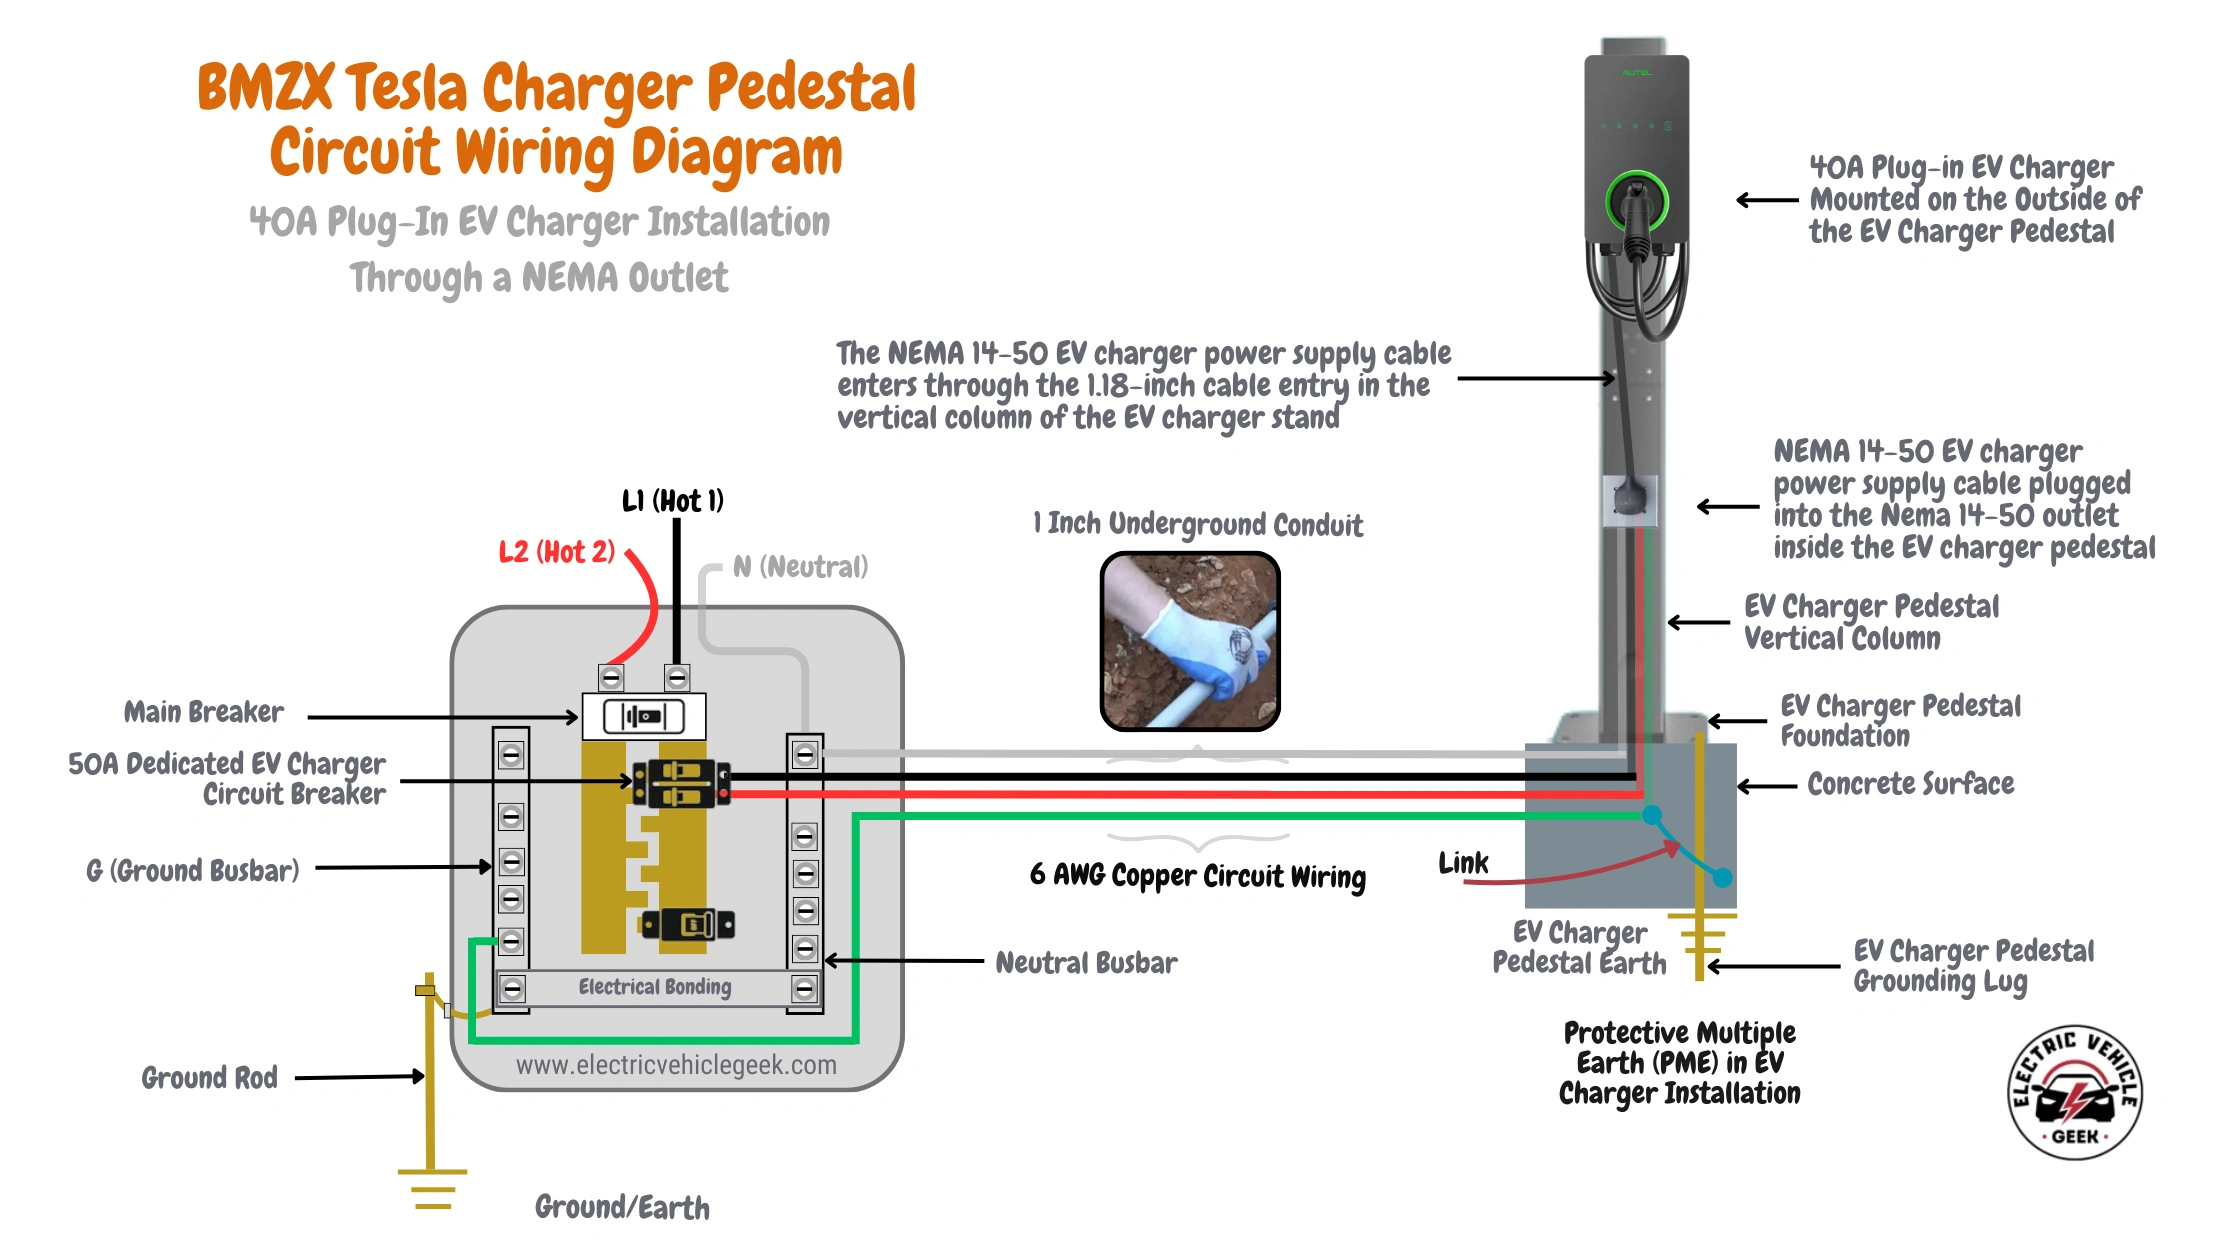
Installing a NEMA outlet in the pedestal provides a clean, streamlined setup. The wiring is concealed inside the pedestal, resulting in a polished and aesthetically pleasing installation.
However, it’s essential to understand that reducing the wire gauge improperly can lead to voltage drops, affecting both performance and safety. Always consult NEC (National Electric Code) guidelines to ensure your setup is safe and up to code.
Final Thoughts
If you’re seeking a cost-effective, reliable, and stylish solution for mounting your Tesla Wall Connector, the BMZX Tesla Charger Pedestal checks all the boxes. It’s easy to install, offers customizable EV charging capabilities, and combines aesthetic appeal with the durability and functionality needed for both home and commercial use.
Bottom Line:
- Solid construction
- Looks like the OEM Tesla pedestal
- Pre-drilled for perfect alignment
- Ideal for plug-in or hardwired setups
- Excellent value for the price
If you’re ready to elevate your Tesla charging setup—without spending a fortune—this pedestal is the smart choice.
EV Charger Pedestals Related Guides
EV Charger Pedestals 101
Everything you need to know about EV charger pedestals, including structure, use cases, and electrical compatibility.
Plug-In EV Charger Pedestal Installation Guide
Step-by-step instructions for installing a plug-in charger on a pedestal with proper NEMA outlet selection and mounting techniques.
Hardwired EV Charger Pedestal Installation Guide
Explore the correct procedures for mounting a hardwired EV charger to a pedestal, with tips on grounding, conduit routing, and code compliance.
There are no reviews yet.